9. Parameter Form Templates
Parameter Form Templates let you define structured data-entry forms that project members fill in for individual Agora objects (exams, series, patients, and folders). Unlike free-form user-defined parameters, a form template specifies exactly which fields appear, their types, labels, and validation rules — ensuring consistent, structured metadata collection across a project.
Use cases include:
Quality-assurance checklists attached to each exam after review
Subject demographic forms filled in at recruitment
Acquisition notes with controlled vocabularies for scanner settings
Post-processing result capture (scores, grades, classifications)
9.1. Template Types
There are two template types. You choose the type when creating a template in the project settings.
- Field List (default)
A straightforward list of fields rendered as a standard form. Agora generates the layout automatically: each field appears on its own row with its label, an appropriate input control, and optional help text. This type is the right choice for most forms.
- HTML Layout
An HTML document you write yourself, containing
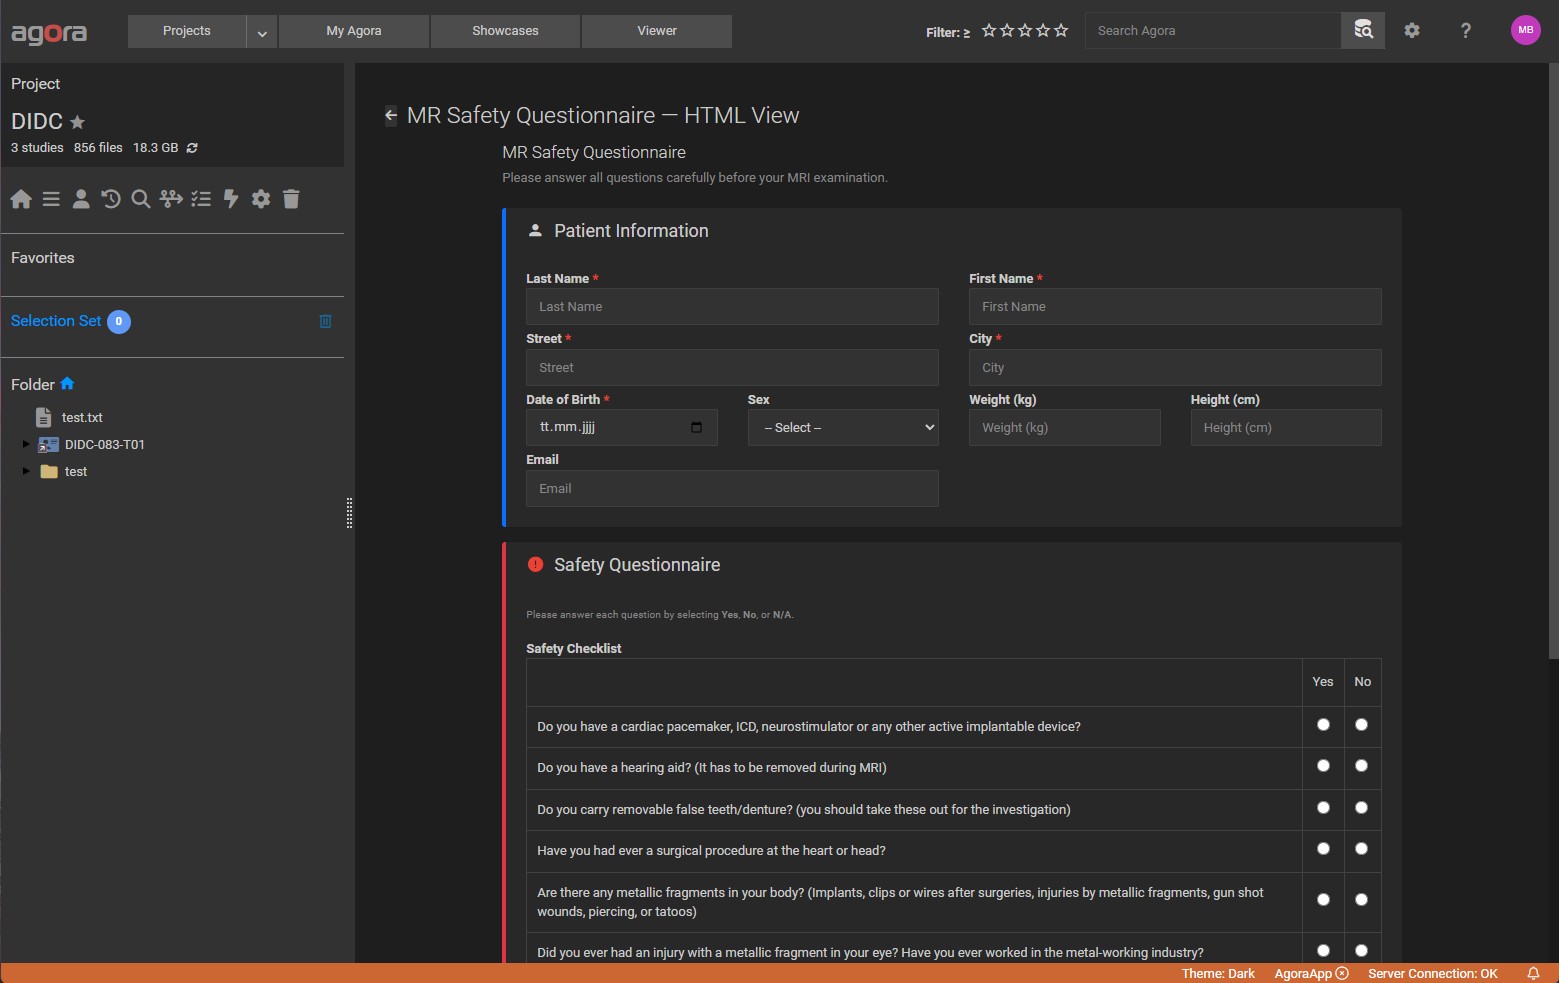
[[SetName.ParamName]]placeholders where input controls should appear. Agora replaces each placeholder with a native<input>or<select>element at render time, so Bootstrap grid classes and any other HTML structure you add remain intact. Choose this type when you need a precise two-column layout, grouped sections, or custom styling that the automatic Field List layout cannot produce.HTML Layout templates can also incorporate fields from one or more Field List templates (configured via Source Templates in the template editor). This lets you maintain a single canonical field list and reuse it inside a custom HTML wrapper.
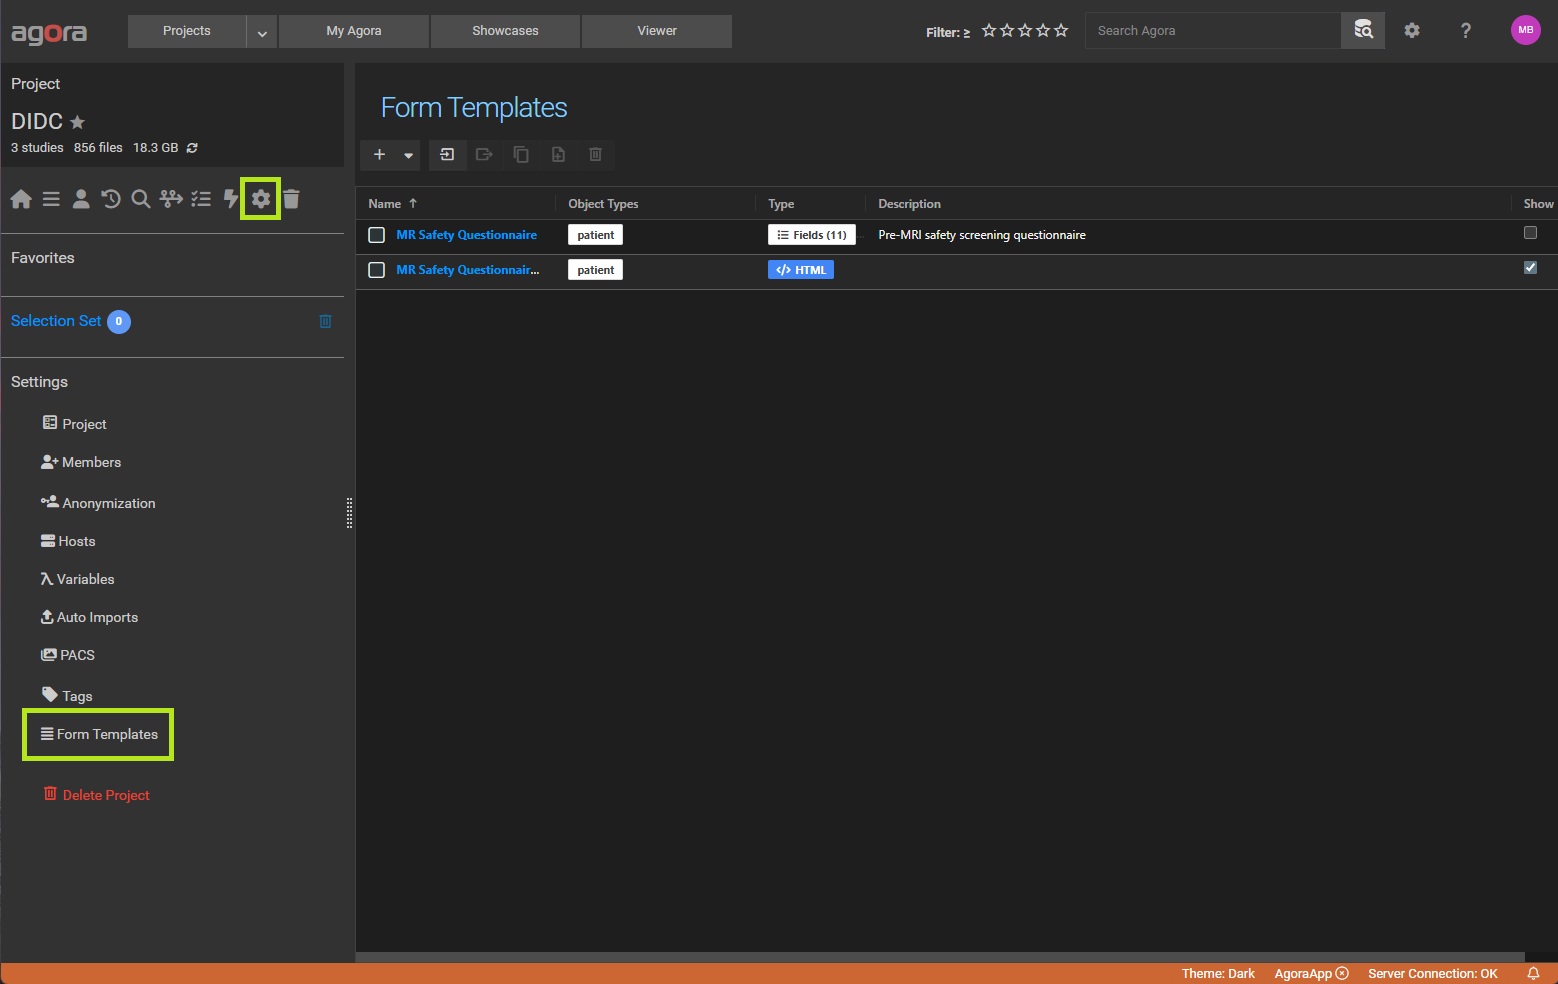
9.2. Managing Templates in Project Settings
Templates are managed per project. Only project Managers can create, edit, or delete templates.
To open the template manager:
Open the project and select Project Settings from the project menu.
Click Parameter Templates in the settings sidebar.
The template list shows all templates defined for the project, including their name, description, type (Field List or HTML Layout), and the object types they apply to.
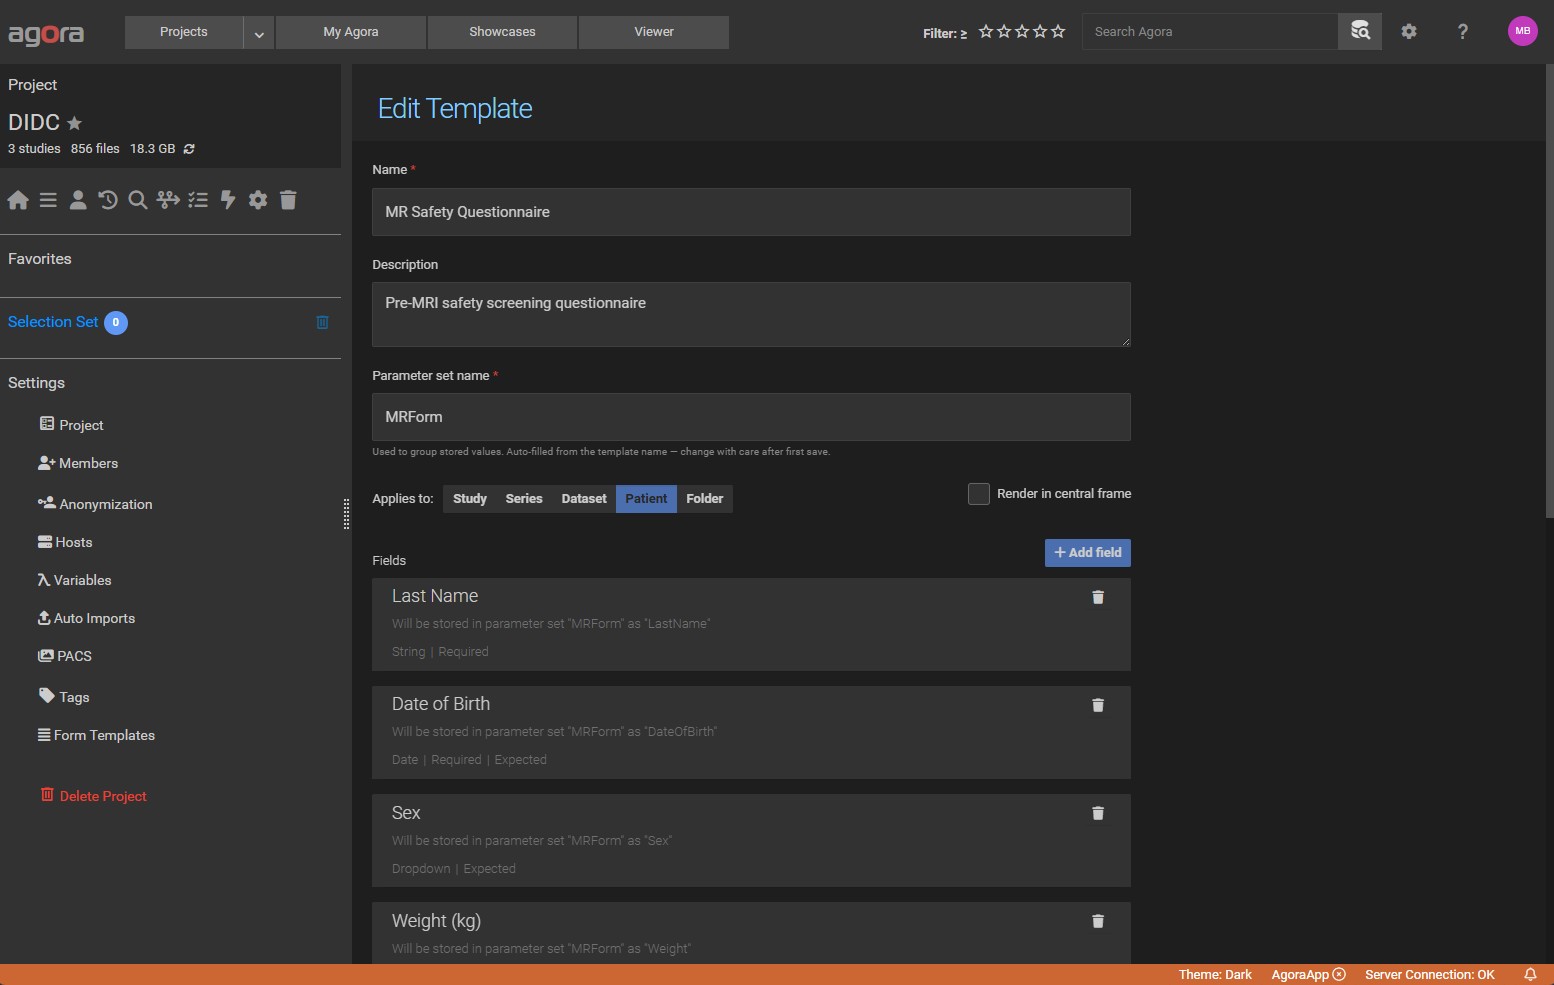
9.2.1. Creating a Template
Click Add (or the icon) above the template list to open the template editor form.
Fill in the following fields:
Field |
Description |
|---|---|
Name |
A short display name shown in the object sidebar Forms tab (max 128 characters). |
Description |
Optional free-text description of the template’s purpose. |
Object Types |
Which object types this template appears for. Select one or more of: Exam, Series, Patient, Folder. |
Template Type |
Field List or HTML Layout (see above). |
Show in Forms tab |
When checked (default), the template appears in the object sidebar. Uncheck to hide a template without deleting it. |
Active |
Whether the template is enabled. Inactive templates cannot be filled in. |
For Field List templates, add fields using the field editor (see Defining Fields below).
For HTML Layout templates, write the HTML content in the editor and optionally select Source Templates (existing Field List templates whose fields you want to use as [[SetName.ParamName]] placeholders in the HTML).
You can also choose Use default HTML layout on a Field List template to render it in the central frame with a two-column layout instead of the sidebar list view.
Click Save to create the template.
9.2.2. Defining Fields
This section applies to Field List templates. Each field in the list defines one input in the rendered form.
Click Add Field to append a new field. Each field has the following properties:
Property |
Description |
|---|---|
Key |
The parameter name stored in the database. Must be unique within the template. Used as the column name when exporting. |
Label |
The human-readable label shown next to the input control. |
Type |
The input type (see Field Types below). |
Description |
Optional help text shown below the input to guide the person filling in the form. |
Required |
When checked, the form cannot be submitted unless this field is filled in. |
Default |
A pre-filled default value shown when the form is first opened. |
Choices |
For Dropdown, Radio, and Matrix types: the list of selectable options, one per line. |
Drag rows to reorder fields. Click the icon on a row to delete it.
9.2.3. Field Types
The following input types are available:
Type |
Description |
|---|---|
String |
Single-line text input. |
Integer |
Numeric input restricted to whole numbers. |
Float |
Numeric input for decimal values. |
Boolean |
Checkbox (true/false). |
YesNo |
Radio buttons with Yes and No options. |
Date |
Date picker; stores values in ISO 8601 format ( |
Dropdown |
Select list. Supply the options in the Choices field, one per line. |
Textarea |
Multi-line text area for longer free-text entries. |
Radio |
Radio button group. Supply the options in the Choices field. |
Checkboxes |
A group of checkboxes where any number of options can be selected. Supply the options in the Choices field, one per line. |
Slider |
Horizontal range slider. The Default field sets the initial position. |
Rating |
Button-group star/score selector. |
Descriptive |
Display-only text block (no input). Useful for section headings or instructions within a form. |
Matrix |
A grid of selectable options where each row is a question item and each column is a choice. Supply row labels and column choices in the Choices field using the format |
Signature |
A consent checkbox. The Label is the consent statement the user must agree to; an optional Description appears as smaller sub-text below. See Signature Fields for full details. |
9.2.4. Signature Fields
A Signature field lets you capture a formal acknowledgement or consent from the person filling in a form. When the user checks the Signature checkbox and saves the form, Agora records:
Who signed (the logged-in user).
When they signed (UTC timestamp).
A SHA-256 integrity hash computed from all parameter values in the parameter set at the moment of signing.
Once signed, the form becomes read-only — no field can be edited until the signature is explicitly cleared. A verification badge appears at the top of the form:
A green “Signed · Verified” badge means the current values match the hash recorded at signing time.
An amber “Signed · Values changed after signing” badge means one or more values were modified after the form was signed (for example, by direct parameter editing). This does not automatically invalidate the record, but it signals that the values no longer match what was signed.
The same read-only state and verification badge also appear in the Parameters tab when viewing the raw parameter set.
Unsigning a form
A project Manager (or the user who signed the form) can click the Unsign button that appears alongside the verification badge. This clears the stored hash, timestamp, and signer, and re-enables editing. The action cannot be undone — the original signed state is not recoverable.
Configuring a Signature field
When adding a Signature field in the template editor:
Set Label to the exact consent text the signer must read and agree to (for example, “I confirm that the information above is accurate and complete.”).
Optionally set Description to add a shorter explanatory sub-line below the consent statement.
No choices, minimum, or maximum values are required.
A template can contain multiple Signature fields (for example, to capture acknowledgement from both a data collector and a reviewer). Signing any one of them locks the entire parameter set.
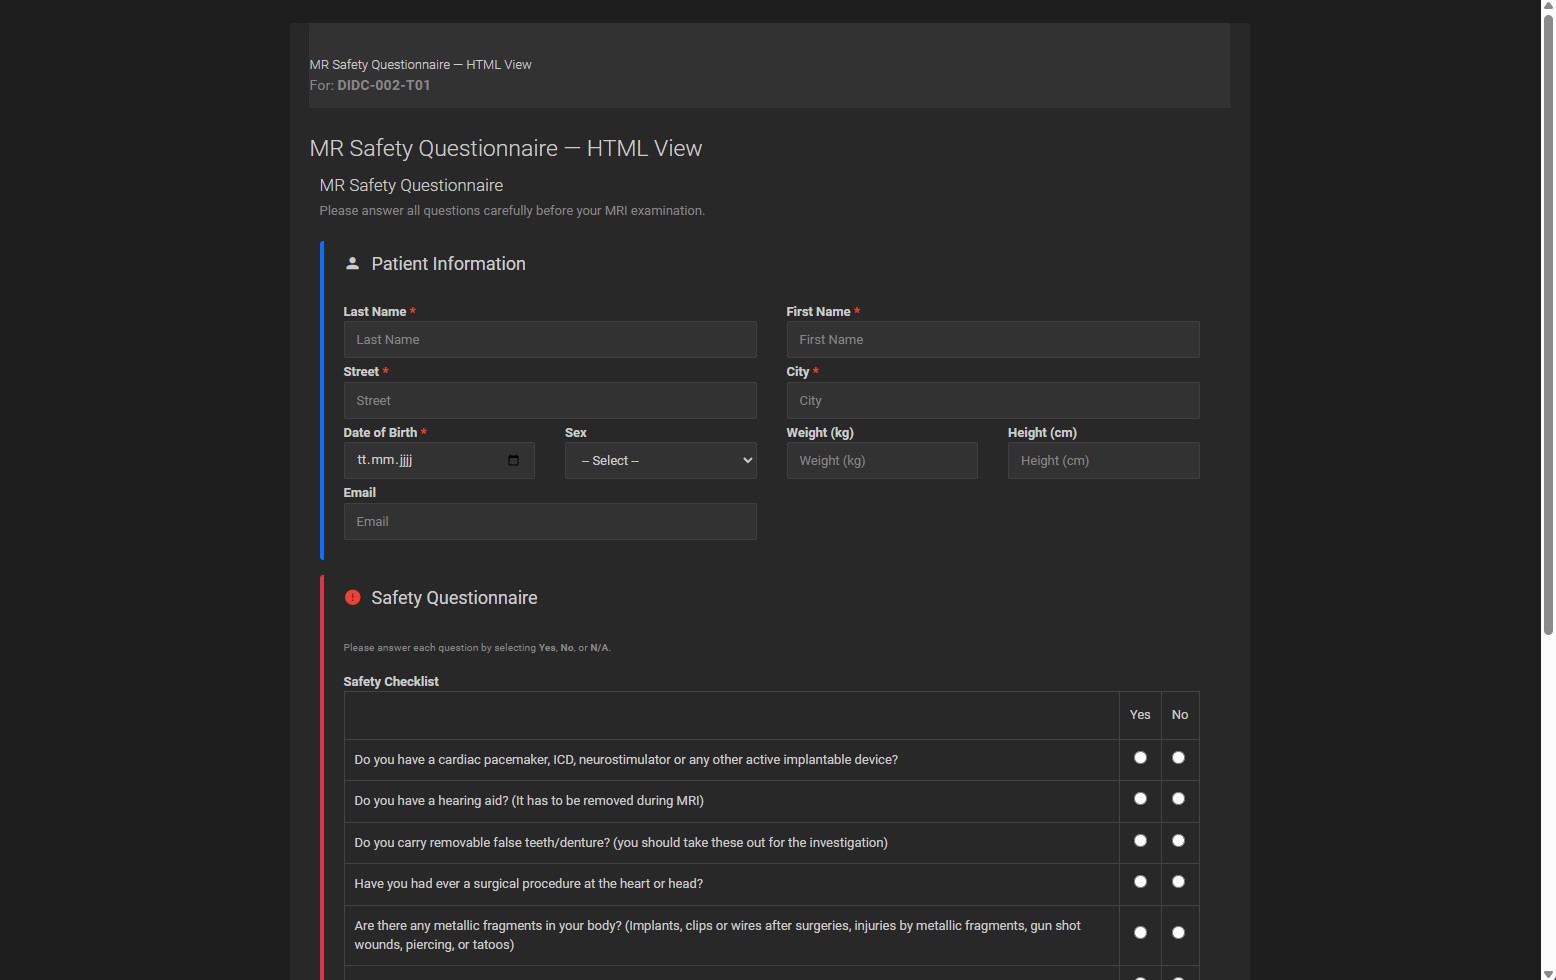
9.3. HTML Layout and Placeholder Syntax
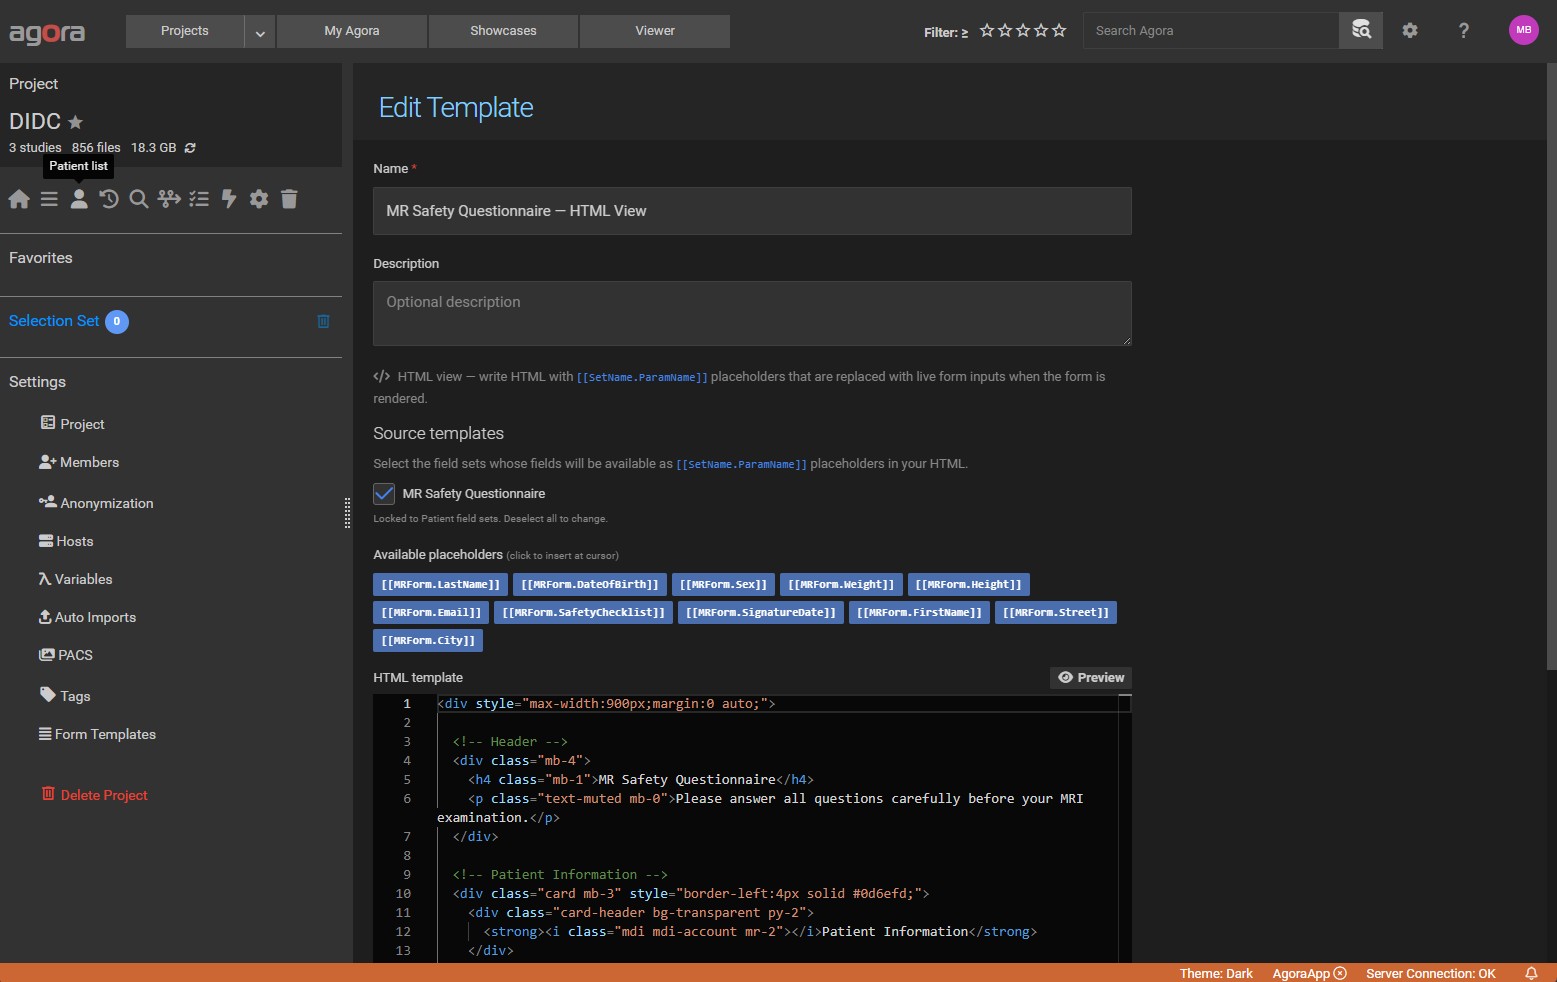
For HTML Layout templates, write standard HTML in the template editor. Place [[SetName.ParamName]] placeholders anywhere in the HTML where you want an input control to appear.
SetNameis the parameterset_name configured on the template (the name under which values will be stored).ParamNameis the key of a field from one of the Source Templates linked to this HTML template.
At render time, Agora replaces each placeholder with a <input> or <select> element bound to the Angular form. Bootstrap CSS classes added to the surrounding HTML remain intact, so you can use the full Bootstrap 4 grid system for multi-column layouts.
Example placeholder usage:
<div class="row">
  <div class="col-6">
    <label>Scan Quality</label>
    [[QAForm.scan_quality]]
  </div>
  <div class="col-6">
    <label>Reviewer</label>
    [[QAForm.reviewer_name]]
  </div>
</div>
Here QAForm is the parameterset_name of the template (or source template), and scan_quality / reviewer_name are field keys defined in a linked Field List template.
9.4. Filling in a Form
The Forms tab appears in the detail panel whenever the selected object has at least one active Parameter Form Template configured for its type.
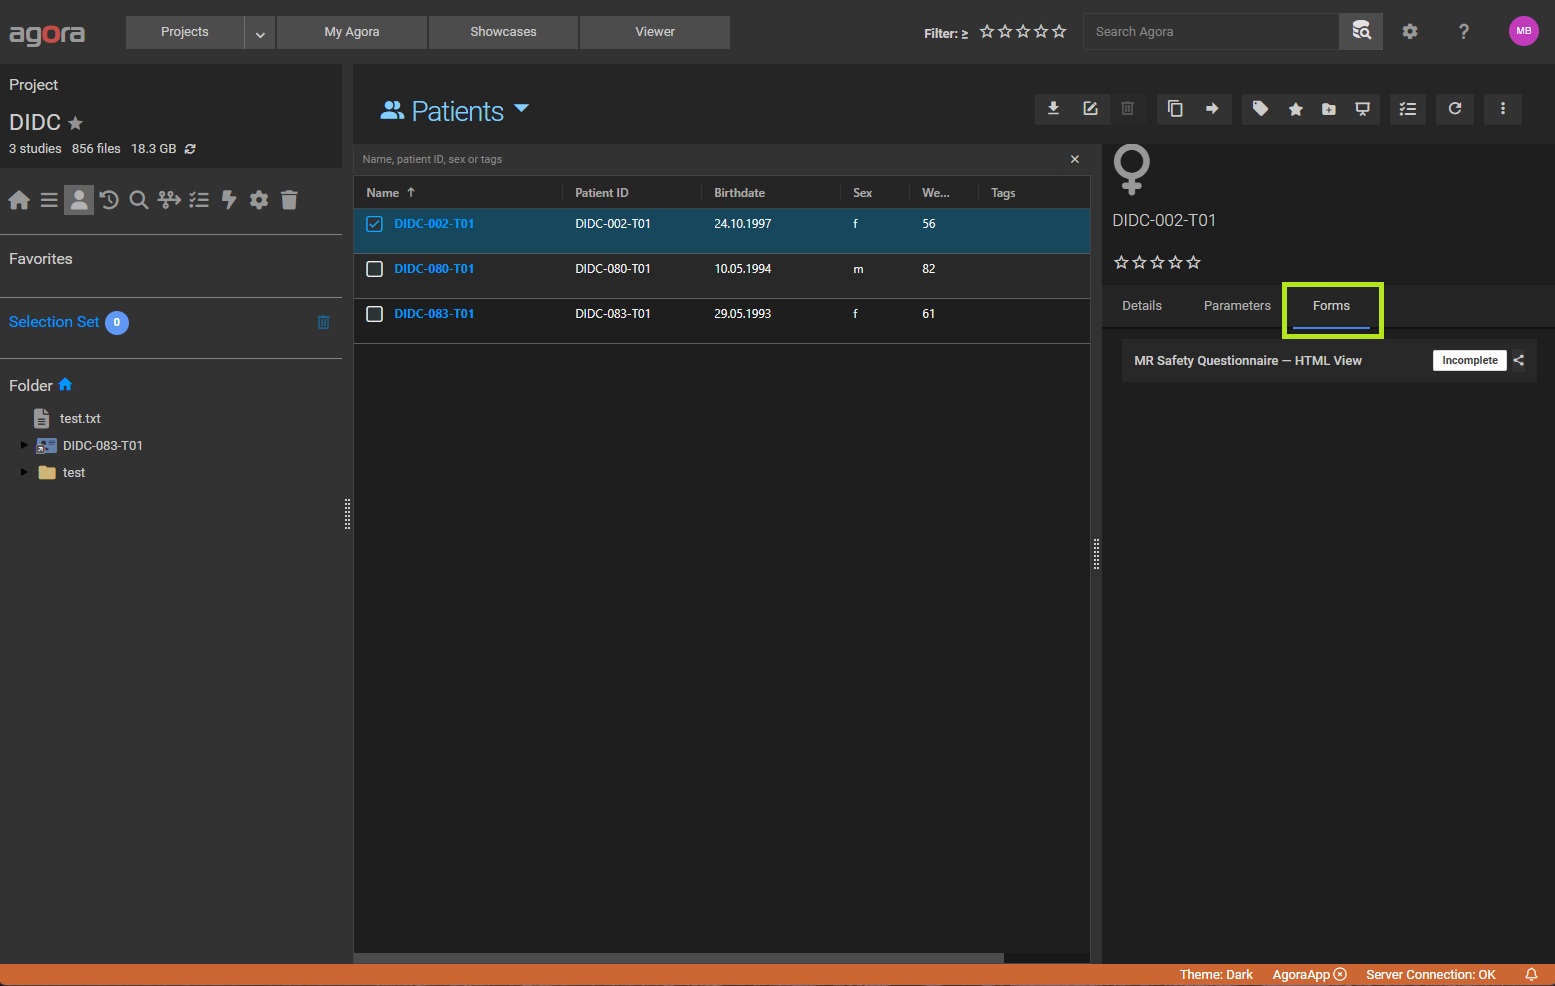
To fill in a form:
Select an exam, series, patient, or folder.
In the detail panel on the right, click the Forms tab.
The list of available templates for that object type is shown. Click the template name to open it.
Fill in the fields and click Save.
If the object already has a saved parameter set linked to this template, the form opens with the previously saved values pre-filled. Saving the form updates the existing parameter set in place.
Field List forms render each field as a labelled row. Required fields are marked with an asterisk. The form validates all required fields before saving.
HTML Layout forms render your custom HTML. Input controls replace the [[SetName.ParamName]] placeholders inline. The form syncs in the same way as a Field List form: filling in a control immediately updates the underlying Angular form model, and clicking Save writes all values to the parameter set.
9.4.1. Central Frame View
If a Field List template has the Use default HTML layout option enabled, selecting it opens the form in the central frame (the main project panel) instead of the sidebar. This gives more horizontal space for wide forms or complex layouts. The sidebar Forms tab continues to show the list of available templates; clicking such a template navigates to the central frame view.
Navigating away from the central frame view and back re-uses the same component instance, preserving any unsaved changes.
9.5. Saved Values and Parameter Sets
When a form is saved, Agora creates (or updates) a parameter set on the object. The parameter set name is the parameterset_name configured on the template. All field values are stored as individual parameters within that set.
The saved parameter set is also visible in the Parameters tab of the detail panel, where you can inspect or manually edit individual values if needed. The parameter set carries a back-reference to the template it was created from, so the Forms tab can reload the correct template when the form is re-opened.
Because the form values are stored as a standard parameter set, they are fully searchable using the Agora Query Language (AQL):
parameter.scan_quality = "good"
parameter.score >= 4
See User-Defined Parameters and Database Search for details.
9.6. Exporting and Importing Templates
Templates can be exported to a JSON file and imported into any project. This makes it easy to share a form definition with colleagues or transfer it between Agora instances.
Exporting a template
In the template list, select the template you want to export (one at a time).
Click the Export button in the toolbar.
Agora downloads a
.jsonfile named after the template.
When you export a Field List template that has exactly one linked HTML Layout template (and that HTML template uses only this field list as its source), Agora automatically bundles both into the single JSON file. Similarly, when you export an HTML Layout template that has exactly one source Field List template, both are included in the export. In both cases a single JSON file captures the complete field definitions and the HTML layout, so the pair can be imported together without any manual re-linking.
If an HTML Layout template has zero or more than one source Field List templates, only the HTML Layout itself is exported.
Importing a template
Click the Import button (file-upload icon) in the toolbar and select a
.jsonfile.If the file contains a bundle (a Field List and its linked HTML Layout), Agora creates both templates in the current project and links them automatically.
If the file contains a single template, Agora creates it as a standalone template in the current project.
Note
Importing does not overwrite existing templates. A new template is always created, even if a template with the same name already exists.
9.7. Copying and Duplicating Templates
Copy to another project
Select one or more templates in the list and click Copy in the toolbar to copy them to a different project. A dialog lets you choose the destination project.
Bundle-aware copy: if you copy a Field List template that has a linked HTML Layout (sole-source pairing), the HTML Layout is copied along with it automatically. If you copy an HTML Layout, all its source Field List templates are copied first, and the HTML Layout is re-created with updated source references in the destination project. If a Field List and its paired HTML Layout are both selected, they are treated as one bundle — they are not duplicated.
Duplicate in the same project
Select a single template and click Duplicate in the toolbar to create a copy within the same project. The copy is named <original name> Copy (or Copy 2, Copy 3, etc., if that name is already taken).
Bundle-aware duplicate: the same paired HTML Layout logic applies — if the selected Field List has a linked HTML Layout, both are duplicated as a matched pair with independent “Copy” names. Similarly, duplicating an HTML Layout also duplicates all its source Field List templates.
9.8. Sharing Forms with External Users (Public Links)
The Public Forms feature lets you share a parameter form with someone who does not have an Agora account — for example, a patient, a collaborator at another institution, or a research participant. You generate a link for a specific template and object, send it to the external user, and they fill in the form directly in their browser. Their submitted values are saved as a ParameterSet on the linked object in the same way as if a logged-in user had filled in the form.
9.8.1. How It Works
You generate a share link for a template and a specific Agora object (exam, series, patient, or folder).
Agora creates a unique, token-based URL of the form
/ui/public/form/<token>.You send the URL to the external user. No Agora account or login is required to open it.
The external user opens the link, fills in the form, and clicks Submit.
Agora saves the submitted values as a
ParameterSeton the target object, using the template’s configured parameter-set name.The result appears immediately in the Parameters tab for that object in Agora — identical to a parameter set filled in by a logged-in project member.
A link can be deactivated or deleted at any time. Once deactivated, the URL returns an “expired” message and no further submissions are accepted.
9.8.2. Generating a Share Link
Share links are managed from the Forms tab in the object detail panel.
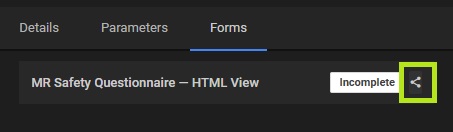
Select the exam, series, patient, or folder for which you want to share a form.
In the detail panel, click the Forms tab.
Locate the template you want to share and click the share icon () next to its name. The Share Form Link dialog opens.
If you want to allow the external user to submit the form more than once, check Allow multiple submissions. Leave it unchecked (the default) to accept only one submission per link.
Click Generate New Link. Agora creates the link and displays it in the dialog.
Click the copy icon to copy the URL to your clipboard, then send it to the external user.
You can generate multiple links for the same template and object if needed — for example, to send to different recipients.
9.8.3. Managing Existing Links
The Share Form Link dialog lists all links you have created for the selected template and object. For each link you can:
Copy the URL to your clipboard (copy icon).
Toggle active/inactive — clicking the link icon deactivates an active link (the external URL shows an “expired” page) or reactivates an inactive one.
Delete the link permanently (trash icon). Deleted links cannot be recovered.
The Active / Inactive badge on each row shows the current state at a glance.
9.8.4. What the External User Sees
When the external user opens the share link, they see a minimal page showing:
The template name and description.
The name of the object the form is for (e.g. the exam name or patient name).
The form fields, rendered identically to the Forms tab inside Agora.
A Submit button.
The Agora header, navigation, and login controls are not shown — external users only see the form itself.
After clicking Submit, the page shows a confirmation message. If the link only allows a single submission and the form has already been filled in, a message informs the user that the form is no longer accepting responses.
9.8.5. Submission Behaviour and Restrictions
Single submission (default): Once the form is submitted, the link rejects further submissions with a “already submitted” message. This is the recommended mode for collecting one response per recipient.
Multiple submissions: When Allow multiple submissions is enabled, the link accepts any number of submissions. Each submission creates a new
ParameterSeton the target object.Expiry: Links do not expire automatically unless an expiry date is configured via the API (see public-form-api). Deactivating a link in the dialog is the standard way to stop accepting responses.
Deleted object: If the Agora object linked to a share link is deleted, the link becomes inactive automatically.
Link ownership: Only the user who created a link can see, manage, or delete it. Other project members cannot see your share links.