6. Importing Data to Agora
There are multiple ways to feed data into Agora. At the base, two distinct interfaces allow the import of data. The Agora DICOM interface allows the import of DICOM data using the DICOM protocol. The Agora REST API allows the upload of arbitrary files. Your browser will use the REST API to allow drag-and-drop data upload on the Agora pages. Some program tools provided with the Agora distribution will also use the REST API for data import functionality. Additionally, interface libraries provided for Python, Matlab, and C++ also provide data import functionality from the respective platform and allow building data import functionality into your own tools and scripts.
6.1. Elements of a data import
Each data import besides the actual files should contain the target Agora user account and the account credentials, the destination folder and the destination folder path. The target user account and credentials are implicit when uploading data by drag-and-drop in the browser. The target project and the target folder path are optional. If they are missing, data will be imported into the MyAgora project of the target user account, or in the root folder of the target project, respectively.
6.2. Upload Data over the Browser
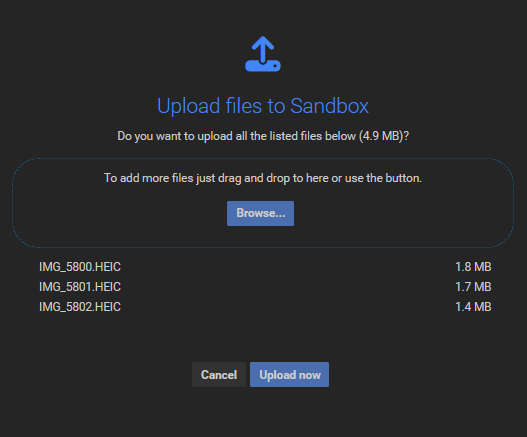
The most direct way to upload and import data into Agora is the drag-and-drop functionality on the Agora project pages. Open the destination project and navigate to the target folder. Drag and drop files directly on the folder view in one of the drop zones depicted below:
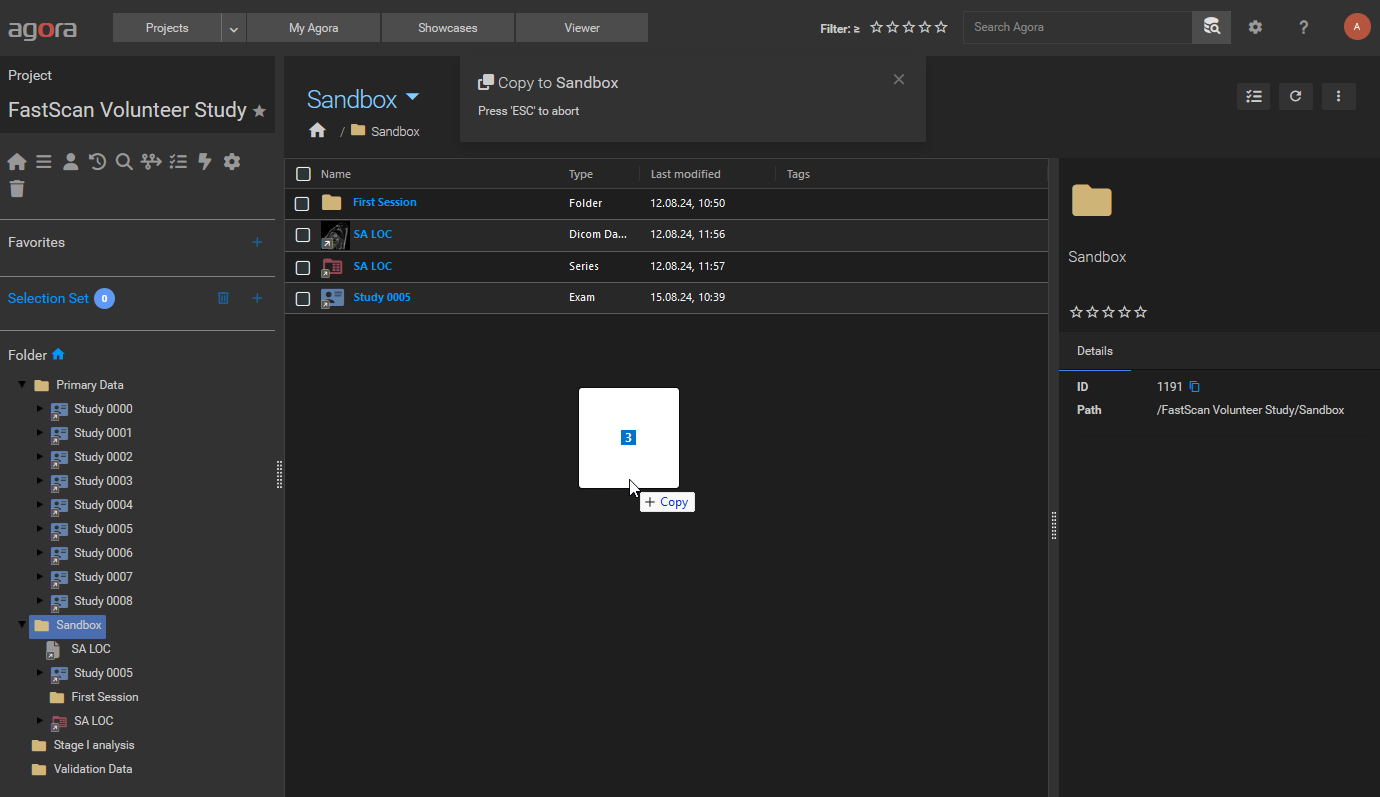 Dragging files into the current folder drop zone.
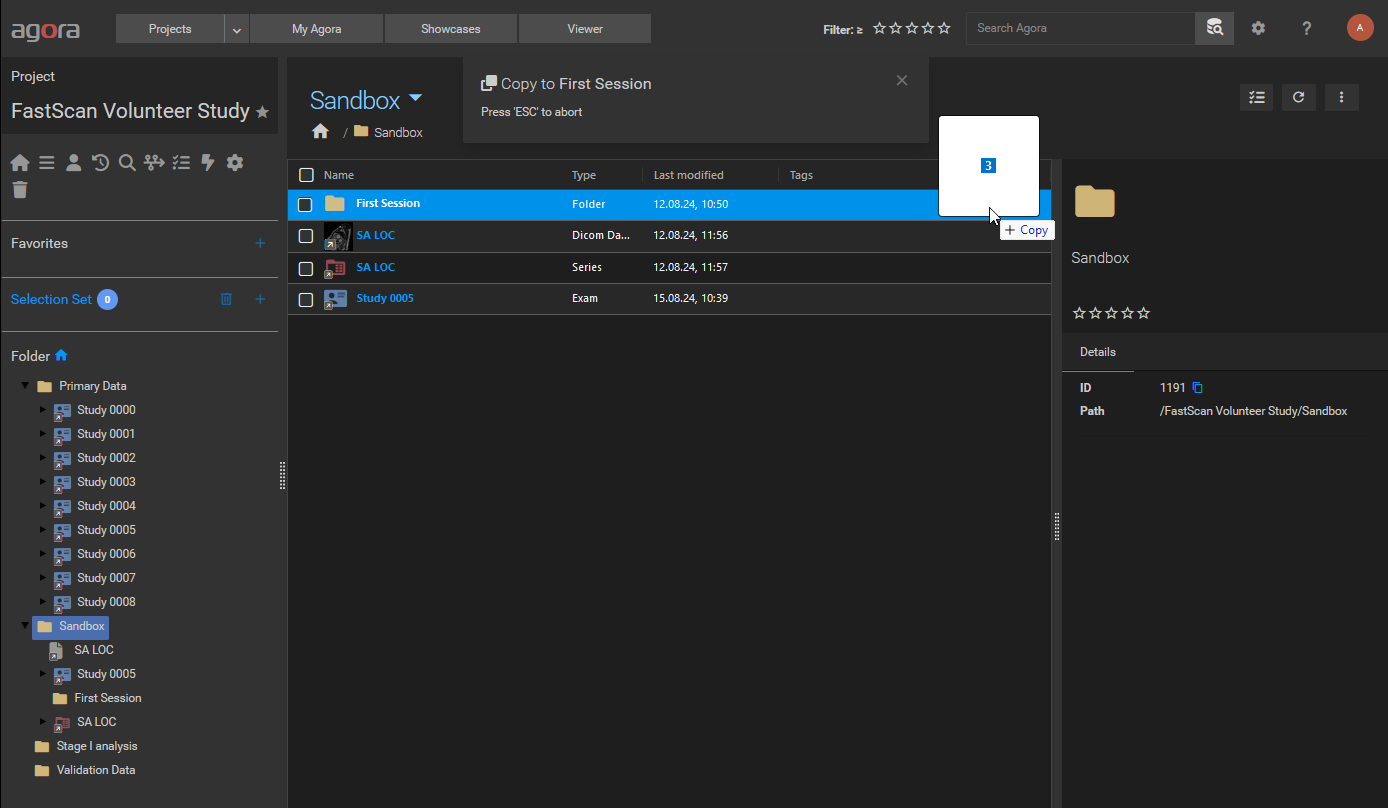 Dragging files into a destination folder drop zone.
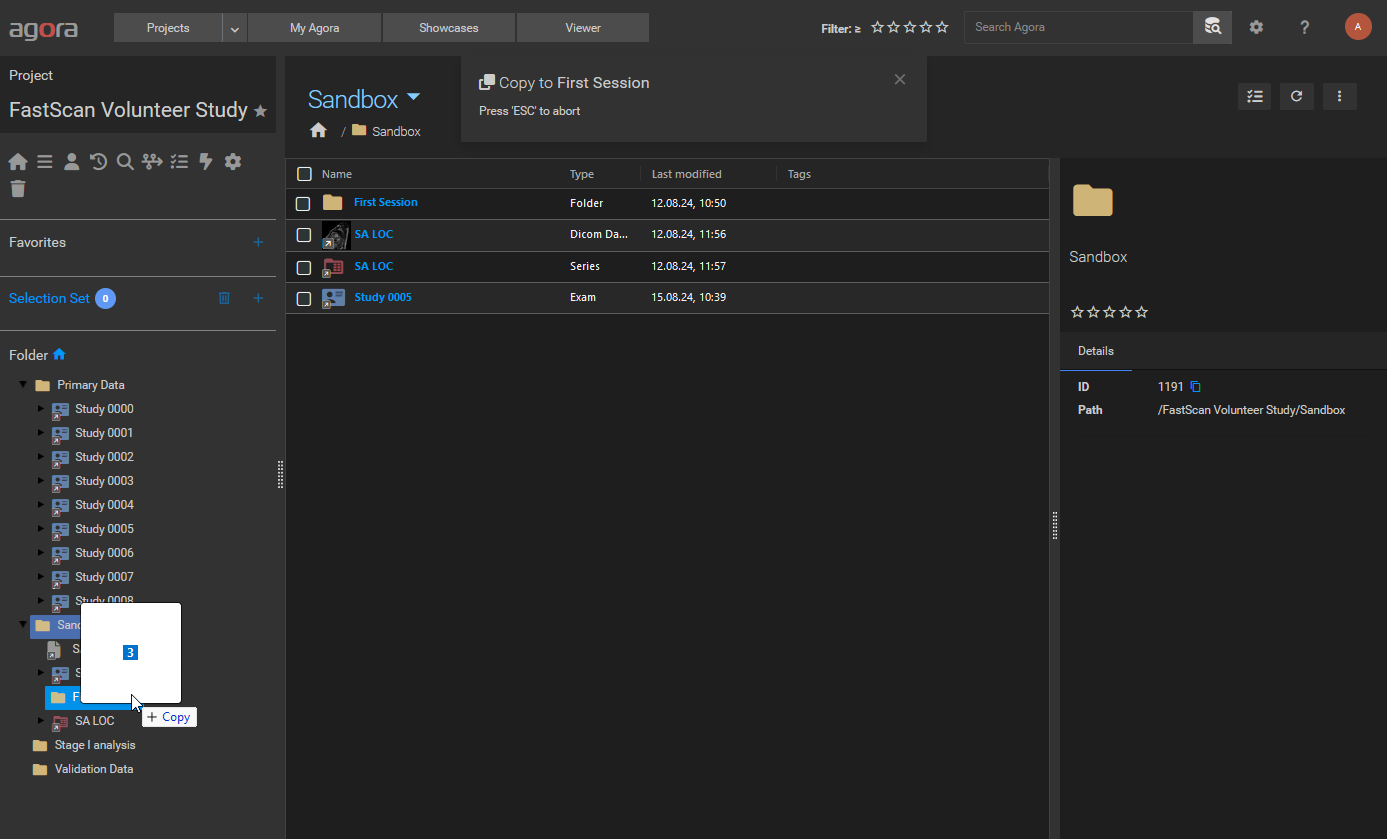 Dragging files into the sidebar folder tree drop zone.
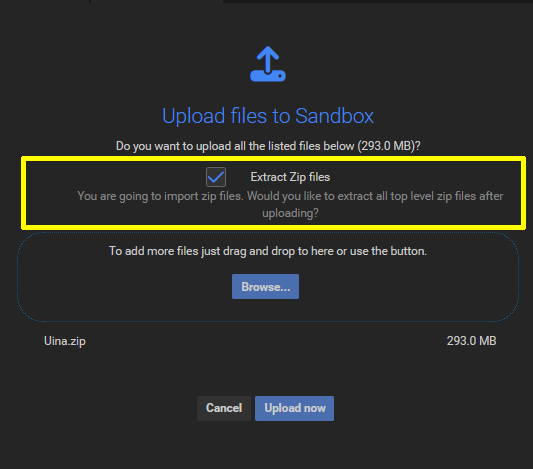
Once the files are successfully dropped, a confirmation dialog appears:
Important
6.3. Upload Data directly from an MR scanner
6.3.1. Philips Platform
On Philips MRI devices, the data transfer to Agora can either be done manually using the gtPacknGo standalone tool or automatically via the gtAgoraBridge tool. Both tools are part of the Agora distribution and available from the GyroTools Customer Portal.
6.3.1.1. Prerequisites
An open network connection to the Agora server is required to transfer data. The transfer will use the https protocol. The server location is not necessarily limited to the hospital network, but may requires firewall adaptations to be accessible from the scanner.
6.3.1.2. Sending data with gtPacknGo
6.3.1.2.1. Installation
Copy the Pack’n Go installer gtPacknGo_vx_x_x.msi to a memory stick and plug it into the scanner.
Copy gtPacknGo_vx_x_x.msi to a local folder on the scanner hard drive.
Double-click the installer gtPacknGo_vx_x_x.msi .
Follow the instructions on the screen.
Start gtPacknGo by clicking on the Windows Start button -> GyroTools -> gtPacknGo x.x.x .
6.3.1.2.2. Configuration
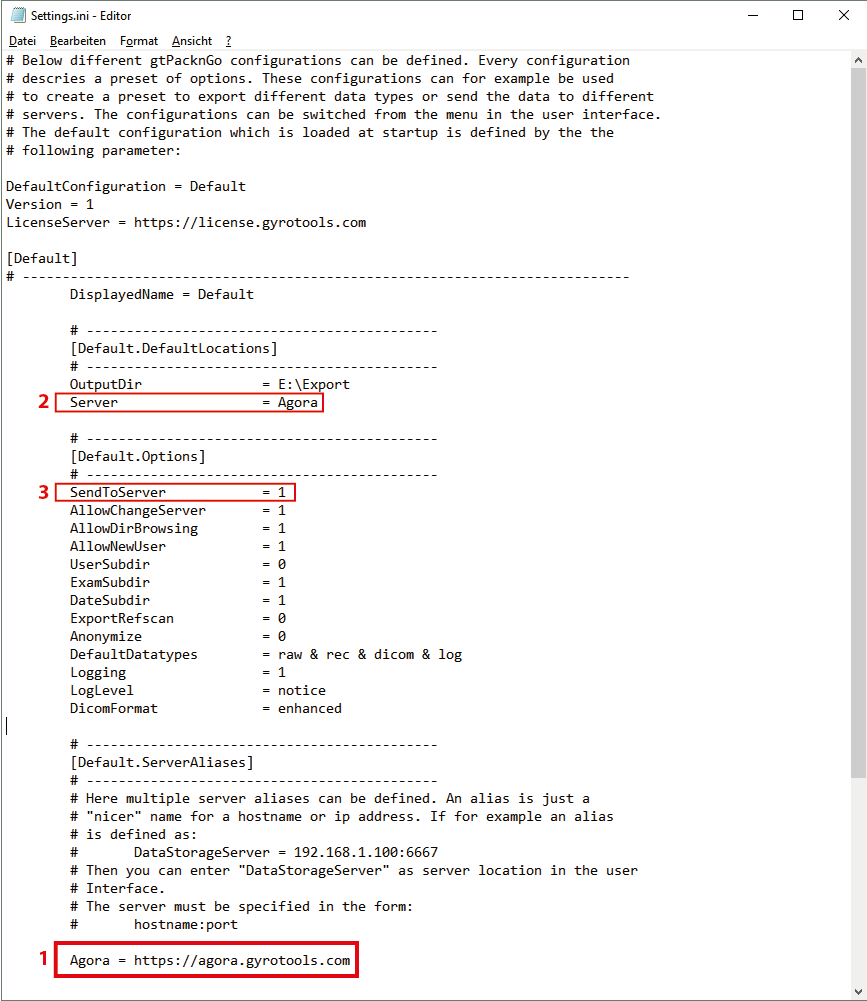
Open E:\Research\gtPacknGo_x_x_x\Settings.ini in a text editor (_x_x_x refers to the current gtPacknGo version).
Define an alias for the Agora hostname in the
[Default.ServerAliases]section. The Alias must be of the form<AliasName> = <AgoraHostname>.Add the alias name as
Serverin the[Default.DefaultLocations]section.If the server tab should be displayed on startup then set
SentToServer = 1.Adapt other options to your liking or keep the default values.
6.3.1.2.3. Usage
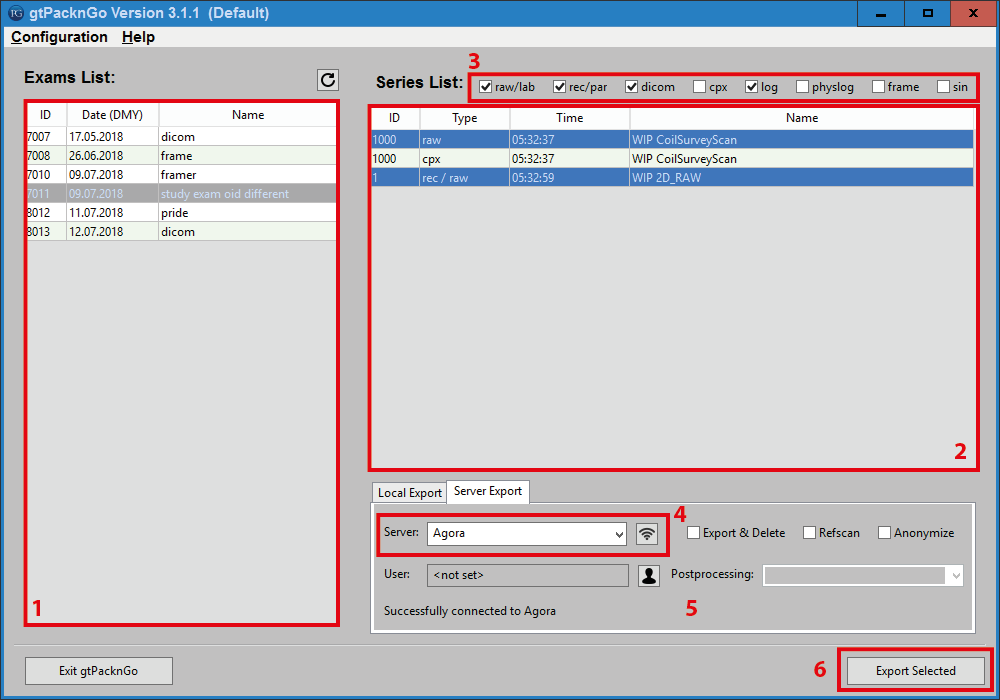
Transfer data to Agora :
Select the patient in the “Exam List” window on the left.
Select the scans to be transferred in the “Series List” panel on the right.
Chose the data formats/types to send via the export checkboxes on the top.
Switch to the “Server Export” tab and specify the Agora hostname. (This step can be skipped if the server was configured in the Settings file -> see configuration section above). To check the connection, press the “Test Connection” button next to the server name.
Adapt the other options to your liking.
Press “Export Selected”.
6.4. Import from Bruker scanners
Please contact your GyroTools representative if you want to directly upload data from your Bruker scanner.
6.5. Import from Siemens scanners
Please contact your GyroTools representative if you want to directly upload data from your Siemens scanner.
6.6. Import from GE scanners
Please contact your GyroTools representative if you want to directly upload data from your GE scanner.
6.7. DICOM Data Transfer
Agora runs a built-in DICOM node that accepts incoming DICOM transfers (C-STORE) from any DICOM-capable device or PACS system. The default connection parameters are:
AE Title:
gtAgoraPort:
3010(can be changed in the Agora configuration file)
To send data to Agora from another DICOM node (e.g. a scanner, PACS, or workstation), configure that system with the above AE title, the hostname or IP address of the Agora server, and the port. Incoming data is routed to the Agora user account and project that match the destination AE title or the configured routing rules.
6.8. Upload Data from the command line
The agora-uploader is a standalone command-line tool written in Go for uploading files and folders to an Agora server. It requires no additional runtime and is available as a pre-built binary for all major platforms.
Installation
Download the binary for your platform from the latest release page.
Basic syntax
agora-uploader --url <server_url> --path <file_or_folder> --target-folder <folder_id> [options]
The --target-folder value is the numeric ID of the destination folder in Agora (visible in the URL when you open a folder in the browser).
Options
Flag |
Description |
|---|---|
|
URL of the Agora server (required). |
|
Path to the file or directory to upload (required). |
|
Destination folder ID in Agora (required). |
|
API key for authentication. If omitted, credentials are prompted interactively. |
|
Extract and import the contents of a ZIP archive instead of uploading the ZIP file itself. |
|
Skip verification of successful uploads. |
|
Disable SSL certificate validation (useful for self-signed certificates). |
|
Print detailed progress information. |
|
Output format: |
|
Log verbosity: |
Examples
Upload a single file (interactive login):
agora-uploader --url https://agora.example.com --path /data/scan.dcm --target-folder 13
Upload a directory using an API key:
agora-uploader -u https://agora.example.com -p /data/ -f 13 --api-key MY_API_KEY
Upload and extract a ZIP archive:
agora-uploader -u https://agora.example.com -p /data/scan.zip -f 13 --extract-zip
Upload to a server with a self-signed certificate:
agora-uploader -u https://agora.example.com -p /data/scan.dcm -f 13 --no-check-certificate
6.9. Upload Data using Python
The gtagora-connector library provides a Python interface to Agora. It can be used to upload files and folders, navigate the project structure, download data, and more.
Installation
pip install gtagora-connector
Connecting to Agora
Authentication with an API key is recommended:
from gtagora import Agora
agora = Agora.create('https://agora.example.com', api_key='<YOUR_API_KEY>')
Username and password can also be used:
agora = Agora.create('https://agora.example.com', user='myuser', password='mypassword')
Uploading files to a folder
Get the target folder by its ID (visible in the browser URL when the folder is open) and call upload:
from pathlib import Path

folder = agora.get_folder(45)
folder.upload([Path('/data/scan1.dcm'), Path('/data/scan2.dcm')])
Navigating the project structure
Folders can be traversed and created programmatically:
myagora = agora.get_myagora()
root_folder = myagora.get_root_folder()
subfolders = root_folder.get_folders()
target_folder = root_folder.get_or_create('results')
Resumable uploads
For large uploads or unreliable connections, use an upload session. Progress is written to a JSON file so the upload can be resumed if interrupted:
files = [Path('/data/raw/rawfile.raw'), Path('/data/raw/rawfile.lab')]
progress_file = Path('/data/progress.json')

session = agora.create_upload_session(
    files,
    progress_file=progress_file,
    target_folder_id=45,
    verbose=True
)
session.start()
For full documentation see the gtagora-connector repository.
6.10. Upload Data using MATLAB
The gtagora-connector-matlab library provides a MATLAB interface to Agora for uploading files, navigating the project structure, downloading data, and more.
Installation
Clone the repository and add the cloned directory to your MATLAB path:
addpath('/path/to/gtagora-connector-matlab');
Connecting to Agora
Authentication uses an API key, which can be generated in your Agora profile settings:
agora = Agora.create('https://agora.example.com', '<YOUR_API_KEY>');
Uploading files to a folder
Get the target folder and call upload with a path to a file or directory:
folder = agora.get_folder(45);
folder.upload('/data/scans/');
Navigating the project structure
Folders can be traversed and created programmatically:
myagora = agora.get_myagora();
root_folder = myagora.get_root_folder();
target_folder = root_folder.get_or_create('results');
Resumable uploads
For large uploads or unreliable connections, use an upload session. Progress is written to a JSON file so the upload can be resumed if interrupted:
files = {'/data/raw/rawfile.raw', '/data/raw/rawfile.lab'};
progress_file = '/data/progress.json';

session = agora.create_upload_session(files, 45, progress_file);
session.start();
For full documentation see the gtagora-connector-matlab repository.
6.11. Custom Import with a Manifest File
When uploading data that Agora does not recognise natively (arbitrary file formats, processed results, custom data), you can accompany the files with an import manifest — a JSON file that tells Agora how to structure the data and what parameters to attach to it.
When a manifest is present in an upload, Agora creates a Study / Series / Dataset hierarchy using the metadata defined in the manifest and stores all specified parameters in the database, making them searchable via AQL.
Browser upload — drag all your data files together with the manifest JSON into the browser upload area. Agora automatically detects the manifest by scanning the dropped .json files for the expected structure (Datasets array and ImportParameter object). Only the files explicitly listed in the manifest are uploaded; any other dropped files are silently ignored. The upload dialog will warn you if any file referenced in the manifest is missing from the selection.
6.11.1. Manifest File Format
The manifest must conform to schema version 2.0.0. The filename can be anything.
Top-level fields:
Field |
Required |
Description |
|---|---|---|
|
yes |
Free-text identifier of the tool that generated the manifest (e.g. |
|
yes |
Schema version. Must be |
|
yes |
One of: |
|
yes |
Scanner-specific raw data type ( |
|
no |
Study, series, and patient metadata (see below). |
|
yes |
List of datasets to create (see below). |
|
yes |
List of parameter sets to attach to datasets (may be an empty array |
ImportParameter — defines the Study/Series/Patient metadata:
Exam(required):UID,Name,Date(dd.mm.yyyy),Time(hh:mm:ss),DeviceName,DescriptionSeries(optional):UID,Name,Date,Time,AcquisitionNumber,TypeLabel,ReferenceScanUIDsPatient(optional):UID,Name,BirthDate,Gender(M/F/O/""),Weight
Datasets — each entry in the array creates one dataset:
Type(required): dataset type label (free text)Name(optional): display name for the datasetFiles(required): list of{ "File": "<filename>" }objects referencing uploaded files by nameParameterSetID(optional): integer or list of integers referencing aParameterSetby itsID
ParameterSets — each entry defines a named group of parameters:
ID(required): integer identifier, referenced by datasets and import parameter objectsParameters: list of parameter objects withID,Name, andValue
6.11.2. Minimal Example
The following manifest imports two files as a single dataset under a custom study, with two acquisition parameters:
{
  "Creator": "MyPipeline:1.0",
  "Version": "2.0.0",
  "Vendor": "Unknown",
  "Type": "",
  "ImportParameter": {
    "Patient": {
      "UID": "patient-001",
      "Name": "Doe John",
      "BirthDate": "01.01.1980",
      "Gender": "M",
      "Weight": 75.0
    },
    "Exam": {
      "UID": "exam-2024-001",
      "Name": "Brain Study",
      "Date": "18.03.2026",
      "Time": "10:30:00",
      "DeviceName": "MyScanner",
      "Description": "Custom acquisition"
    },
    "Series": {
      "UID": "series-2024-001",
      "Name": "T1 Map",
      "Date": "18.03.2026",
      "Time": "10:31:00",
      "AcquisitionNumber": 1,
      "TypeLabel": "T1",
      "ReferenceScanUIDs": []
    }
  },
  "Datasets": [
    {
      "Type": "NIFTI1",
      "Name": "T1_map",
      "Files": [
        { "File": "t1_map.nii.gz", "ParameterSetID": null },
        { "File": "t1_map.json",   "ParameterSetID": null }
      ],
      "ParameterSetID": 1
    }
  ],
  "ParameterSets": [
    {
      "ID": 1,
      "Name": "Acquisition Parameters",
      "Parameters": [
        { "ID": 1, "Name": "FlipAngle",       "Value": 12.0 },
        { "ID": 2, "Name": "RepetitionTime",  "Value": 2500.0 }
      ]
    }
  ]
}
When uploading via the browser, simply drag all data files and the manifest JSON together — Agora detects and uses the manifest automatically.
6.11.3. Using the Python Connector
The gtagora-connector library provides a helper to generate a manifest template and upload it alongside your data:
from gtagora import Agora
from pathlib import Path

agora = Agora.create(url='https://agora.example.com', api_key='<your-api-key>')

# Generate a template manifest (fills in placeholder values)
manifest = agora.create_import_template(
    vendor='Unknown',
    type='',
    files=[Path('t1_map.nii.gz'), Path('t1_map.json')]
)

# Edit manifest fields as needed, then save it
import json
manifest_path = Path('agora_import.json')
manifest_path.write_text(json.dumps(manifest, indent=2))

# Upload data files together with the manifest
agora.upload(
    paths=[Path('t1_map.nii.gz'), Path('t1_map.json'), manifest_path],
    target_folder_id=42,
    json_import_file=manifest_path
)
create_import_template accepts optional exam, series, and patient objects to pre-populate the metadata from existing Agora objects. json_import_file tells the upload session which file contains the manifest.