4. Projects
Projects are the top most organisational unit to organise your data in Agora. Projects are independent of each other and every action performed inside a project will not affect data or settings of any other project. The same data files can be contained in multiple projects, but altering the data in any way will cause the creation of a copy, such that the data in other projects remains unchanged.
Users can create an unlimited number of projects. You can only see and have only access to the projects you created and the ones for which you were invited as a member by other users of the system. In addition, each user also has a private MyAgora project. The MyAgora project cannot be shared with other users.
To see a list of all accessible projects, select the project button on the main menu bar.
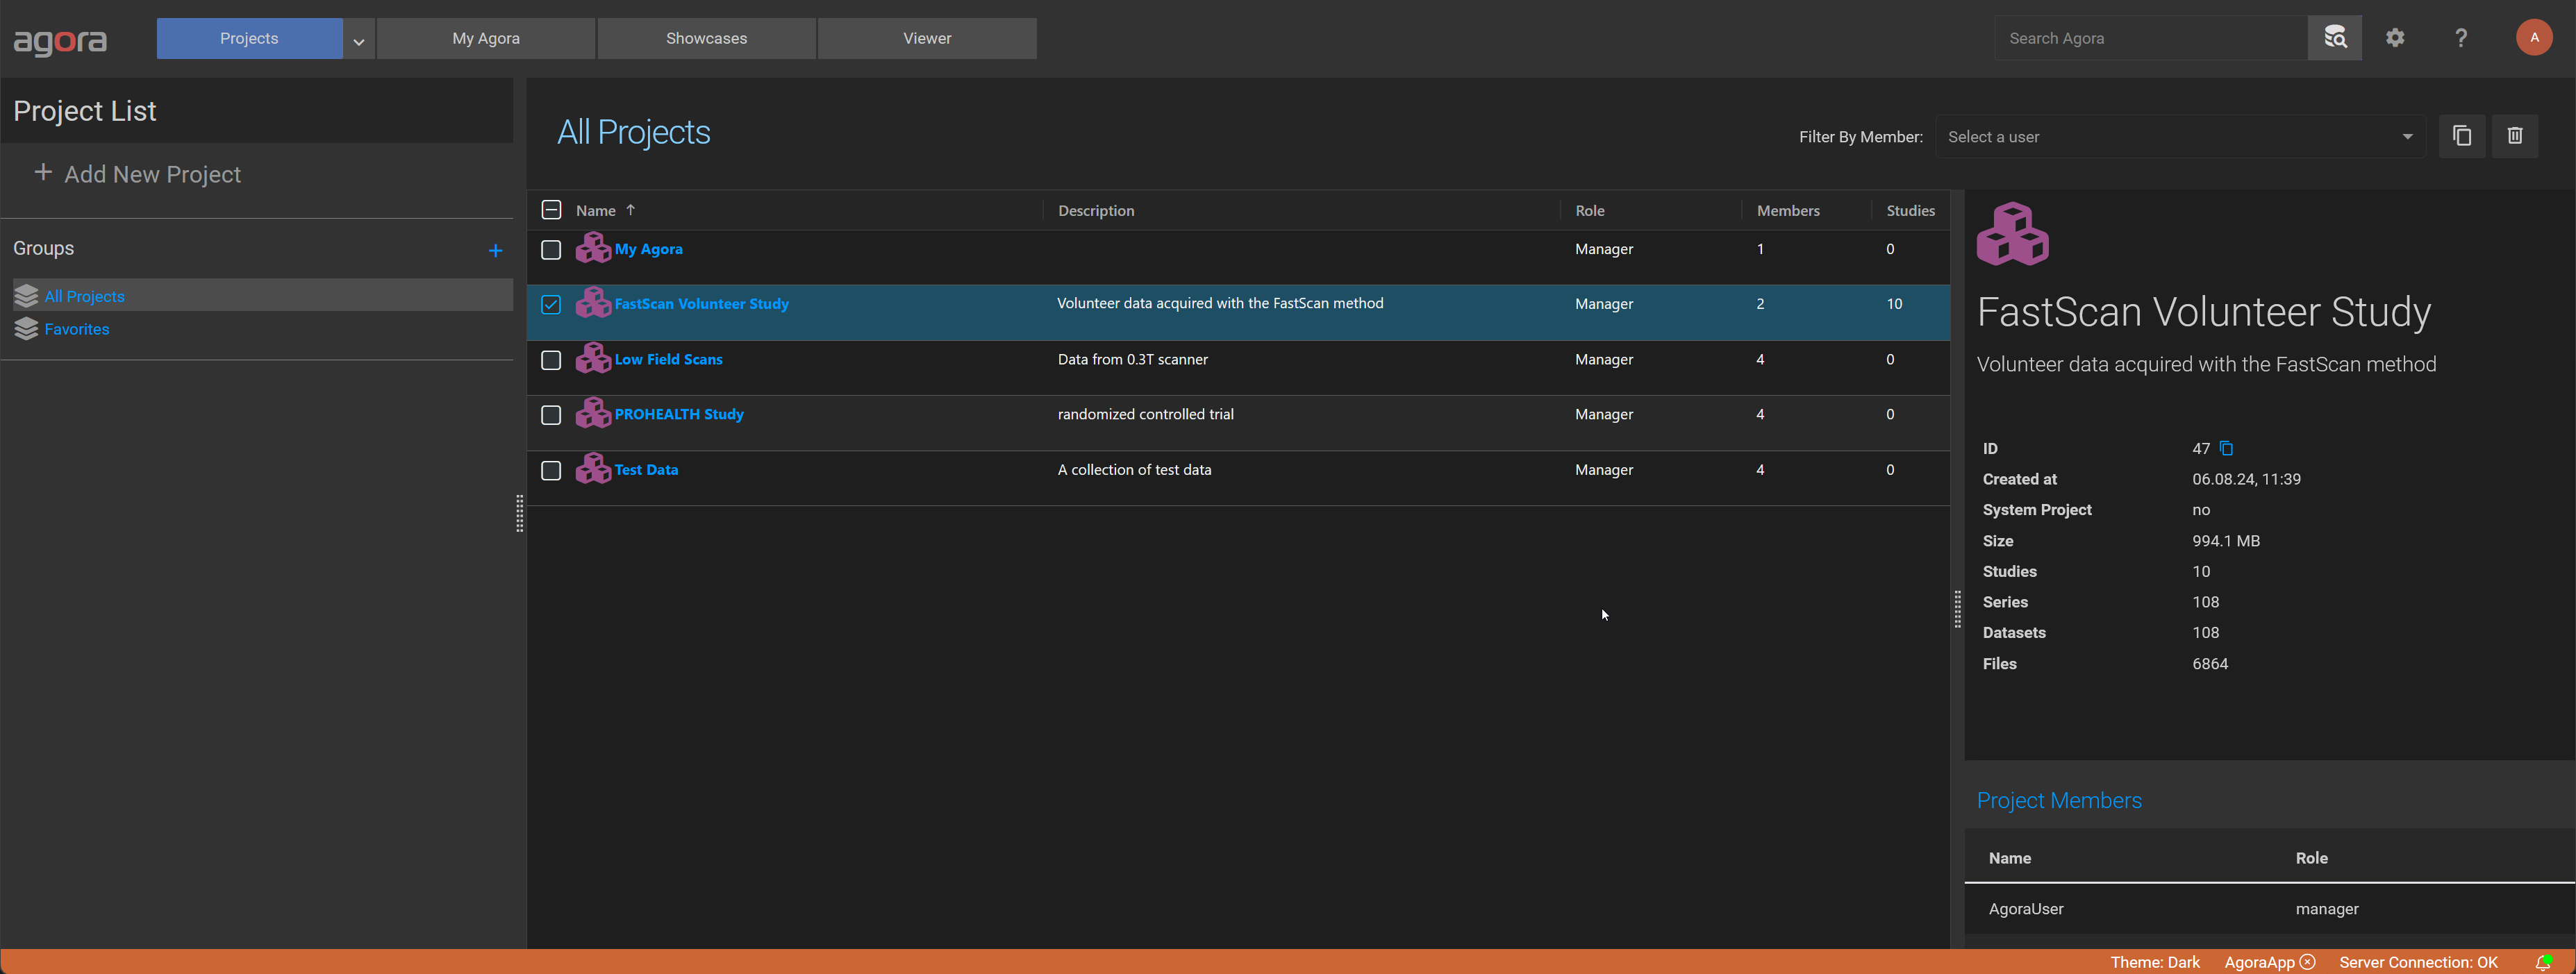
Select a project from the project list or from the project selector in the main menu bar to access the respective project page.
4.1. Project Groups
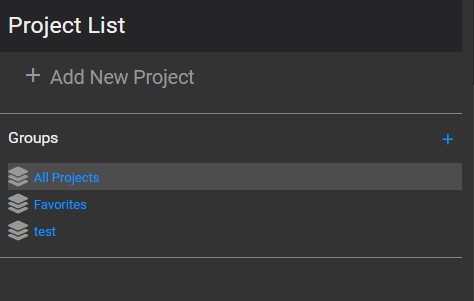
Projects can be organized in groups. Project groups are a user-specific organization tool and serve no other purpose. Each user can create his own group structure which is not shared with other users. Every project may belong to multiple groups.
4.2. Project Page
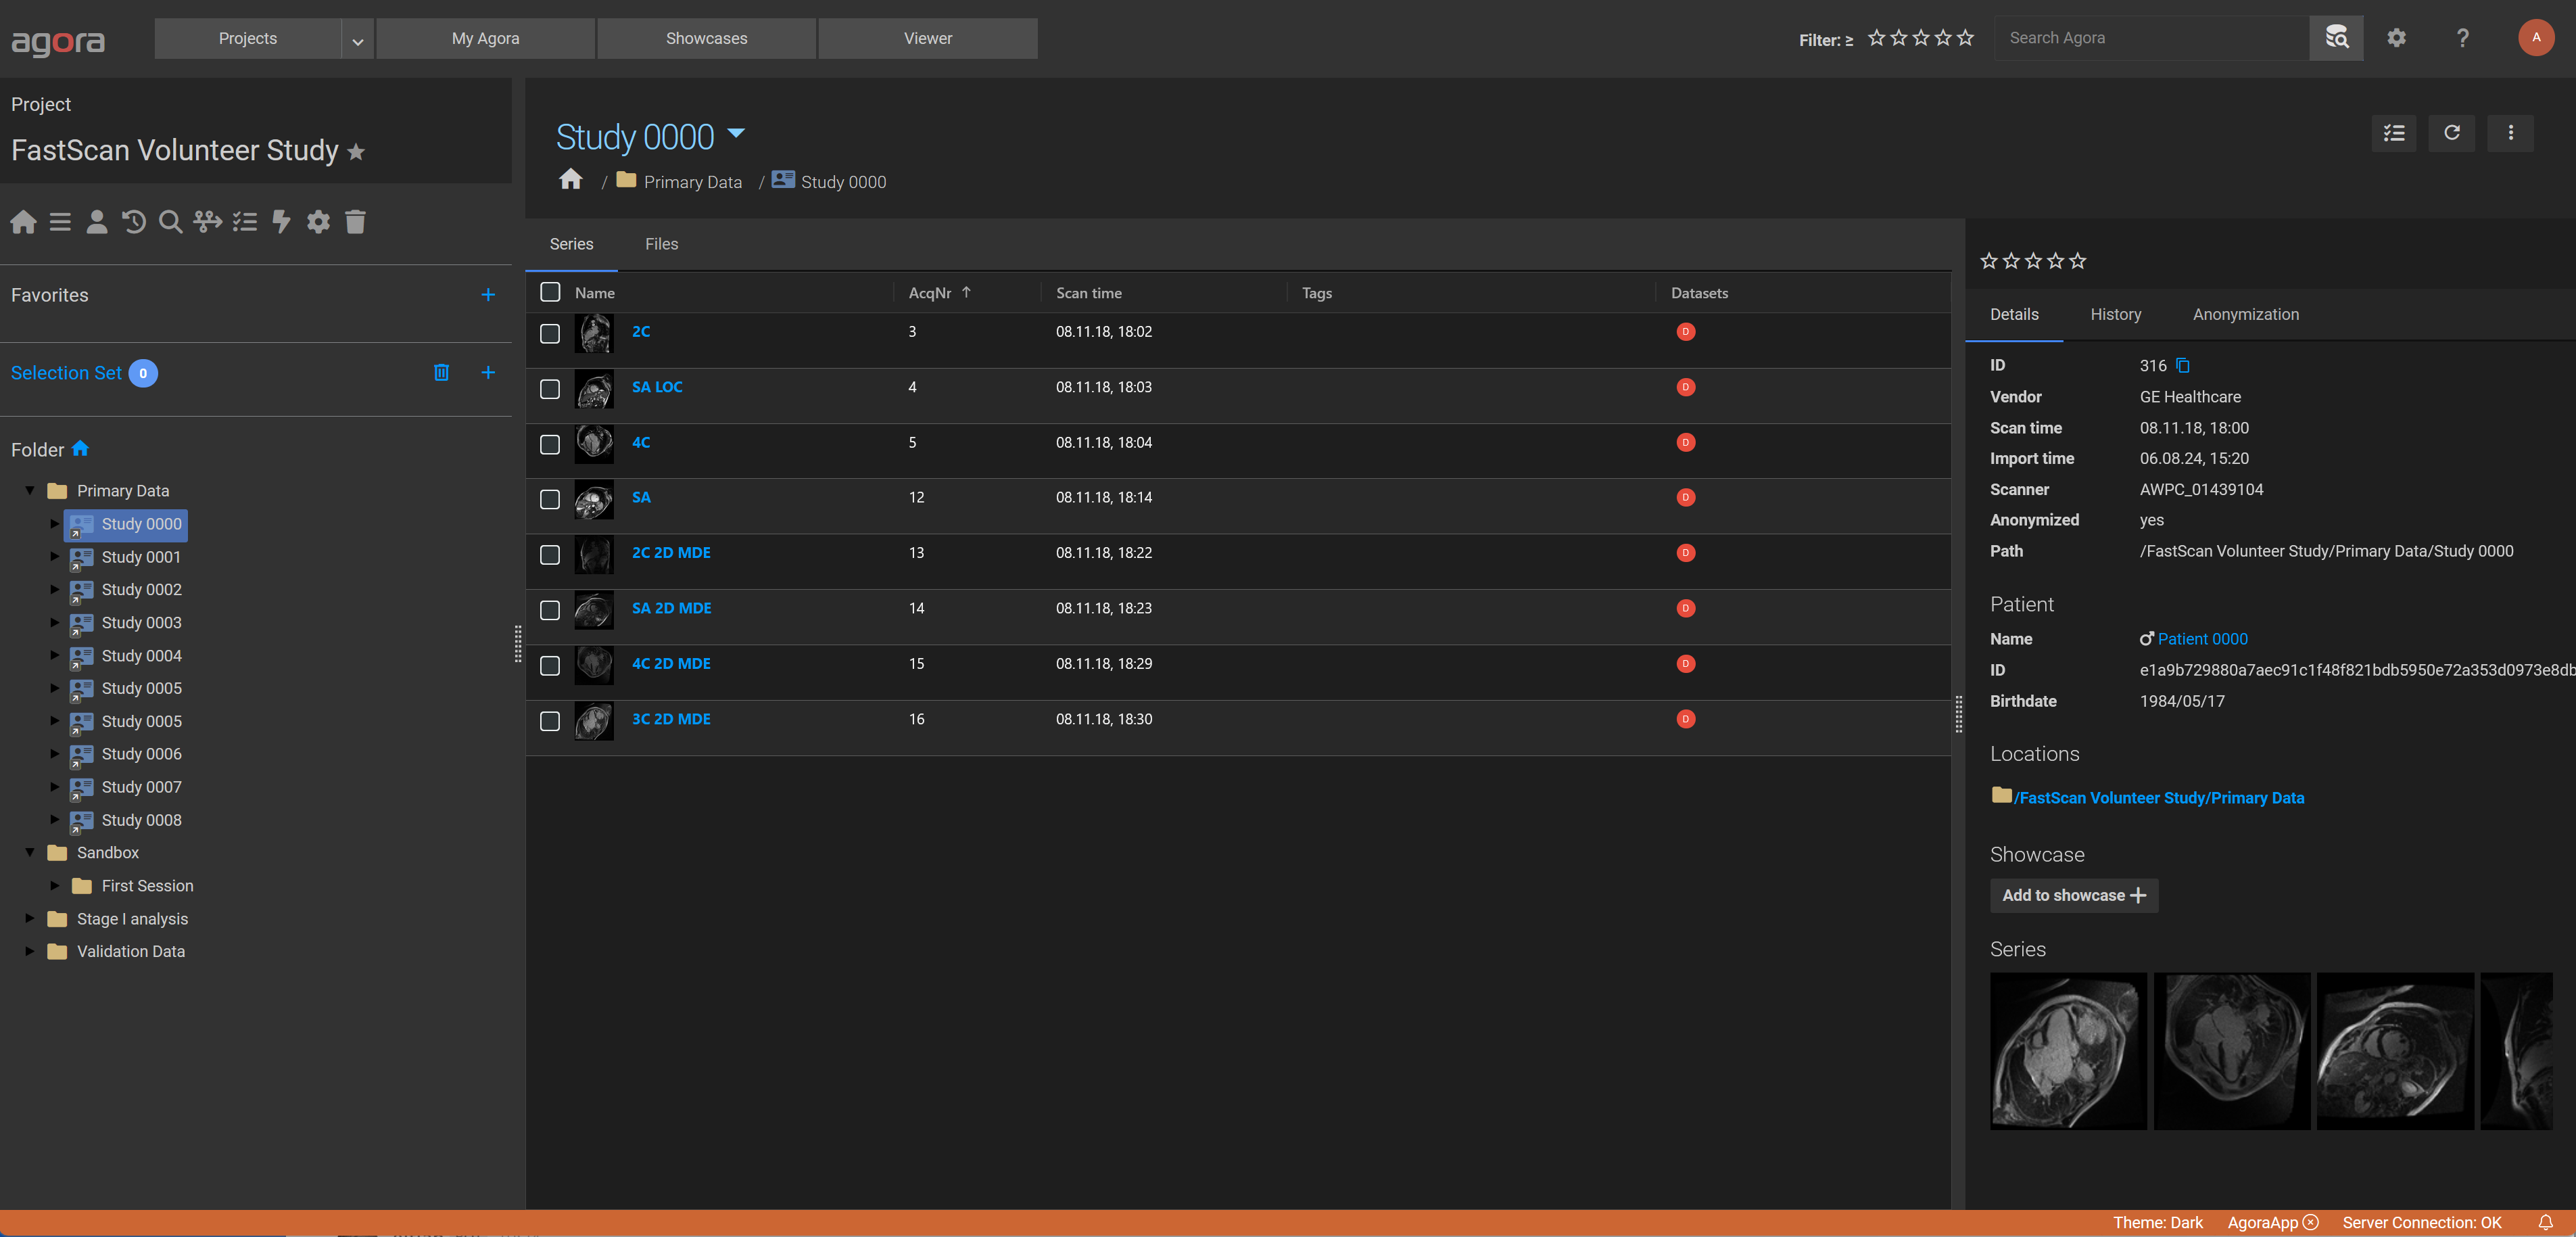
The project page displays three panels: The leftmost panel displays the project menu and the folder tree. The panel on the right displays the project view and is itself divided into two panels. The middle panel shows the currently selected project view such as the folder tree, the study list, the patient list, the timeline, or others more. The rightmost panel holds the detail view of the currently selected item in the project view. The button bar in the top right corner of the project view gives access to actions that operate on currently selected items.
4.3. Project Menu
Use the project menu to access the different project views, the search page, the timeline, the tasks and triggers configuration pages, the project settings, and the trash box.
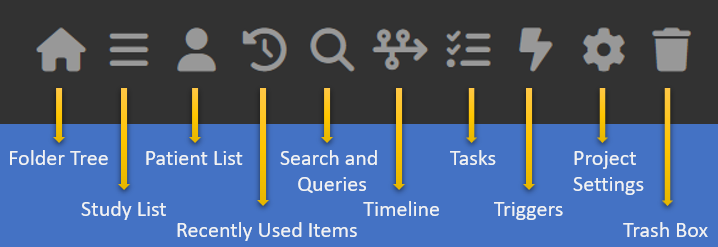
4.3.1. Folder Tree
Each project has a folder tree which can contain folders, files, and references to Agora data element such as studies, series, and datasets. The folder tree is displayed in the panel below the project menu and is also displayed as a table in the main view panel when folder tree view is selected. In the main view panel, the folder tree can be navigated. Open folders by left-click on the folder names. Use the breadcrumb trail at the top of the folder tree view or the tree view in the left panel to navigate through the folders. To create a new folder, use the dropdown menu next to the folder title above the folder table.
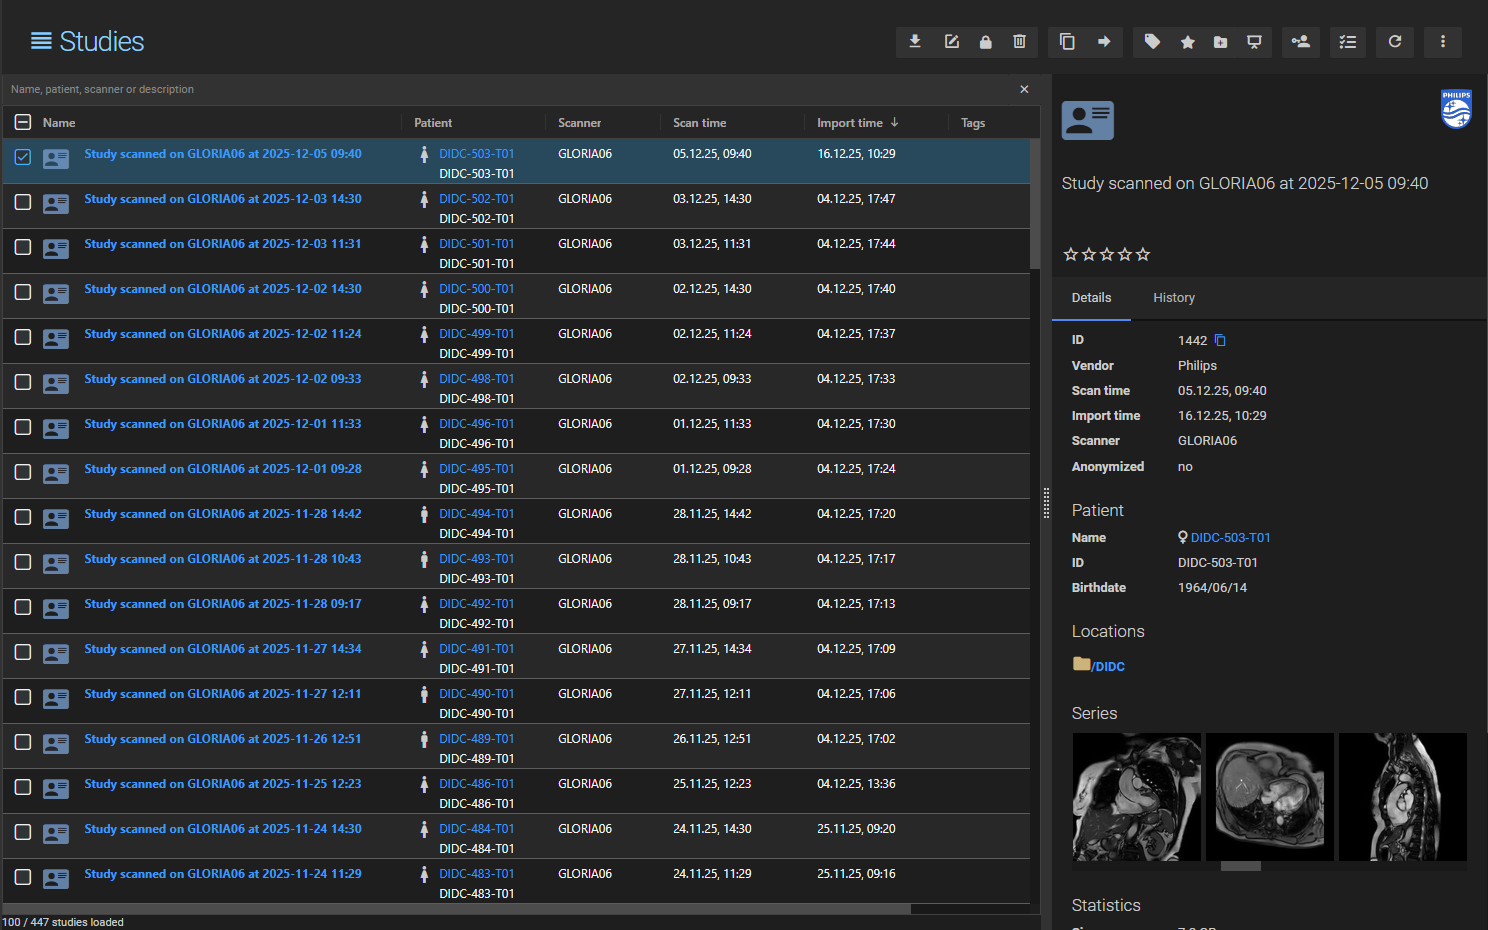
4.3.2. Study List
The Study List displays all studies contained in the project. See the Agora Data Model in the next section for the definition of a study. Note that studies are not automatically represented in the folder tree. Drag and drop studies from the study list into the folder tree to store references of studies in the folder tree. Left-click on a study name to display the list of series contained in a particular study. Open a series to reveal the list of datasets contained in the series. Left-click on a dataset to see the parameter lists associated with the dataset. If the dataset contains image data, the image will be displayed in the viewer.
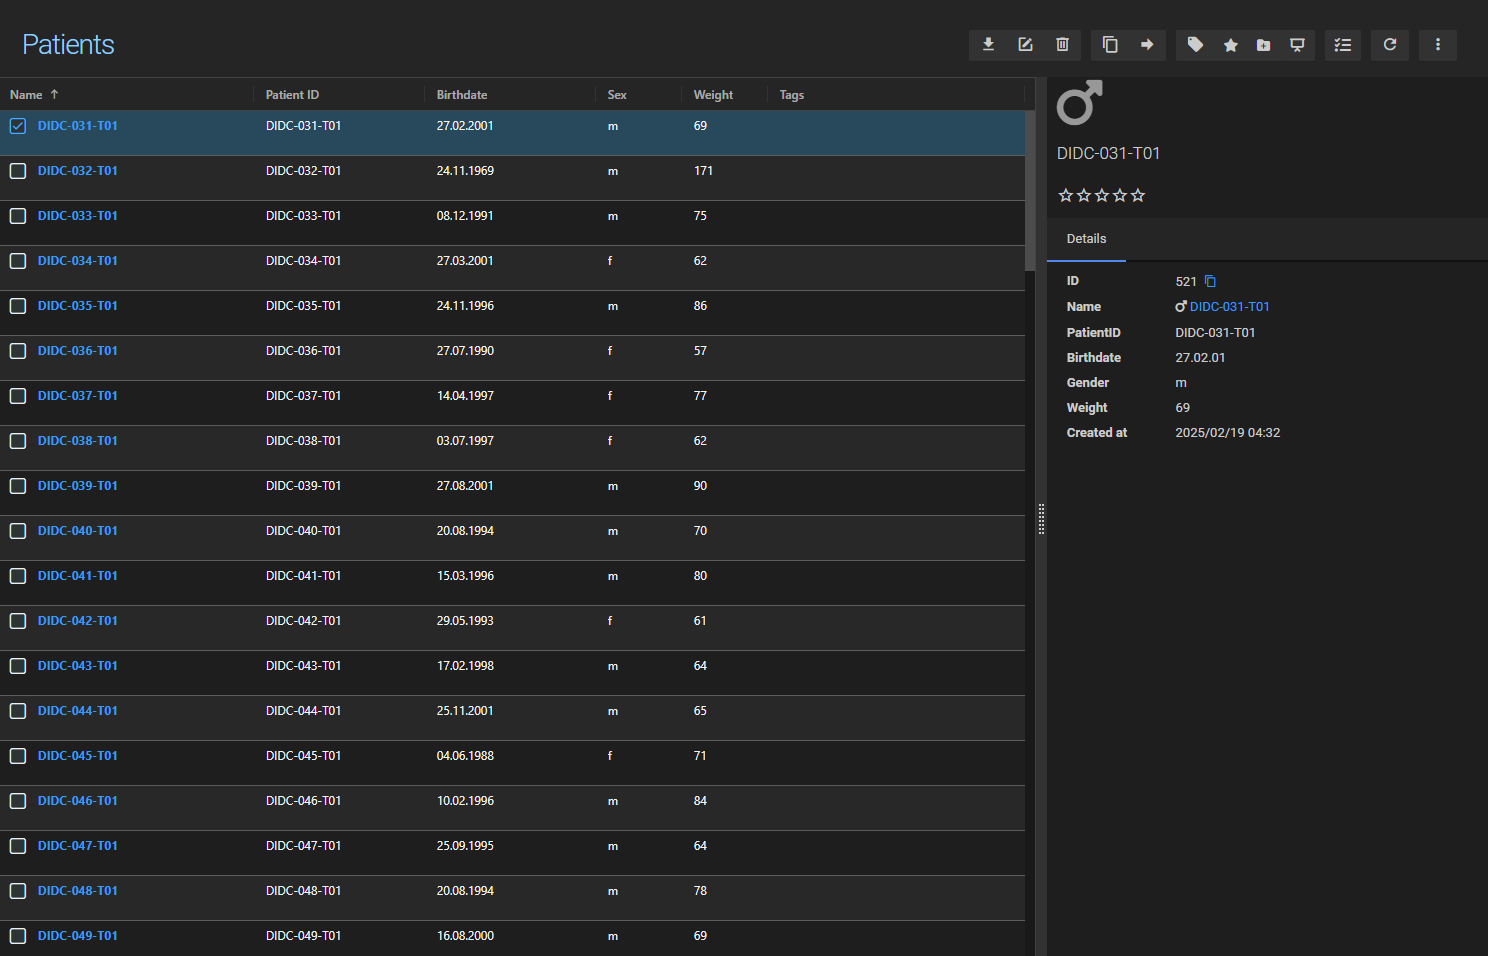
4.3.3. Patient List
The Patient List view lists the studies contained in the project according to the patient information. A individual patient may have multiple associated studies.
4.3.4. Recently Used Items
Use the Recently Used Items view to see the list of recently accessed items.
4.3.5. Search and Queries
The Search and Queries view gives access to the detailed search page. See Database Search for a detailed description.
4.3.6. Timeline
The Timeline is a chronological history of everything that has happened within the project. It records events such as data imports, task and trigger executions, dataset conversions, copies and moves between projects, folder synchronisations, and more.
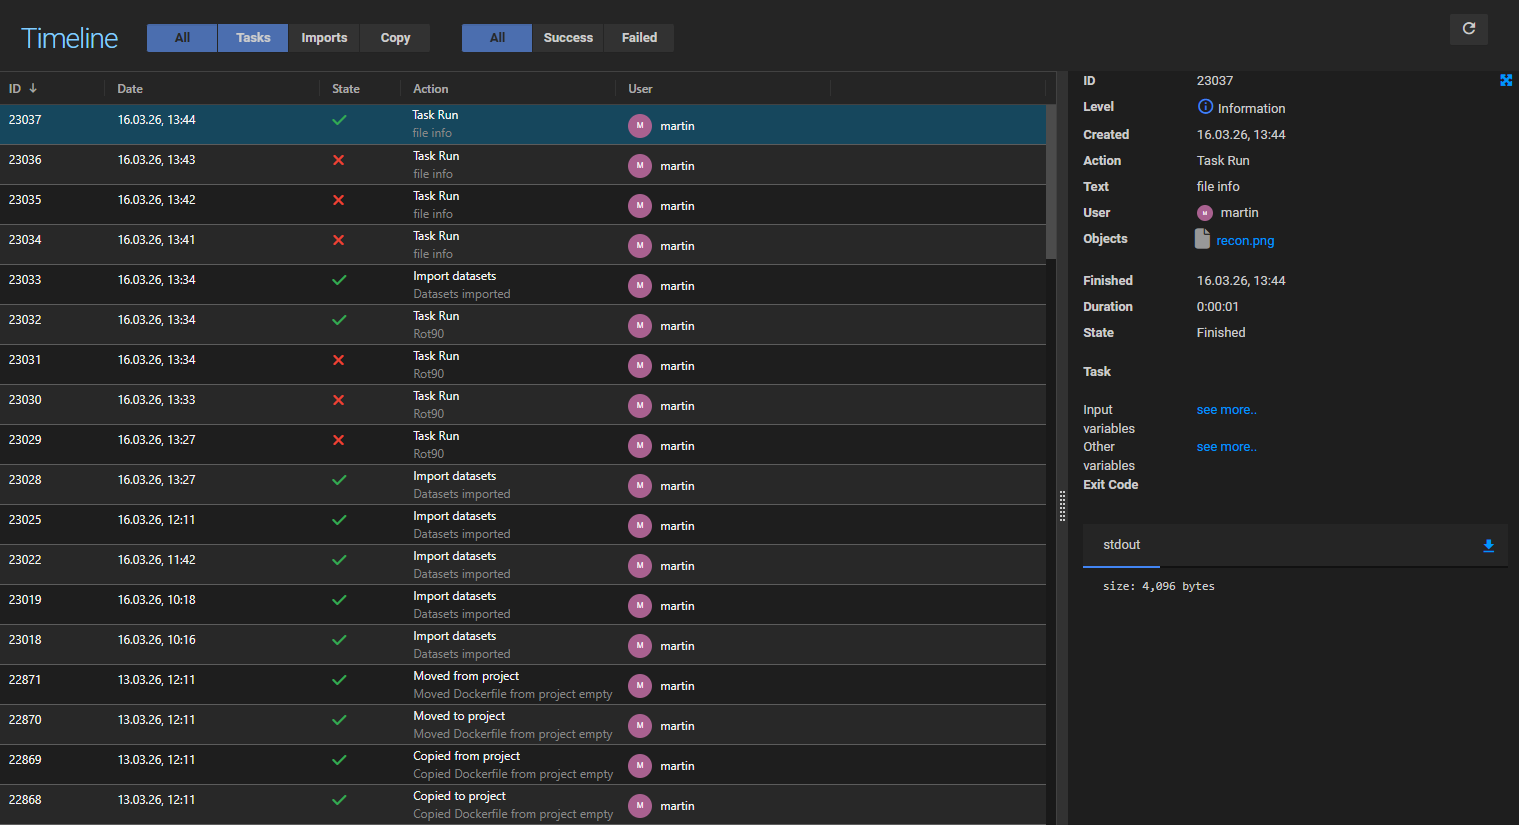
Each entry in the timeline shows:
Date — when the event occurred.
State — the outcome of the event: Queued, Started, Finished, Error, Canceling, or Canceled.
Action — the type of event (e.g. Task Run, Import data, Copy to project).
User — the user who triggered the event.
Selecting an entry opens a detail panel on the right with additional information depending on the event type, including related objects, the target folder, runtime duration, and — for errors — a description of what went wrong. Task runs additionally show input variables and exit codes. Import events list the imported files with download links.
Filtering
Use the filter bar above the timeline to narrow the list:
Action filter — show all events, or restrict to Tasks, Imports, or Copy operations.
State filter — show all events, or restrict to Success or Failed outcomes.
The timeline updates in real time: new events appear at the top as they occur without needing a manual refresh.
4.3.7. Tasks
The task panel lists the tasks available in the project. It also allows to define new tasks with the task editor. See Tasks for a detailed description. To execute a task, select the input data in the folder tree or study list and select the “run task” button in the context menu bar in the top right corner of the main view panel.
4.3.8. Triggers
The Triggers view displays the triggers defined for this project. See the section Triggers below for a detailed description.
4.3.9. Project Settings
The project settings page is accessible from the project menu. It is divided into several sections, each controlling a different aspect of the project. Sections are only visible to users whose role grants the required permissions.
4.3.9.1. General
Name — the display name of the project.
Description — an optional description of the project.
Display task results in a separate tab — when enabled, task output datasets are shown in a dedicated tab instead of inline alongside the other datasets of a series.
4.3.9.2. Members
The Members section is used to invite users to the project and control their access rights. Removing a user from the member list immediately revokes their access and the project will no longer appear in their project list.
Each member is assigned a role. The following default roles are available:
Role |
Default permissions |
|---|---|
Manager |
Full access. Can manage all project settings, data, tasks, and members. |
Scientist |
Can anonymize data, manage and run tasks, and manage/add/delete data. |
User |
Can run tasks and manage/add/delete data. |
Collector |
Can only add data. |
Observer |
Read-only access. Cannot modify anything. |
The permissions of each role (except Manager) can be customised in the permissions table below the member list. The following permissions can be toggled individually:
Permission |
Description |
|---|---|
Project Administration |
Manage project settings and members. |
Anonymize Data |
Anonymize studies in the project. |
Edit Tasks / Hosts / Triggers |
Create and modify tasks, hosts, and triggers. |
Run Tasks |
Execute tasks on project data. |
Organize Data |
Move, copy, rename, and organise objects. |
Delete Data |
Delete objects and folders. |
Add Data |
Upload and import data into the project. |
Note
The MyAgora project cannot have members.
4.3.9.3. Anonymization
Anonymize data when added to project — when enabled, all studies imported into the project are automatically anonymized on arrival. Requires at least one recovery key to be configured before enabling.
Anonymization Profile
The profile determines which DICOM tags are removed or replaced during anonymization. A default profile is provided. A custom profile can be created and edited from this settings page.
Recovery Keys
Recovery keys allow a de-anonymization to be performed at a later date if the original patient information needs to be retrieved. Each recovery key has a name, a contact name, and optional notes identifying who holds the key. Studies anonymized before a key was created cannot be recovered using that key.
4.3.9.4. Hosts
Hosts define the external servers and services the project can connect to. See Hosts for full documentation of all host types and their configuration fields.
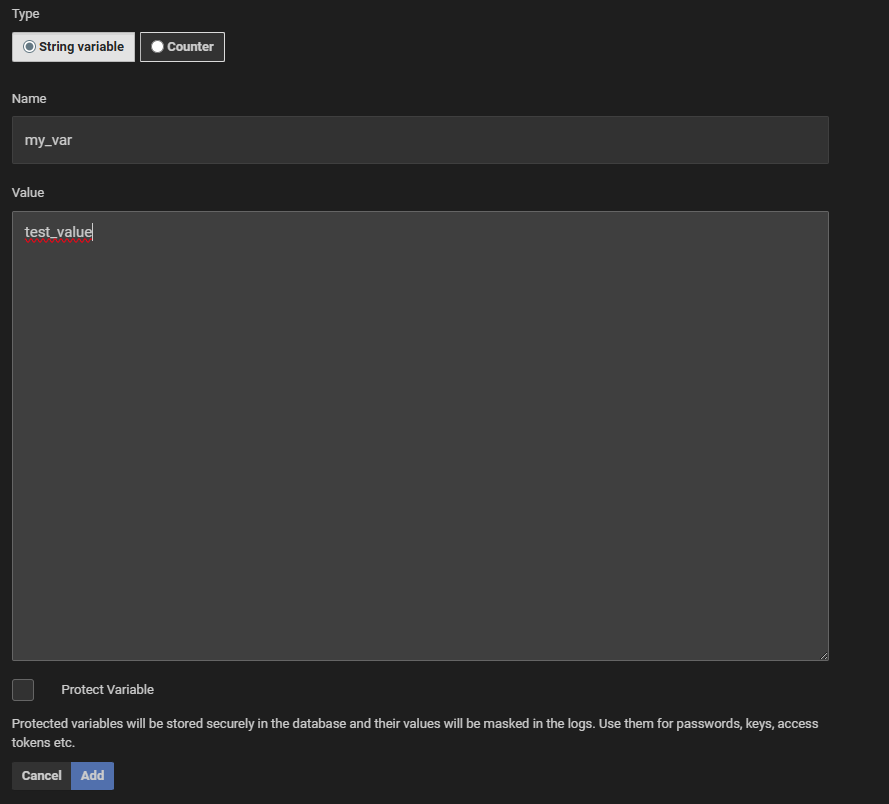
4.3.9.5. Variables
Variables are named values that can be referenced in task scripts using {{ variables.<name> }}. They are useful for storing configuration that is shared across multiple tasks, such as paths or server addresses.
Name — the variable name used in task scripts.
Value — the value of the variable.
Protect Variable — when enabled, the value is stored encrypted and masked in logs. Use this for passwords, API keys, and other sensitive values.
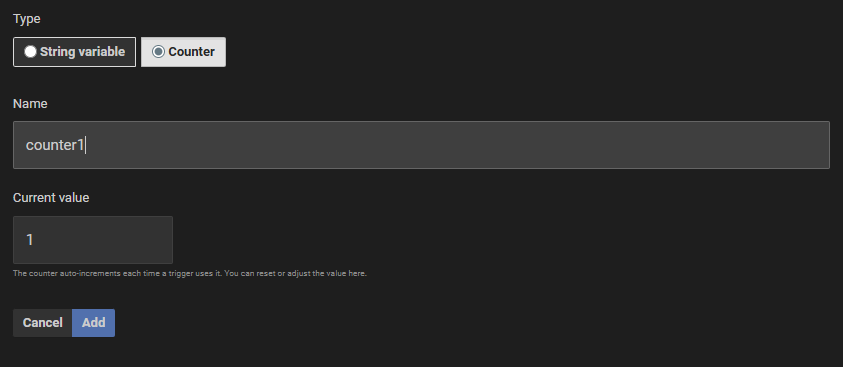
4.3.9.6. Counters
Counters are project-scoped integer variables that increment automatically each time a trigger uses them. They are useful for assigning a sequential number to imported objects — for example naming items Study 1, Study 2, and so on without any manual bookkeeping.
Counter names must be valid Python identifiers (letters, digits, and underscores; must start with a letter or underscore). The value shown in the list is the number that will be used the next time the counter is referenced by a trigger.
Add — click the add button to create a new counter. Enter a name and an initial value (defaults to 1).
Edit — click an existing counter in the list to open the edit form. You can change both the name and the current value in the same form. Changing the value restarts the sequence from that number; changing the name updates the variable name used in all trigger scripts and templates.
Delete — select a counter and click the delete button to remove it permanently.
See Project Counters for details on how to use counters in trigger templates and scripts.
4.3.9.7. Auto Imports
Auto Import rules watch a network folder and automatically import any data that appears in it into the project. This is useful for integrating scanner export workflows.
Name — a label for the auto-import rule.
Description — optional description.
Active — enables or disables the rule without deleting it.
Schema — the import schema that defines how files are parsed and organised on import.
File Transfer Protocol — the protocol used to access the watched folder (e.g. Windows Network Folder / Samba).
Watched Folder — the network path to monitor (e.g.
\\server\share).Network Credentials — username and password used to access the watched folder.
4.3.9.8. PACS
The PACS settings page allows querying a connected DICOM node (PACS system) and importing studies directly from it into the project. The available DICOM nodes are taken from the project’s configured Hosts entries of type DICOM Node.
4.3.9.9. Parameter Templates
The Parameter Templates section lets project managers create and manage Parameter Form Templates — structured data-entry forms that project members fill in for individual Agora objects. Templates specify the fields, their types, and validation rules. Once created, they appear in the Forms tab of the detail panel for the object types they are configured for.
See Parameter Form Templates for full documentation.
4.3.9.11. Delete Project
Permanently deletes the project and all its data. This action cannot be undone. Only project managers can delete a project.
4.3.10. Trash Box
When deleting files or data elements from a project, these items are moved to the trash box. From the trash box elements may be recovered or irrevocably deleted.