6. Maintain Agora
6.1. Update Agora
it is recommended to maintain your Agora installation up-to-date. Updating Agora to the newest version is a simple process. To prepare for a version update, performing a full database backup upfront is recommended. This is described in the next paragraph. Also plan the update to take place in a period with no user activity, as the process requires 2-5 minutes of downtime.
To update Agora without backup, type gtagora update.
gtagora will suggest to update to the latest version for which a license is available. After accepting, the tool will download the new container images and restart Agora.
Important
Always use the latest version of the gtagora tool. The command gtagora update will check for a new version of the gtagora tool. If a new version exists, update the tool with gtagora update-installer.
6.1.1. Upgrading to Agora 8
Version 8 moves Agora to a new major version of its underlying framework and requires PostgreSQL 17. Installations that still run an older PostgreSQL version have to update the database once, with gtagora db update, before Agora itself can be updated. gtagora update refuses to update to version 8 until this has been done.
1. Check the current database version
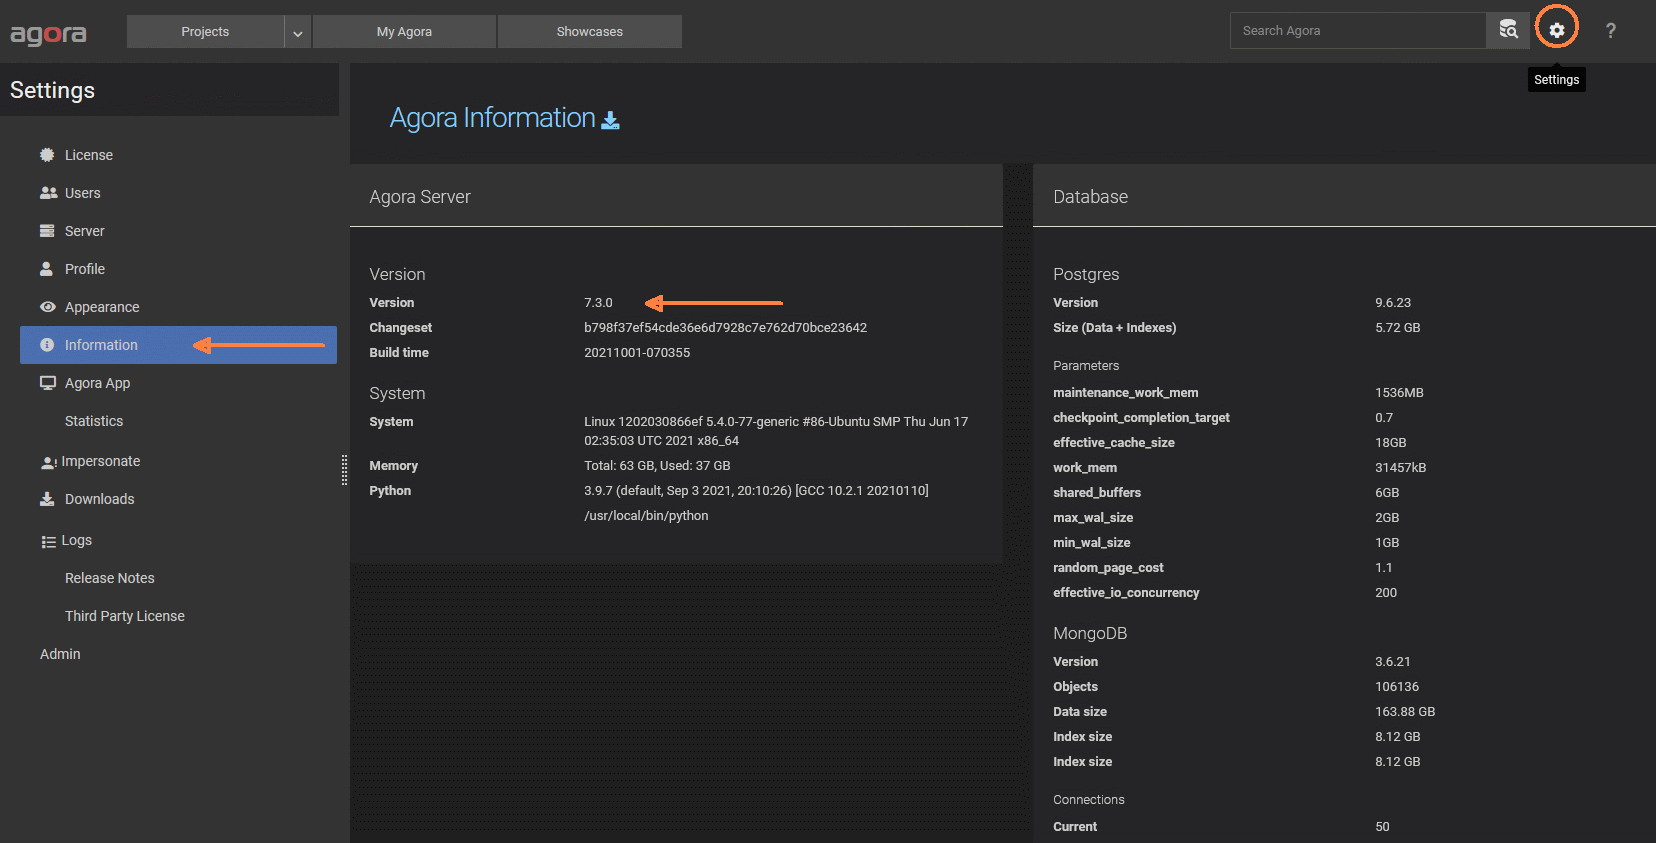
Open Settings → Information and look at Version under Database → Postgres.
If the version starts with
17, the database is already up to date. Skip step 4.Any lower version (e.g.
9.6or13) has to be updated.
2. Update the installer
sudo gtagora update-installer
The database update for version 8 is only available in a recent version of the gtagora tool.
3. Make a backup
Create a backup of the database as described in Backup, or follow Update with the possibility to return to the previous version below. Plan the update for a period with no user activity: Agora is stopped during the database update, and on large installations dumping and restoring the database can take considerably longer than a normal update.
4. Update the database
sudo gtagora db update
The command shows the database directory and asks for confirmation. It then:
checks that enough disk space is free — about half the size of the current database, on the volume that holds the database directory,
stops Agora,
writes a dump of the database,
moves the current database files aside as a backup,
creates a new database with PostgreSQL 17, restores the dump into it, and verifies it.
If anything fails while the new database is created, the command rolls back on its own: the old database files and the previous configuration are restored, and Agora can be started again with sudo gtagora start.
After a successful update, Agora is left stopped. Two safety copies are kept next to the database directory:
the dump, in the folder
db_update_dumps,the old database files, in a folder named after the database directory with the old version and a timestamp appended (e.g.
<database directory>_13_20261001_093000).
5. Update Agora
sudo gtagora update
This updates Agora to version 8 and starts it. The Agora database is migrated automatically on this first start, which can take longer than the usual 2-5 minutes on large installations.
6. Verify and clean up
Log in and check that Settings → Information now shows the new Agora version and Postgres version 17. Once you are confident that everything works, the safety copies from step 4 can be deleted to free disk space.
Note
If gtagora update stops with the message Cannot update to Agora 8… because the postgres database needs to be updated first, the database update of step 4 is still missing. The message shows the current and the required database version. Nothing has been changed at that point; run sudo gtagora db update and repeat the update.
Also note for version 8:
Check your license. A license is issued for a range of Agora versions. If the license does not cover version 8, Settings → License reports that it does not support the installed version; renew or upgrade the license in that case.
Anatomy detection starts on its own. Studies that are already in Agora are classified by a nightly job, so the detected anatomy appears gradually after the update and causes additional load during the first nights. The feature can be switched off under Settings → Server → General → Classification (see Anatomy Detection).
6.2. Update with the possibility to return to the previous version
Open Agora in the Browser and take note of the current version
Shutdown Agora
gtagora stop
Backup the
config.jsonand the coresspondingdocker-compose.ymlfile
cp /etc/gyrotools/agora/config.json /backup/
cp /etc/gyrotools/agora/docker-compose.yml /backup/
Create a backup directory. Make a copy of the docker volumes
agora_dbandagora_mongo.
rsync -aP /path/to/agora_db /backup/
rsync -aP /path/to/agora_mongo /backup/
Important
It is important to shut down Agora before copying the database folders. Copies of database folders created during operation are not reliable backups!
Tip
To find out which directory a Docker volume points to, the docker volume inspect VOLUME_NAME command can be used.
Update Agora
gtagora update
The update command will restart Agora. Check if Agora works properly.
If it becomes necessary to restore Agora to the old version (eg because of a failed update), proceed as follows:
Shutdown Agora
gtagora stop
Restore the database backups
rm -rf /path/to/agora_db/*
rm -rf /path/to/agora_mongo/*

rsync -aP /backup/agora_db/ /path/to/agora_db/
rsync -aP /backup/agora_mongo/ /path/to/agora_mongo/
Restore the configuration
cp /backup/config.json /etc/gyrotools/agora/
cp /backup/docker-compose.yml /etc/gyrotools/agora/
Apply the changes
gtagora rebuild
Start Agora
gtagora start
6.3. Update to a specific version
gtagora update <VERSION> updates agora to the specified version.
Important
Downgrades are generally not possible. The result could be a serious loss of data.
6.4. Update Agora-Installer
When the wizard (gtagora without arguments) is started, it automatically checks if a new version of the Agora installer is available.
The Agora installer can also be updated with the gtagora update-installer command.
To update the Agora Installer manually, download it from from http://download.gyrotools.com/download/getagora/gtagora and save the binary in /usr/bin/. Before you can run the binary, set the appropriate persmission (chmod +x /usr/bin/gtagora)
6.5. Move data
It may be necessary to move an Agora storage location to another disk. This may be to replace an old disk or to store the data on a larger or faster disk.
Important
Special care should always be taken when copying or moving data, as errors can happen all too quickly. Make sure that you have a backup of the data in any case.
Before you start moving or copying data, stop the Agora. Otherwise it can lead to serious data loss or even worse to a corrupt database. Agora uses docker volumes to store data. With the following command all volumes can be displayed. The volumes are created by the installer. The most important volumes in Agora are:
agora_data_1: contains the data filesagora_db: contains the database files
The following is an example of how to move Agora database data. It works exactly the same with all other data volumes.
Stopping Agora
gtagora stop
Check if all agora container are down
docker ps

docker ps
CONTAINER ID  IMAGE  COMMAND  CREATED  STATUS  PORTS  NAMES
Now inspect the volume that you want to move (one of agora_db, agora_data_1, agora_log, agora_nginx)
docker volume inspect <VOLUME_NAME>

[
    {
        "CreatedAt": "2020-05-19T23:25:29+02:00",
        "Driver": "local",
        "Labels": {},
        "Mountpoint": "/var/lib/docker/volumes/agora_db/_data",
        "Name": "agora_db",
        "Options": {
            "device": "/data/test4/volumes/db",
            "o": "bind",
            "type": "none"
        },
        "Scope": "local"
    }
]
The “device” value should reflect the current data location of this volume. Copy or move the data to a new location.
rsync -aP /data/test4/volumes/db /data_new/test4/volumes/db
Now we recreate the volume with the new location:
docker volume rm agora_db
docker volume create agora_db --opt type=none --opt device=/data_new/test4/volumes/db --opt o=bind
Important
It can happen that Docker stops with the error message “Volume in use” when deleting volumes. To solve this problem you should first check if there are really no relevant containers running.
docker ps
Then you can show all containers that have a reference to a certain volume. For VOLUME_NAME use the name of the volume you want to move.
docker ps -a --filter volume=VOLUME_NAME
The list should only show you containers with status=exited
Now delete all the exited containers:
docker rm $(docker ps -q --filter status=exited --filter volume=VOLUME_NAME)
Try again to delete the desired volume.
Start Agora
gtagora start