13. Tasks
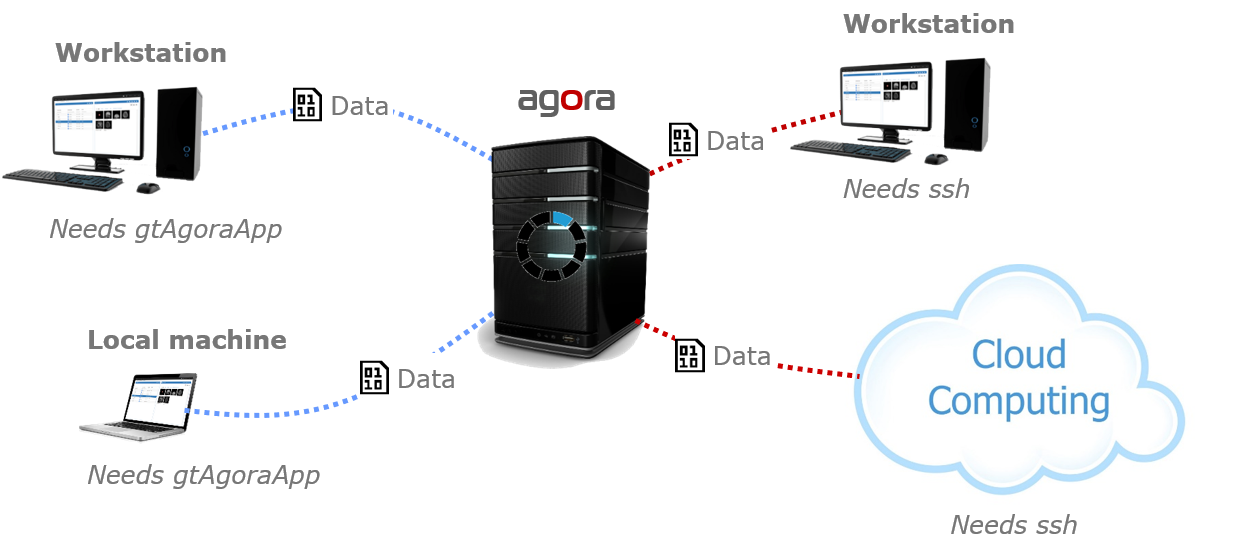
A task is an arbitrary program started from within Agora. Tasks can receive Agora objects (datasets, series, studies, folders) or user-defined parameters (strings, integers, floats, booleans) as inputs, run on the local machine or on any SSH-accessible server, execute natively or inside a Docker/Podman container, and optionally import their results back into Agora automatically when finished.
Tasks are managed in the project settings under the Tasks menu.

Two task types are available: UI Tasks configured through a form, and Script Tasks defined in YAML.
13.1. UI Tasks
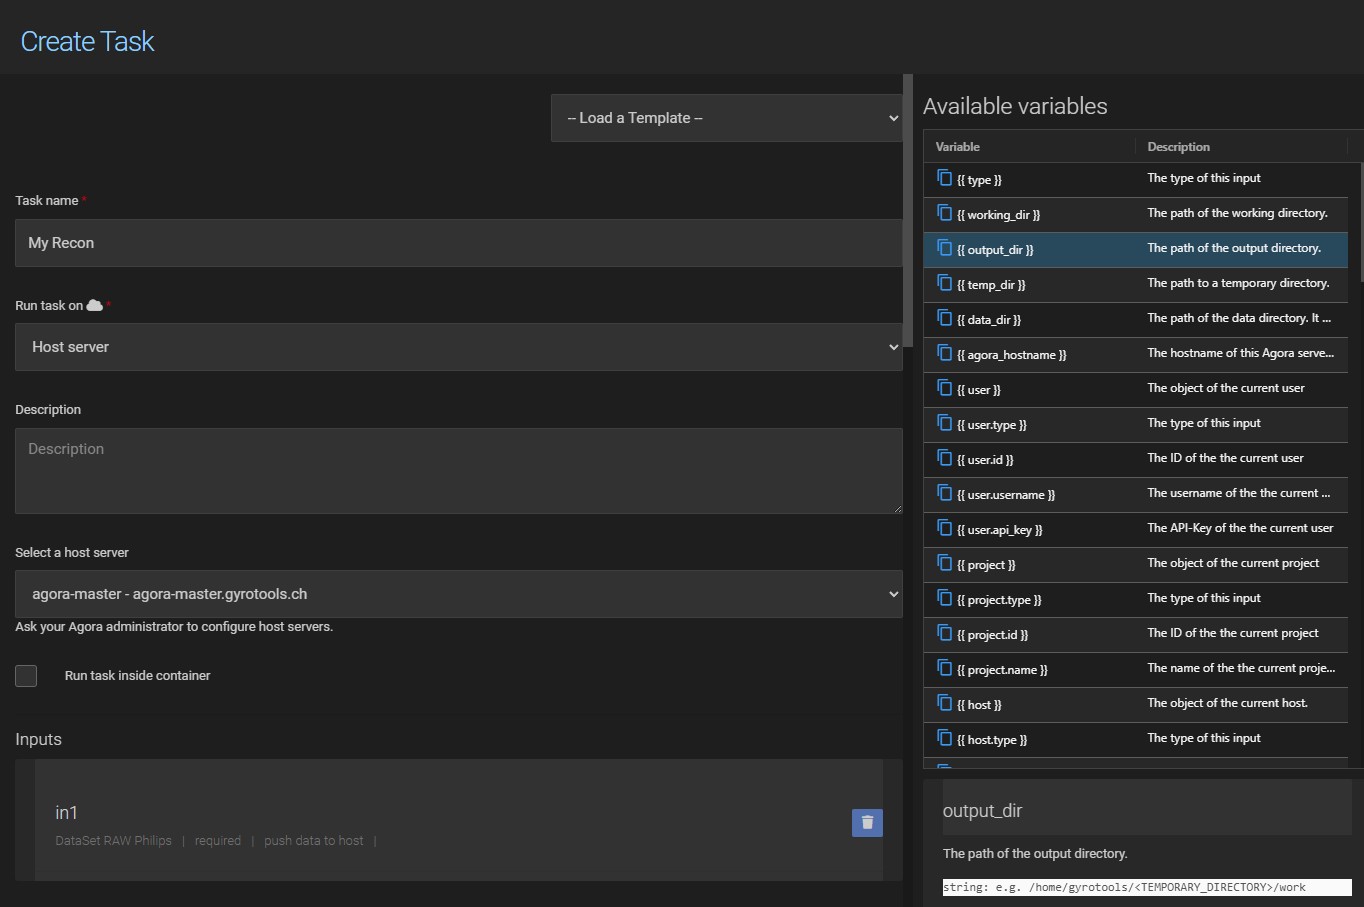
A UI task is configured through a form in the task definition page. Click New in the task list to open it.
13.1.1. Task Name
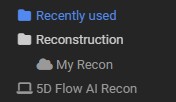
The task name determines where the task appears in the task menu. Use forward slashes to create a nested menu structure:
Reconstruction/My Recon
produces a Reconstruction submenu containing the My Recon entry:
13.1.2. Execution Target
Run task on controls where the task executes:
Local client computer — runs on the machine the user is currently using in the browser. Requires the gtAgoraApp to be installed and running (see Local Tasks).
Host server — runs on a remote server via SSH. The desired server must first be added in the project’s Host settings (see Hosts).
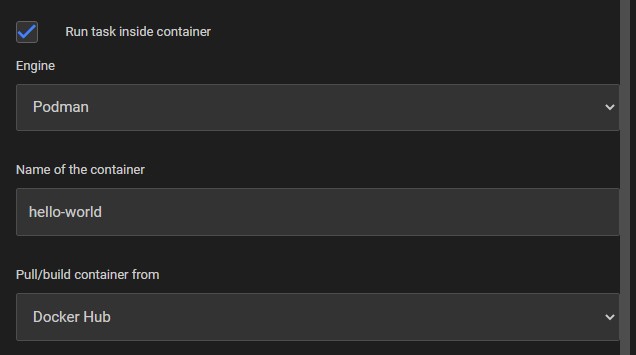
13.1.3. Container
Enable Run task inside a docker container to execute the command inside a Docker or Podman container. Enter the name of the pre-built container image and optionally specify volumes to mount.
Note
Agora follows the standard Docker pull behaviour: if the specified image is not already available on the host, it will be pulled automatically from Docker Hub or from the configured private Docker repository host.
13.1.4. Inputs
Each input has a name, a key (used as the placeholder prefix), a type, and an optional required flag. The type can be any Agora object (Dataset, Series, Study, Folder) or a scalar (string, integer, float, boolean). For Dataset inputs, the expected dataset format can be further restricted.
13.1.5. Command Line
The command that is executed. Inputs and paths are referenced using {{ placeholder }} syntax. The list of available placeholders for the configured inputs is shown on the right-hand side of the task definition page.
13.1.6. Additional Parameters
Success code — the exit code that marks a successful run. Any other exit code marks the task as failed. Defaults to
0.Parse output for error — a regular expression applied to the program output. If it matches, the task is marked as failed regardless of the exit code.
Outputs — after the task completes, Agora searches the working directory (
{{ working_dir }}) for files matching the configured output type and imports them into Agora automatically.Default Target Path — the default Agora folder path where task outputs are imported (e.g.
/My Agora/results). This can be overridden at runtime when starting the task.
13.1.7. Examples
1. Open a file in Notepad (local task)
Opens any file of type Other in Windows Notepad on the local machine:
Name: Viewers/Open in Notepad
Run task on: Local client computer
Input:
  Key: file  |  Type: DataSet  |  Type: Other  |  Required: yes
Command line: notepad {{ inputs.file.file.path }}
Outputs: No Output

2. Print dataset file information
A simple Python task that uses only the standard library to print the name and size of every file in a dataset. No external dependencies are required.
Name: File Info
Run task on: Host server  (select the configured host)
Input: Key: in1 | Type: DataSet | Type: Other | Required: yes
Command type: Python Script
    Python executable path: python OR python3
Command line:
    import os
    path = '{{ inputs.in1.path }}'
    print(f'size: {os.path.getsize(path):,} bytes')
Outputs: No Output
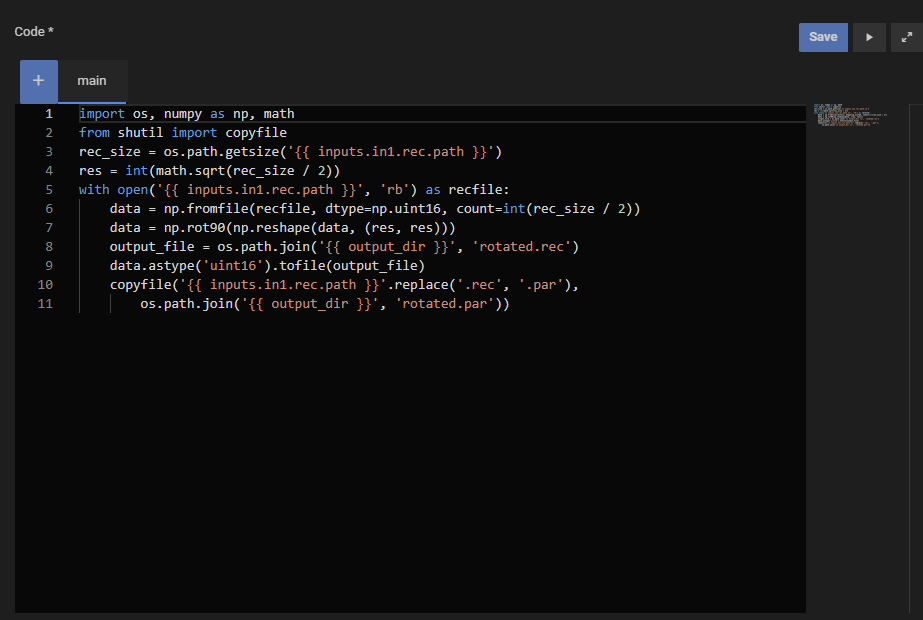
3. Rotate a PAR/REC dataset in a Docker container
Rotates a PAR/REC image by 90° using the gyrotools/gtagora-connector-py container, which includes numpy. The rotated REC file and its PAR header are written to the output directory and imported back into Agora.
Name: Python/Rotate PAR/REC
Run task on: Host server  (select the configured host)
Run inside docker container: yes  |  Container name: gyrotools/gtagora-connector-py
Input: Key: in1 | Type: DataSet | Type: ParRec | Required: yes
Command line (script_type: python):
  import os, numpy as np, math
  from shutil import copyfile
  rec_size = os.path.getsize('{{ inputs.in1.rec.path }}')
  res = int(math.sqrt(rec_size / 2))
  with open('{{ inputs.in1.rec.path }}', 'rb') as recfile:
      data = np.fromfile(recfile, dtype=np.uint16, count=int(rec_size / 2))
      data = np.rot90(np.reshape(data, (res, res)))
      output_file = os.path.join('{{ output_dir }}', 'rotated.rec')
      data.astype('uint16').tofile(output_file)
      copyfile('{{ inputs.in1.rec.path }}'.replace('.rec', '.par'),
          os.path.join('{{ output_dir }}', 'rotated.par'))
Output: Auto (default)
13.2. Script Tasks
Script tasks are defined in YAML and are inspired by GitLab CI/CD pipelines. A script task consists of one or more jobs, each running a script on a host. Jobs can be grouped into stages to control execution order, share data via artifacts, and receive Agora objects or user-defined parameters as inputs.
To create a new script task, select Script Task from the dropdown on the task toolbar:

The YAML is written in an editor directly in the task definition page. A task can also consist of multiple files (e.g. a separate Python or Matlab script), which are added as additional tabs in the editor and referenced from the main file using template variables.
13.2.1. Structure
A script task file has the following top-level keys:
stages:       # optional – defines stage order
  - stage1
  - stage2

inputs:       # optional – declares inputs
  my_input:
    type: dataset
    ...

my_job:       # one or more job definitions
  host: my_host
  script: echo "hello world"
Any key that is not stages or inputs is treated as a job definition.
13.2.2. Stages
By default all jobs run in parallel. Use stages to impose a sequential order. Jobs belonging to the same stage run in parallel; stages run one after another in the order they are declared.
stages:
  - build
  - test

compile:
  stage: build
  host: my_host
  script: echo "building..."

run_tests:
  stage: test
  host: my_host
  script: echo "testing..."
13.2.3. Inputs
Inputs are declared under the top-level inputs key. Each input has a name and the following fields:
Field |
Required |
Description |
|---|---|---|
|
yes |
Type of the input. Agora object types: |
|
if |
Restricts which dataset format is accepted. One of: |
|
no |
If |
|
no |
If |
|
no |
Default value for scalar inputs ( |
|
no |
Minimum and maximum value for |
Example:
inputs:
  scan:
    type: dataset
    dataset_type: nifti1
    push_data: true
    required: true
  output_name:
    type: string
    default: result.nii
    required: false
13.2.4. Job Fields
Each job is a top-level key whose value is an object with the following fields:
Field |
Required |
Description |
|---|---|---|
|
yes |
Name of the SSH host on which the job runs (as configured in the project’s Host settings). Use |
|
yes* |
The script to execute. Multi-line scripts are written with the YAML block scalar |
|
no |
Interpreter for the script. One of: |
|
no |
The stage this job belongs to. Must match a name declared in the top-level |
|
no |
A human-readable description of the job, shown in the task runner UI. |
|
no |
Docker/Podman image to run the script in (e.g. |
|
no |
Build a container image on the fly from a Dockerfile stored in the task files. Requires |
|
no |
Container runtime: |
|
no |
Name of a Docker Repository host (configured in Host settings) from which to pull the image. |
|
no |
Additional arguments passed to |
|
no |
Output files or directories produced by this job (see Artifacts below). |
|
no |
A map of environment variables to set before the script runs. |
|
no |
If |
|
no |
If |
|
no |
Options for Python execution. |
|
no |
Options for Matlab execution. |
|
no |
Expected exit code for a successful run. Defaults to |
|
no |
Maximum execution time in seconds before the job is cancelled. |
13.2.5. Artifacts
Artifacts are files or directories produced by a job that should be persisted — either to pass to a subsequent job or to import back into Agora. Each artifact has a name and the following fields:
Field |
Required |
Description |
|---|---|---|
|
yes |
Path to the file or directory on the host. Supports |
|
no |
If |
|
no |
Destination folder path in Agora where the artifact is imported (e.g. |
An artifact defined in one job is accessible in all subsequent jobs via {{ artifacts.<name>.path }}.
13.2.6. Template Variables
Scripts and field values support Jinja2-style template variables ({{ ... }} for values, {% if ... %} for conditionals):
Variable |
Description |
|---|---|
|
A unique temporary directory on the host for writing output files. Always use this as the base path for artifacts. |
|
Fields of an input object, e.g. |
|
Path to an artifact produced in a previous stage. |
|
Inline content of another file in the task, referenced by its path without extension (e.g. |
|
Address of the current Agora server. |
|
API key of the user who started the task. |
|
ID of the current project. |
|
Timestamp of when the task was started. |
13.2.7. Examples
Hello World (native):
hello_world:
  host: my_host
  script: echo "hello world"
Hello World (in a container):
hello_world:
  host: my_host
  image: ubuntu:22.04
  script: echo "hello world"
Python script:
hello_python:
  host: my_host
  script_type: python
  python_options:
    executable: python3
  script: |
    print("hello world")
Two stages sharing data via artifacts:
stages:
  - build
  - test

create_file:
  stage: build
  host: host_1
  script: |
    echo "created in build stage" > {{ output_dir }}/build.txt
  artifacts:
    output:
      path: "{{ output_dir }}/build.txt"

print_file:
  stage: test
  host: host_2
  script: |
    cat {{ artifacts.output.path }}
Inputs, artifacts and import back into Agora:
inputs:
  nifti:
    type: dataset
    dataset_type: nifti1
    push_data: true
  target_filename:
    type: string
    default: new_filename.nii

process:
  host: my_host
  script: |
    cp {{ inputs.nifti.file.path }} {{ output_dir }}/{{ inputs.target_filename.value }}
  artifacts:
    result:
      path: "{{ output_dir }}/{{ inputs.target_filename.value }}"
      import: true
      import_path: "/My Agora/results"
For more examples, see the predefined templates available in the task definition page.
13.3. Where Tasks Run
13.3.1. Local Tasks
A local task runs on the machine the user is currently using. The gtAgoraApp must be installed and running on that machine. If the app is installed on multiple computers and signed in with the same account, Agora will ask the user to select the target machine when starting the task.
13.3.2. Host Server Tasks
Tasks can run on any server accessible via SSH. Add the server as an SSH host in the project’s Host settings first (see Hosts). Once added it appears in the host dropdown of the task definition.
13.3.3. Containers (Docker and Podman)
Both UI Tasks and Script Tasks support running inside Docker or Podman containers. Containers isolate the execution environment and make it easy to reproduce results regardless of what is installed on the host.
Docker is the default container engine.
Podman can run containers without root privileges and uses the same image format. In most cases replacing
dockerwithpodmanin your workflow is sufficient.
The container engine must be installed on the target host. For UI Tasks, select the engine in the task definition form. For Script Tasks, set container_engine: docker or container_engine: podman in the job definition.
13.4. Monitoring Task Output
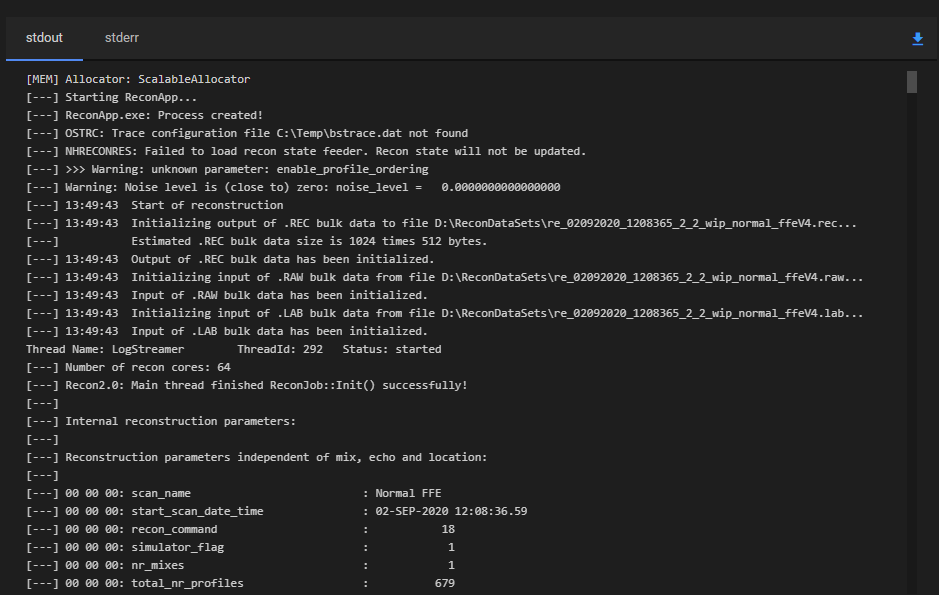
The stdout and stderr output of a running task are visible in its Timeline entry. The output updates in real time while the task is executing, so you can monitor progress without waiting for it to finish. Navigate to the Timeline in the project menu and select the relevant task run entry to open the detail panel.
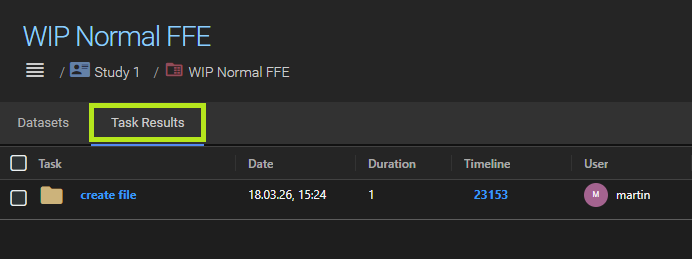
13.5. Task Results
When a task is configured to import its output files back into Agora (via Outputs in a UI Task or artifacts with import: true in a Script Task), the results are imported automatically when the task finishes.
Import destination
The default destination for task results is the same location as the task inputs — the folder, series, or study from which the task was started. Two ways to change this:
At runtime — when starting a task the user can select an alternative target folder in the run dialog.
In the task definition — a Default Target Path can be specified in the task definition (e.g.
/My Agora/results). This path is pre-filled in the run dialog and used as the default if the user does not override it.
Results in a series
If the task input was a series (or a dataset within a series), the results are imported back into that same series. However, task results inside a series are treated differently from the series’ native datasets:
By default, task results are displayed on a separate Results tab in the series detail view, keeping them visually distinct from the original acquisition data.
In the project settings, you can disable Display task results in a seperate tab. When disabled, task results appear together with the native datasets in the main dataset list. They are marked with a small task result badge so they can still be distinguished.

Managing task results
Two additional actions are available for task results within a series:
Delete all task results — removes all imported task results from the series at once.

Import result — promotes a task result to a regular dataset. Once imported, it is no longer marked as a task result and is indistinguishable from any other dataset in the series.

13.6. Batch Mode
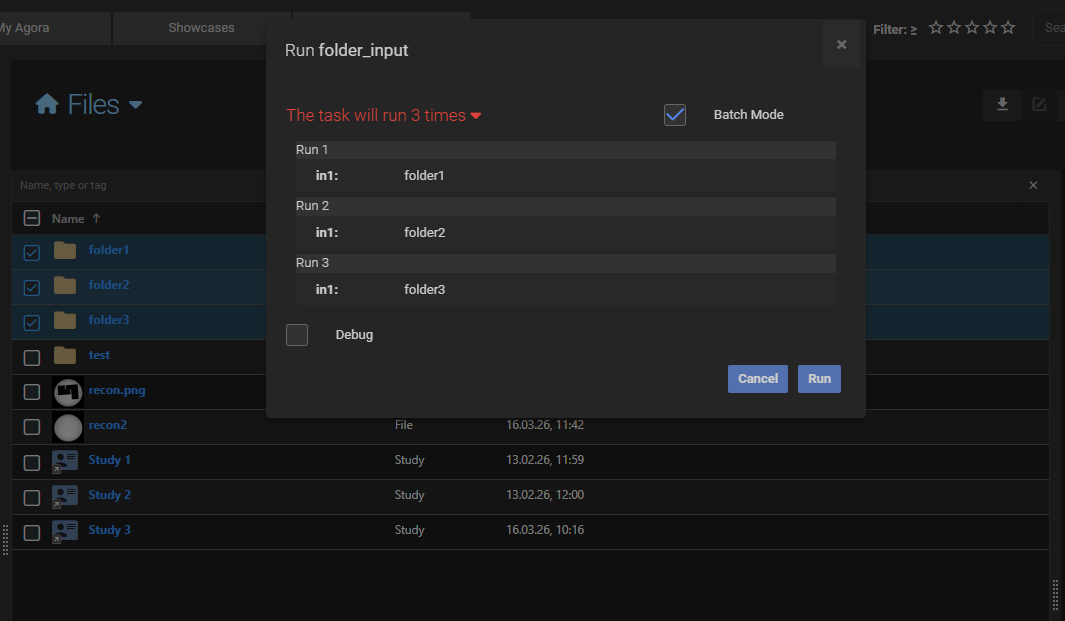
When a task has object inputs (datasets, series, studies, or folders), Agora can run it automatically multiple times — once for each matching set of inputs. This is called batch mode.
Selecting multiple objects of the same type
If the task expects a single folder and you select three folders before starting the task, Agora runs the task three times, once for each folder. The same applies to any other object type: selecting N objects of the matching type produces N task runs.
Using a container as input
If the task expects datasets or series and you select a containing object (a folder, study, or series), Agora expands the container and iterates over its contents:
Folder — Agora traverses the folder recursively and groups the contents by sub-folder path. Each sub-folder whose contents match the task inputs produces one task run.
Study — Agora expands the study into its series and datasets and tries to match them against the task inputs.
Series — Agora expands the series into its datasets.
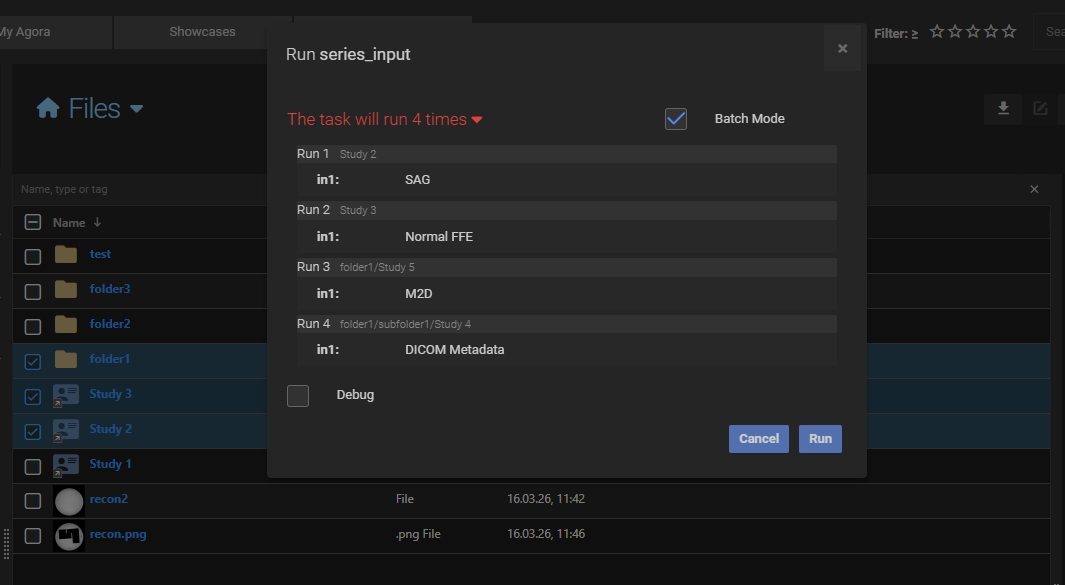
Matching rule for tasks with multiple inputs
When a task defines more than one object input, Agora checks each candidate group strictly: the group must contain exactly the right number of objects for each required input type. If a sub-folder contains too many or too few objects of a given type, that sub-folder is skipped.
For example, if a task expects two nifti datasets and a sub-folder contains three (or more), that sub-folder is skipped — it is ambiguous which two datasets should be used. A sub-folder containing exactly two nifti datasets produces one task run.
Single-input tasks
If the task has only one object input, any container whose contents include at least one object of the correct type will produce a task run for each matching object found.
For example, if a task expects one nifti dataset and we select a folder containing 3, then the task will run three times.
Filtering by name with a regular expression
Each task input can optionally define a regular expression. When set, only objects whose name matches the regex are considered during input matching:
For datasets, the regex is matched against the original filename of each file in the dataset.
For series, studies, and folders, the regex is matched against the object name.
Objects that do not match the regex are invisible to the batch logic, just as if they were not present in the container. This is useful when a folder contains a mix of datasets and the task should only pick up specific ones.
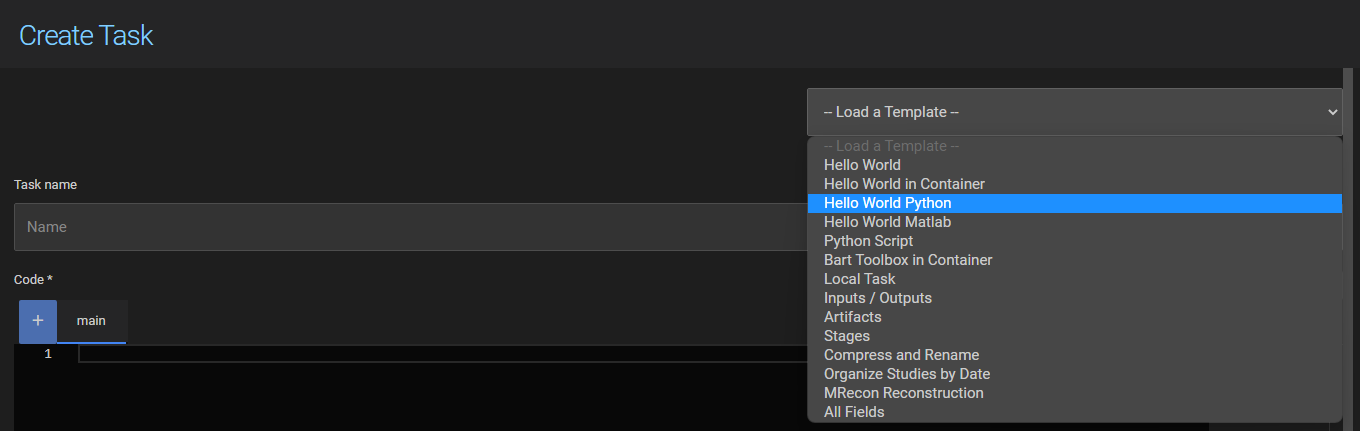
13.7. Task Templates
A set of predefined templates is available at the top of the task definition page. Templates cover common use cases and serve as a starting point for both UI Tasks and Script Tasks.
13.8. How-To Guides
13.8.1. Setup and perform a Philips Recon 2.0 reconstruction
The task below will run a Philips Recon 2.0 reconstruction in the Philips PARADISE environment. It assumes that you have access to the Philips PARADISE environment which is provided as a virtual machine. Please contact your Philips clinical scientist oin order to obtain the VM.
13.8.1.1. Network Integration of Philips PARADISE Environment
The process of making the Philips PARADISE environment accessible from Agora involves deploying the provided VMware machine into your network infrastructure where it can communicate with Agora. This can be accomplished through two primary approaches:
running the VM directly on the same server as Agora
establishing a dedicated hypervisor platform to host the PARADISE environment
When choosing the first approach the virtual machine can be deployed alongside Agora on the same server, providing direct network connectivity and simplified management. This approach minimizes network complexity and ensures low-latency communication between the PARADISE environment and Agora but might put additional load on the host system which can be quite significant.
Alternatively, setting up a dedicated hypervisor platform such as VMware ESXi or Proxmox VE provides greater flexibility
and resource isolation, especially when multiple virtual machines are run in parallel. When using Proxmox as the
hypervisor, the PARADISE environment will need to be converted to KVM format to ensure compatibility with Proxmox’s
QEMU/KVM virtualization technology. One approach for this conversion is to use the virsh tool. Please refer to its
documentation for detailed procedures.
Setting up the PARADISE VMware on the network ensures that Agora can establish a ssh connection and transfer data.
13.8.1.2. OpenSSH Server Installation
To enable secure communication between Agora and the Philips PARADISE environment, you need to install and configure an OpenSSH server in the virtual machine machine. Follow these steps to set up the OpenSSH server:
1. Download OpenSSH ZIP
Go to: Win32-OpenSSH Releases
Download the latest release (e.g.,
OpenSSH-Win64.zip).
2. Extract the Files
Right-click the ZIP and select Extract All…
Extract to:
C:\Program Files\OpenSSHServer(Create this folder if it doesn’t exist.)
3. Add OpenSSH to System Path
Open Settings > System > About > Advanced system settings > Environment Variables
Under System variables, select
Pathand click EditAdd:
C:\Program Files\OpenSSHServerClick OK to save.
4. Install the SSH Server as a Service
Open PowerShell as Administrator
Navigate to the install folder:
cd "C:\Program Files\OpenSSHServer"
Run the install script:
.\install-sshd.ps1
If blocked, run:
Set-ExecutionPolicy RemoteSigned -Scope Process
5. Start and Enable SSH Server
Start the service:
Start-Service sshd
Enable autostart:
Set-Service -Name sshd -StartupType 'Automatic'
6. Allow SSH in Windows Firewall (Optional)
Open PowerShell as Administrator and run:
New-NetFirewallRule -Name sshd -DisplayName 'OpenSSH Server (sshd)' -Enabled True -Direction Inbound -Protocol TCP -Action Allow -LocalPort 22
7. Test the SSH Server
On your Windows machine:
ssh localhost
Or from another machine:
ssh gyrotest@<YOUR_HOSTNAME_OR_IP>
13.8.1.3. Add the PARADISE Environment as Agoa Host
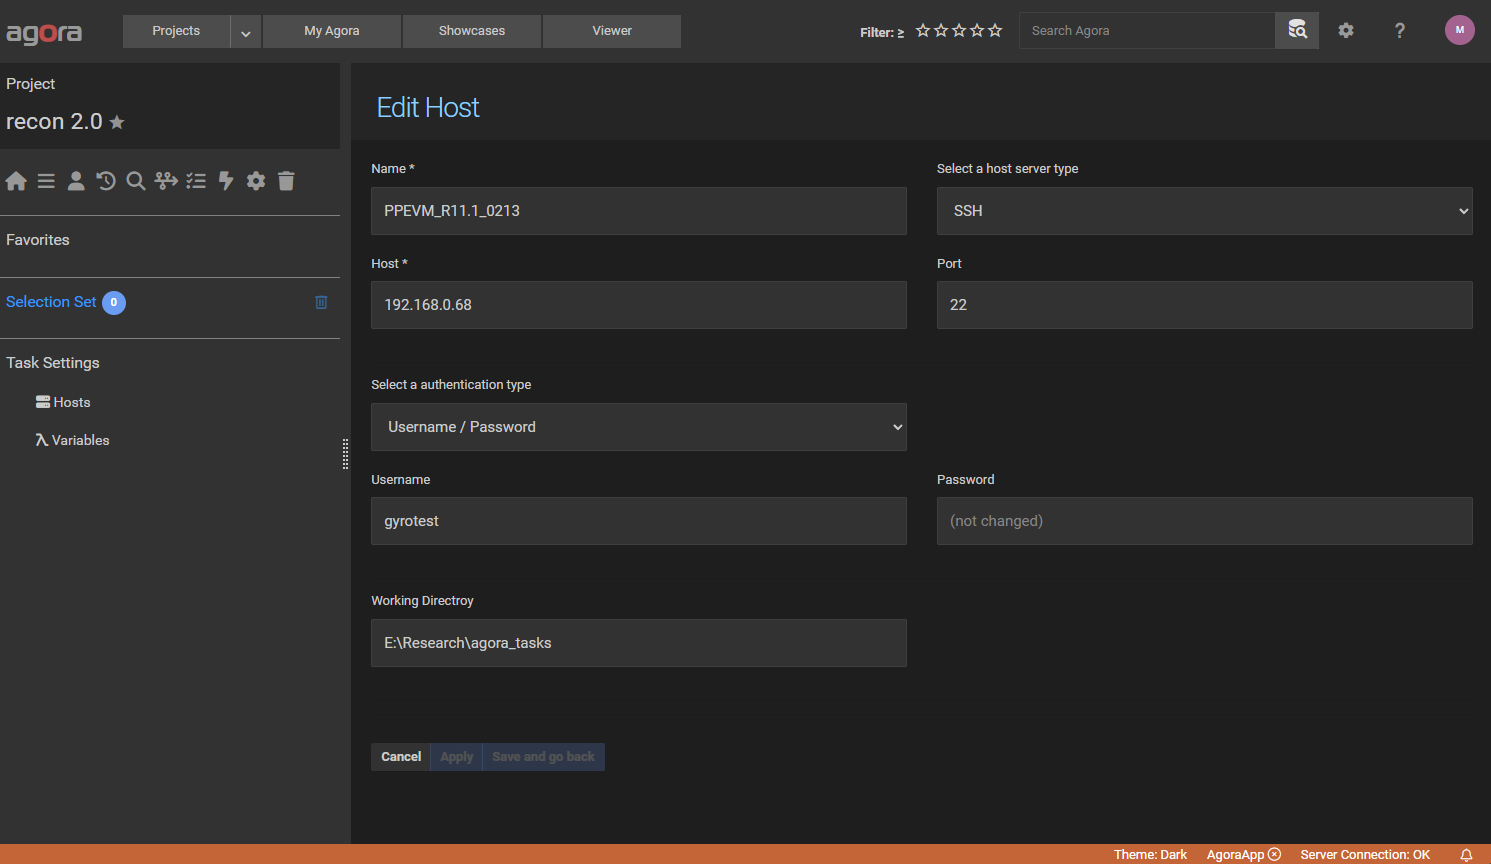
Open the desired Agora project and navigate to the “Tasks” section. In the left sidebar, select “Hosts” and add a new
ssh host like in the screenshot below. Use the IP address of your VMware machine and the username
gyrotest. Also make sure that the working directory exists. After creating the host make sure that the green
checkmark appears in the last column which indicates that the connection was successful.
13.8.1.4. Create a Hello World Task
To verify that the connection to the PARADISE environment is working correctly, you can create a simple “Hello World” task. In the “Tasks” section of Agora, navigate to the “Tasks” tab and create a new Powershell task with the following settings:
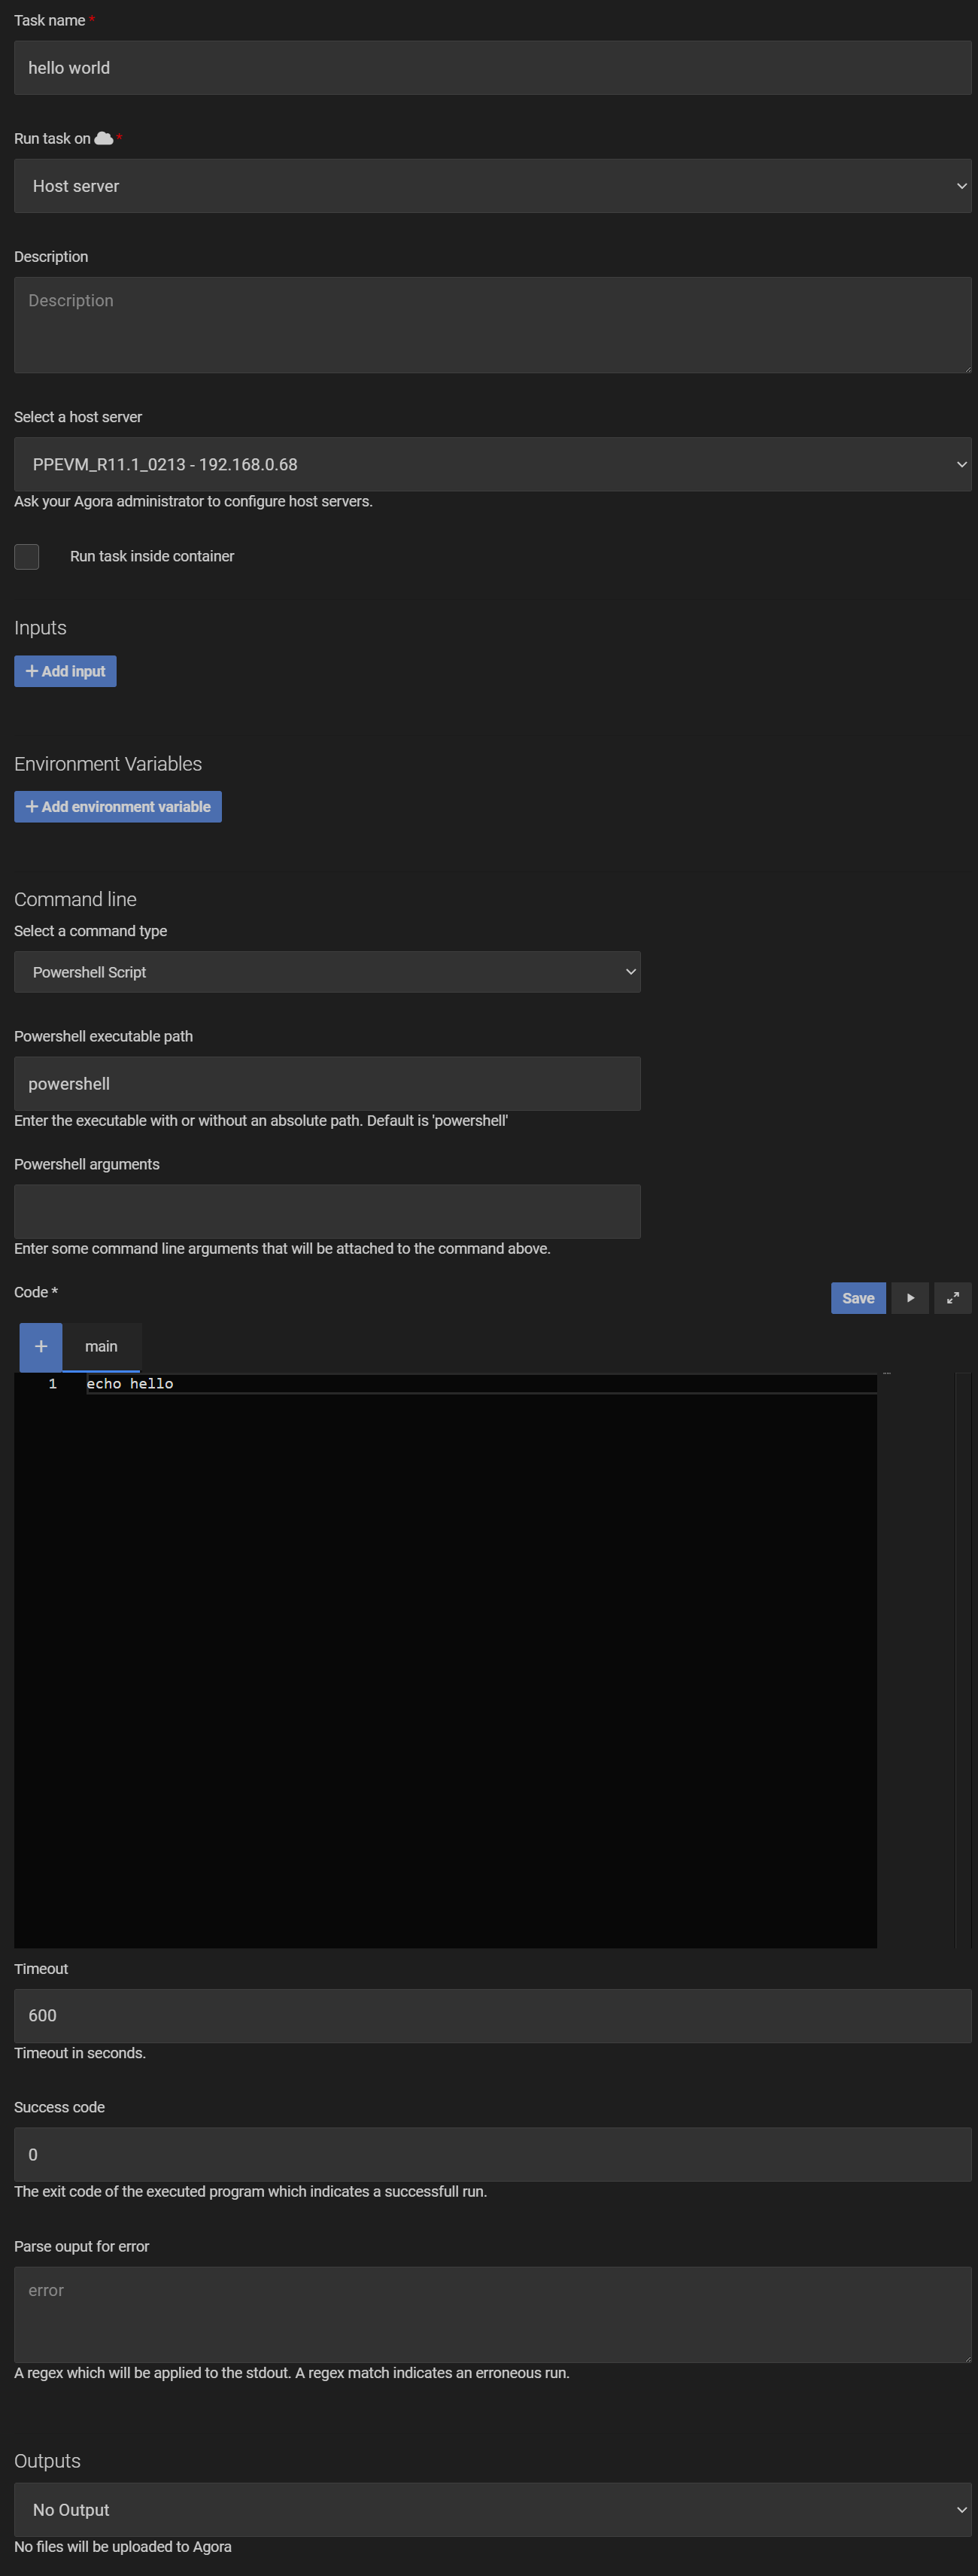
After saving the task, you can run it without inputs and check the log output in the Timeline to verify that the task ran successfully.
13.8.1.5. Reconstruct an Existing Test Dataset
In the next step we will reconstruct an existing test dataset “perfect_toast” which is alreay available in the PARADISE environment. Replace the script from the “Hello World” task with the following code (replace the path definitions to match your release):
# Path definitions
$PPFolder = "G:\Ppe\PPEVM_R11.1_0213"

# Set environment variables
$env:RECON_HOME = "$PPFolder\system\recon\recplatform\res"

# Prepend required directories to PATH
$env:PATH = "C:\nmr\Recon\Recon1.0\Recon-prog;R:\InProductSW\Ruby\ruby-2.4.0\x64\bin;C:\Program Files (x86)\Graphviz-2.38\bin;" + $env:PATH

# Set window title (works in Windows Terminal/PowerShell)
$Host.UI.RawUI.WindowTitle = "Recon 2.0 Developer Console"

# Run oslnm_nu.exe commands
& oslnm_nu.exe MODIFY GROUP GYRO_RECSIM_DISABLE_IMGCOM_INIT FALSE
& oslnm_nu.exe MODIFY GROUP GYRO_REC_USE_AUTOVIEW TRUE

# Run ReconApp_nux.exe with argument
& $PPFolder\system\recon\recplatform\bin\nux\ReconApp_nux.exe -d perfect_toast

# Copy the results to the output folder
& Copy-Item -Path "D:\ReconDataSets\perfect_toast_ClassicReconCppEx.rec" -Destination "{{ output_dir }}\perfect_toast_ClassicReconCppEx.rec"
& Copy-Item -Path "D:\ReconDataSets\perfect_toast_ClassicReconCppEx.xml" -Destination "{{ output_dir }}\perfect_toast_ClassicReconCppEx.xml"
and set the “Outputs” to “Auto”:

The above script will set the required environment variables, run the reconstruction command ReconApp_nux.exe, and copy the results to the
output directory. After saving the task, you can run it without inputs and the resulting rec/xml image dataset will be
uploaded to the selected output folder within Agora.
13.8.1.6. Change the DataSetPath in the recon.conf File
This step is optional but recommended. By default the PARADISE environment will reconstruct datasets which are located
in the D:\ReconDataSets folder. This folder already contains several test datasets including the perfect_toast
dataset we used in the previous step. However, for easier management it is recommended to change the DataSetPath
to an empty folder which is only used by the Agora task. To do this, open the recon.conf file located in
G:\Ppe\<PP_RELEASE_FOLDER>\system\recon\recplatform\res with a text editor and change the DataSetPath variable
to a new folder like in the screenshot below. Make sure that the folder exists.

13.8.1.7. Create the Final Recon 2.0 Task
Modify the previous task and create a “Philips Sin File” input:
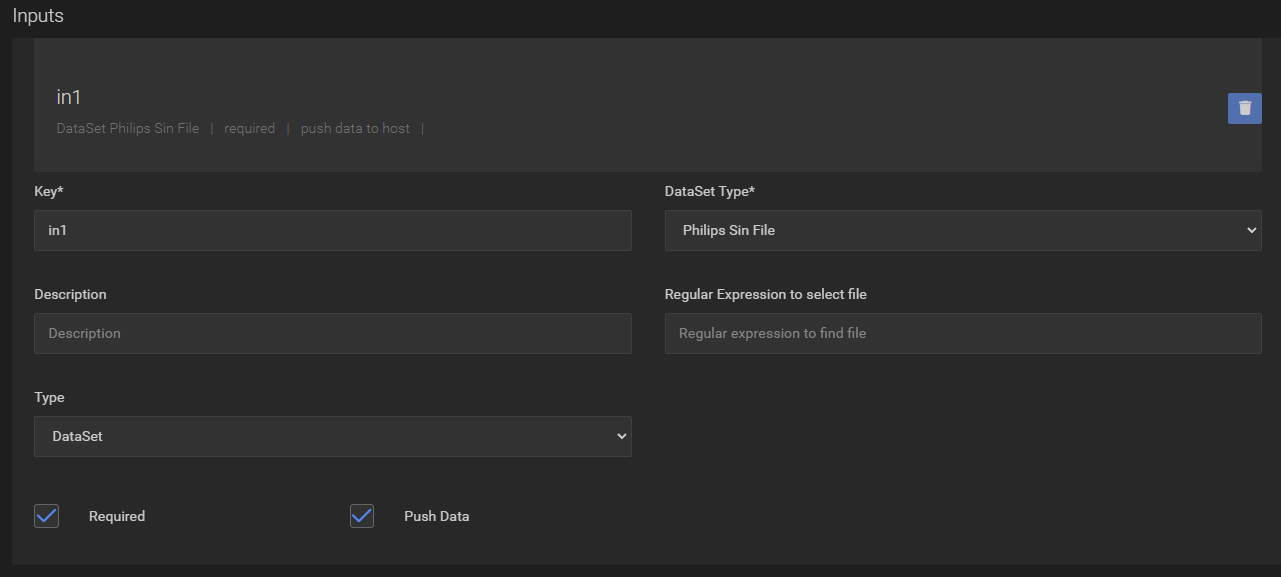
Then replace the script with the following code which will copy the transferred files from Agora into the DataSetPath (defined in the previous step) and run the reconstruction (replace the path definitions to match your release):
# Path definitions
$PPFolder = "G:\Ppe\PPEVM_R11.1_0213"
$DataSetPath = "D:\AgoraReconDataSets"

# Set environment variables
$env:RECON_HOME = "$PPFolder\system\recon\recplatform\res"

# Prepend required directories to PATH
$env:PATH = "C:\nmr\Recon\Recon1.0\Recon-prog;R:\InProductSW\Ruby\ruby-2.4.0\x64\bin;C:\Program Files (x86)\Graphviz-2.38\bin;" + $env:PATH

# Run oslnm_nu.exe commands
& oslnm_nu.exe MODIFY GROUP GYRO_RECSIM_DISABLE_IMGCOM_INIT FALSE
& oslnm_nu.exe MODIFY GROUP GYRO_REC_USE_AUTOVIEW TRUE

# Delete the contents of the DataSetPath (from a previous reconstruction)
Remove-Item "$DataSetPath\*" -Recurse

# Copy the datasets from the temporary task directory into the Recon 2.0 DataSetPath
& Copy-Item -Path "{{ inputs.in1.path }}\*" -Destination "$DataSetPath" -Recurse -Force

# Run ReconApp_nux.exe on the dataset from Agora
& $PPFolder\system\recon\recplatform\bin\nux\ReconApp_nux.exe -d {{ inputs.in1.raw.basename }}

# Copy the results to the Agora output folder
& Copy-Item -Path "$DataSetPath\*.rec" -Destination "{{ output_dir }}" -Recurse -Force
& Copy-Item -Path "$DataSetPath\*.xml" -Destination "{{ output_dir }}" -Recurse -Force
The entire task should look like in the screenshot below:
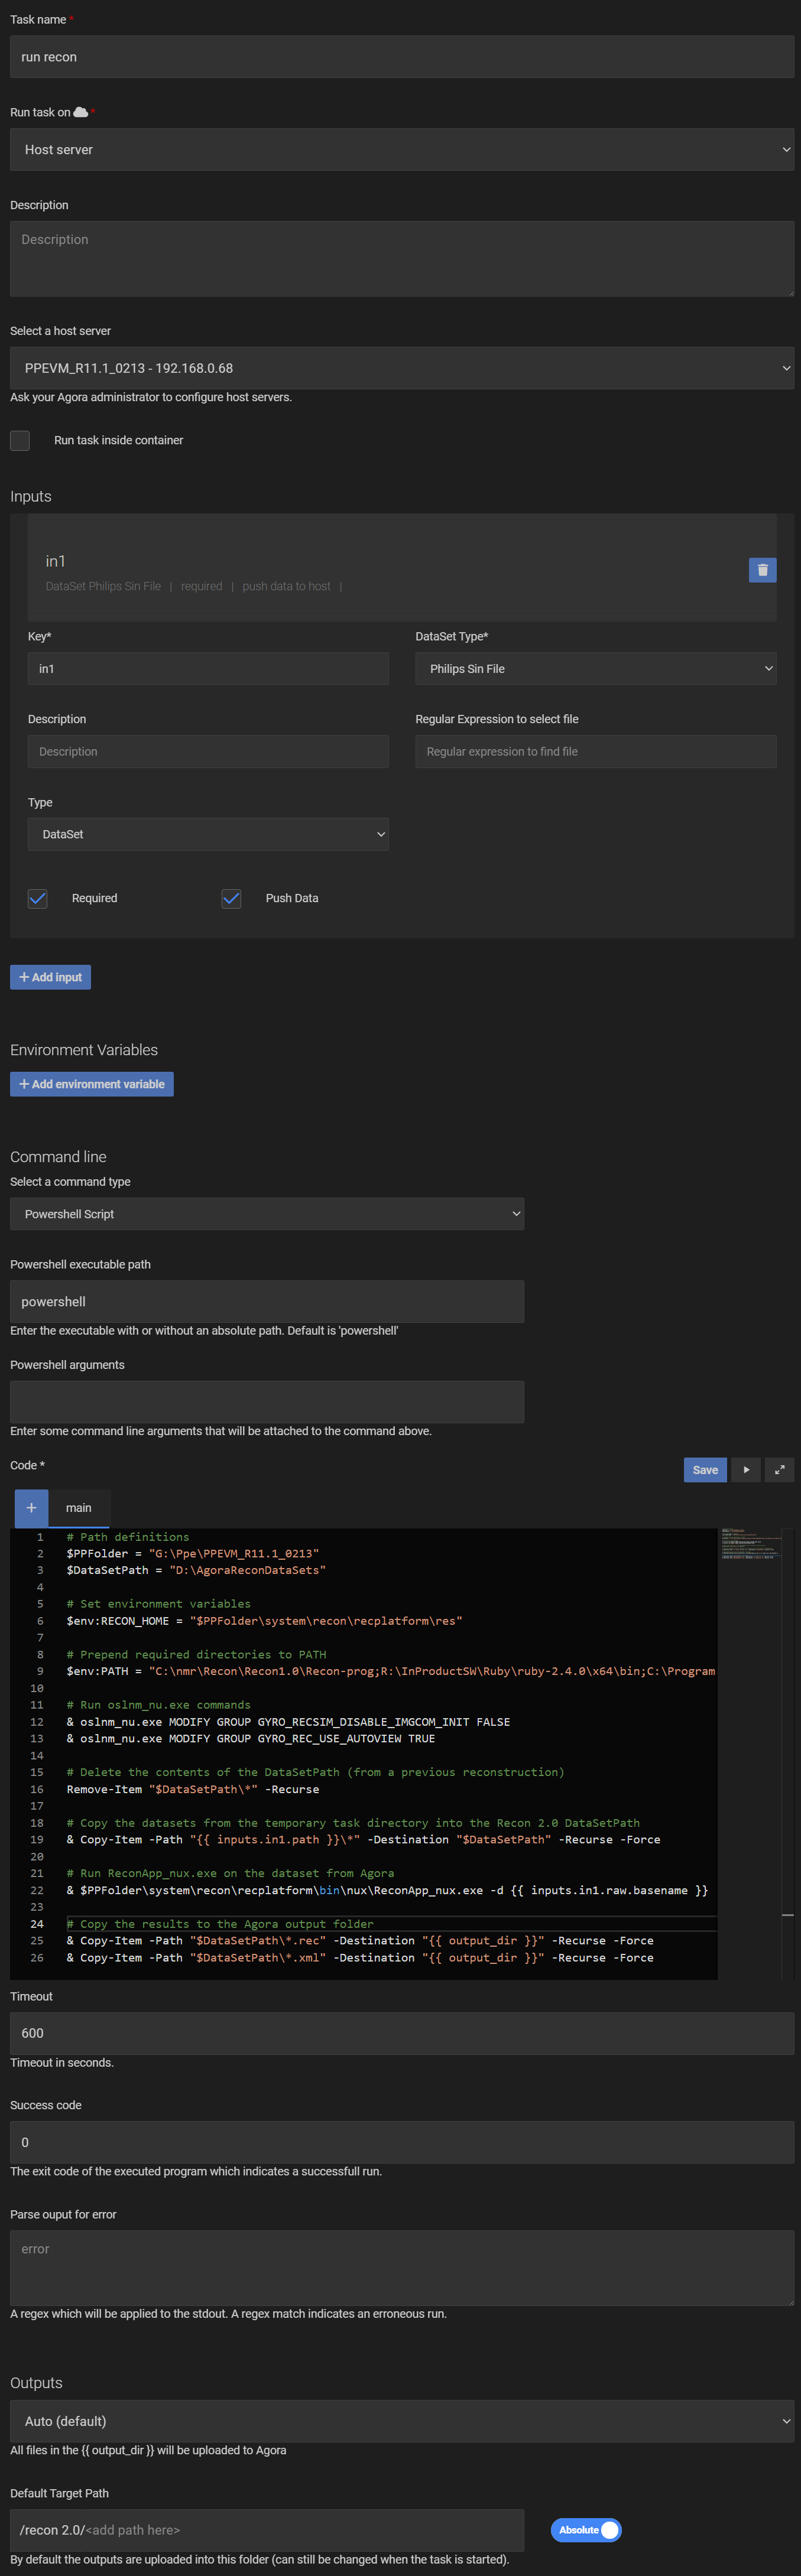
After saving the task, you can now run it with a Philips sin file as input and the reconstructed rec/xml files will be uploaded to Agora to the selected output folder or Series.