8. Managing Data
Agora organises project data using a folder tree, similar to a file system on your computer or a cloud storage service like Google Drive. The folder tree is shown in the left sidebar and reflects the structure of the current project. Each folder can contain subfolders as well as any type of Agora object — studies, series, datasets, and files — all mixed together. Navigating into a folder displays its contents in the center table.
8.1. Creating a Folder
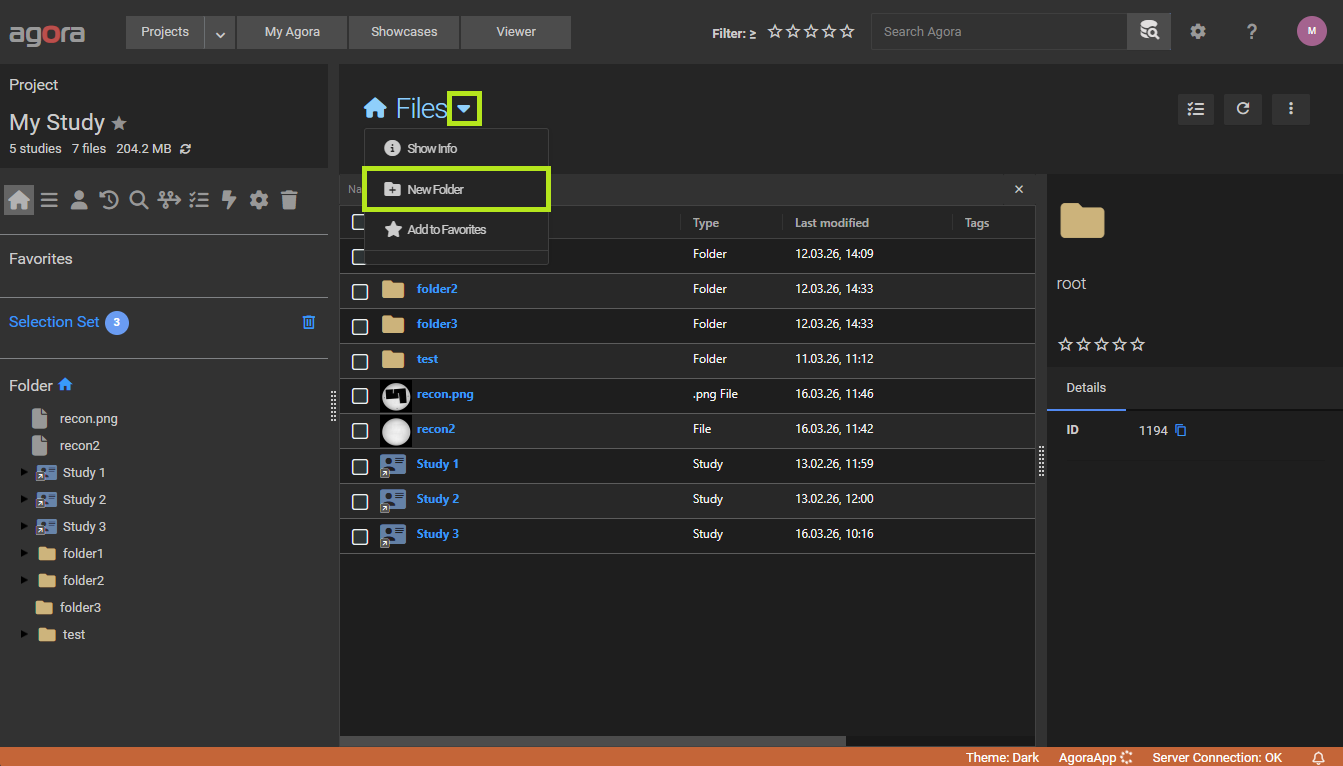
To create a new subfolder inside the current folder, click the folder name (or the icon for the root) at the top of the center table to open its dropdown menu, then select New Folder. Enter a name and confirm.
8.2. Creating Studies and Series
In addition to importing data from a scanner or file upload, you can manually create studies, series, and add datasets to existing structures directly in the browser.
Creating a new study
Navigate to the Study List view. Click the menu next to the Studies heading and select New Study. Enter a name and assign a patient — either by selecting an existing patient from the dropdown or by creating a new one inline. Confirm to add the study to the study list.
Creating a new series in an existing study
Open the study, then click the menu next to the study title and select New Series. Enter a name and confirm. The series is added to the study immediately.

8.3. Creating a Patient
Patients can be created independently of any study. Navigate to the Patient List view, then click the dropdown arrow next to the Patients heading and select New Patient. Fill in the patient details (name, patient ID, date of birth, sex, and weight) and confirm. The new patient appears in the patient list immediately and can then be assigned to studies.
Note
A patient with no studies attached is shown with a warning icon in the patient list. Studies can be reassigned to the patient via the study edit dialog.
8.4. Adding a dataset to an existing series
Open the series, then drag one or more datasets from the folder tree or from another series onto the series view. Agora adds the dropped datasets to the series.
8.4.1. Limitations
Links cannot be dragged into a series. Only actual datasets (not folder references) can be added. If you drag a dataset that is already a link in a folder, the underlying dataset is added to the series directly.
A series can contain at most one raw dataset. Raw dataset types (Philips Raw, Siemens Raw, Bruker Raw, ISMRMRD) are exclusive — adding a second raw dataset to a series that already contains one is not permitted.
Locked studies are read-only. No series or datasets can be added to a study that has been locked by a project manager. The lock must be removed first.
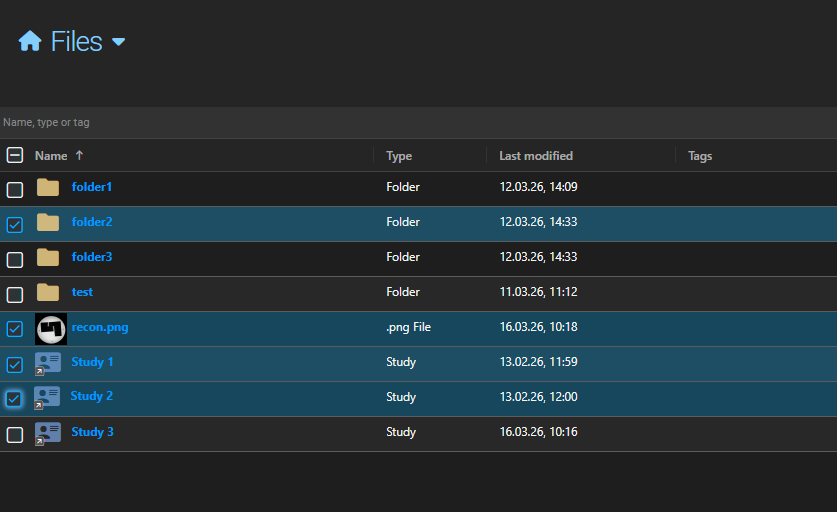
8.5. Selecting Items
Select a single object by clicking its checkbox or icon. For multi-selection, use checkboxes or hold Shift (range select) or Ctrl (individual items) while clicking. Single-clicking a row link opens the item.
8.6. Detail Panel
Selecting an object opens the detail panel in the right-hand sidebar. The panel shows metadata and controls for the selected object. Its contents vary by object type:
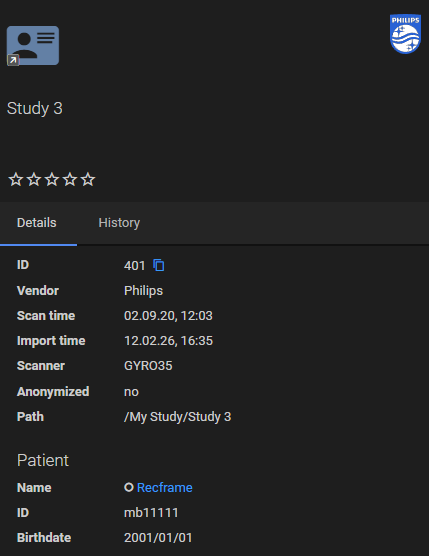
Studies — name, description, tags, rating, scan time, scanner information, anonymization status, patient details, and a list of contained series with thumbnails.
Series — name, tags, rating, scan time, scanner, the parent study (as a clickable link), and contained datasets.
Datasets — name, tags, rating, file type, file size, the parent series and study (as clickable links), and a list of individual files. Image datasets additionally show an image preview tab.
Folders — name, description, tags, rating, and any attached search queries.
All object types also show a History tab with a log of changes made to the object.
When multiple objects are selected the detail panel shows shared tag and rating controls that apply to all selected items at once.
8.7. User-Defined Parameters
In addition to the acquisition parameters automatically extracted from imported files (such as DICOM tags), Agora lets you attach your own custom key/value metadata to any Agora object. These user-defined parameters are organised into named parameter sets and are stored in the Agora database alongside the object.
User-defined parameters are available on:
Studies (exams)
Series
Patients
Folders
To access them, select an object and open the Parameters tab in the detail panel on the right.
8.7.1. Parameter Sets
An object can have multiple parameter sets, each identified by a name (e.g. QA Flags, Processing Results, Subject Info). Using separate sets keeps logically distinct groups of parameters organized and prevents name collisions when parameters come from different sources — for example, one set populated manually and another filled in by a trigger.
Creating a parameter set
Click the button in the Parameters tab toolbar to create a new parameter set. The default name is New parameter set; a suffix (2, 3, …) is added automatically if a set with that name already exists.
Selecting a parameter set
Use the dropdown in the toolbar to switch between the parameter sets attached to the selected object.
Renaming a parameter set
With a set selected, click the pencil button to edit the set name inline. Press Enter or click away to confirm; press Escape to cancel.
Copying and pasting a parameter set
To duplicate a parameter set — either on the same object or onto a different object:
Select the set you want to copy and click the copy button. The set is saved to the clipboard.
Navigate to the target object (or stay on the same one) and open its Parameters tab.
Click the paste button. A new parameter set is created with the same name and parameters as the copied set.
The clipboard persists for the duration of your browser session.
Deleting a parameter set
Select the set and click the delete button. A confirmation dialog will ask you to confirm before the set and all its parameters are permanently removed.
8.7.2. Parameters
Each parameter set contains a table with three columns:
Column |
Description |
Notes |
|---|---|---|
Name |
The parameter name |
Free-form text; must be non-empty before the row is saved. |
Type |
The data type |
One of: |
Value |
The parameter value |
Input control adapts to the chosen type (number field, date picker, true/false dropdown, or text). |
Adding a parameter
Click the button in the toolbar. A new empty row appears at the bottom of the table and the cursor is placed in the Name cell. Fill in the name and value; the row is saved automatically once both the name and value are non-empty.
Editing a parameter
Click any cell in a row to edit it inline. Changes are saved to the server immediately when you leave the cell (single-click edit mode). The Type cell uses a dropdown; changing the type resets the value editor to an appropriate input control.
Deleting a parameter
Select a row (click it) and click the button in the toolbar. The row is removed and the change is saved immediately.
8.7.3. Value Types
The following types are available for parameter values:
Type |
Description |
|---|---|
String |
Any text value (default type for new parameters). |
Integer |
A whole number (e.g. |
Float |
A decimal number (e.g. |
Date |
A date in |
Boolean |
|
Array |
A list of values entered as comma-separated items (e.g. |
8.7.4. Searching by User-Defined Parameters
User-defined parameters are searchable using the Agora Query Language (AQL) in the same way as acquisition parameters. Use the parameter. prefix followed by the parameter name:
parameter.reviewed = true
parameter.score >= 4
parameter."subject.group" = "control"
When the result type is set to Study or Series, the query engine searches both the acquisition parameters on datasets and the user-defined parameters attached directly to the study or series. This means you can use a single parameter query to find objects regardless of whether the parameter was added manually or extracted from an imported file.
See Database Search for the full AQL syntax.
8.7.5. Automating User-Defined Parameters with Triggers
User-defined parameters can be attached to objects automatically using triggers:
The Add Parameter trigger action attaches a fixed set of key/value parameters to the matched object whenever the trigger fires. The parameter set name and key/value pairs are configured in the trigger definition.
The Python Script trigger action can compute parameter values dynamically and return them via the
parametersandparameters_namekeys in the result dictionary.
In both cases, if the trigger fires more than once for the same object with the same parameter set name, the existing set is updated in place (upsert) rather than creating a duplicate.
8.8. Forms Tab
The Forms tab in the object detail panel provides access to Parameter Form Templates — structured, pre-defined forms that guide data entry for an object. Unlike the free-form Parameters tab, each form template specifies exactly which fields appear and their types, ensuring consistent metadata collection across a project.
The Forms tab appears automatically when the selected object type has at least one active template configured in the project settings. Click a template name in the tab to open and fill in the form.
See Parameter Form Templates for full documentation, including how to create templates in project settings, the available field types, and the HTML Layout template syntax.
See Triggers for details on the Add Parameter and Python Script actions.
8.9. Organization Within a Project
Objects can be moved or linked to a different folder within the same project using drag and drop. Select one or more items in the center table, then drag them onto a folder in the left sidebar folder tree.
Folders and files are physically moved to the target folder. Hold Ctrl while dragging to copy them instead of moving them.
Studies, series, and datasets are not physically moved regardless of whether Ctrl is held. Instead, Agora creates a link (a reference) to the object in the target folder. The same study, series, or dataset can therefore appear in multiple folders simultaneously without duplicating any data. Dragging it to another folder adds a new link; it does not remove the existing one.
To place objects in the home (root) folder of the project, drag them onto the home icon at the top of the folder tree.
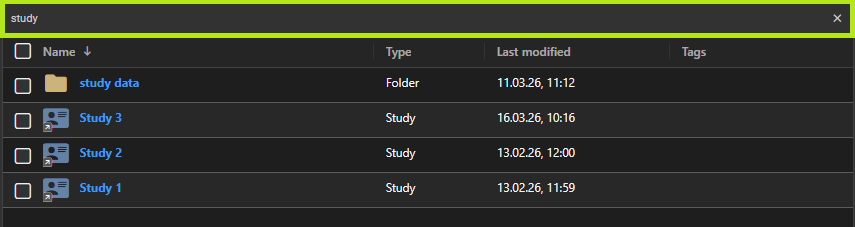
8.10. Quick Search and Filtering
Use the search bar at the top of the center table to filter the objects currently in view. The search matches against the object name, type, and tags as you type. Clear the search by clicking the icon in the search field.
Individual columns can also be filtered and sorted independently. Click a column header to sort by that column; hold Ctrl while clicking multiple headers to sort by several columns at once. Folders always appear at the top of the list regardless of sort order.
8.11. Query Folders
A query folder is a regular folder with one or more saved AQL queries attached to it. When synchronized, Agora runs the queries and adds the matching studies, series, and datasets to the folder automatically alongside any manually placed items. This is useful for creating “smart folders” that always show the results of a specific search — for example, all studies acquired on a particular scanner, or all datasets with a specific parameter value.
See Database Search for the AQL query syntax and how to save queries.
8.11.1. Attaching a Query
A query must be saved before it can be attached to a folder (see Database Search). To attach a saved query:
Navigate to the folder.
Click the menu next to the folder name at the top of the center table.
Select Attach Query and choose a query from the list.
The query is run immediately when attached, and its results appear in the folder. Multiple queries can be attached to the same folder — the folder then displays the combined results of all attached queries.

8.11.2. Synchronizing a Query Folder
Query results are not updated automatically when data in the project changes. To refresh the folder contents, click the menu next to the folder name and select Synchronize. Agora re-runs all attached queries and updates the folder to reflect the current results — new matches are added and items that no longer match are removed.
The Synchronize option is only visible in the menu when at least one query is attached to the folder.
8.11.3. Managing Attached Queries
The detail panel (right sidebar) lists all queries attached to the selected folder. Each query is shown as a clickable link — clicking it opens the query in the query editor. To remove a query from the folder, click the icon next to it in the detail panel. Removing a query triggers an automatic sync to remove the items that were contributed by that query.
8.11.4. Constraints
Query folders are not available on the root folder of a project.
Only saved queries can be attached. Create and save a query in the Search and Queries view first.
Query results appear alongside manually placed items in the folder. Manually placed items are never removed by a synchronization.
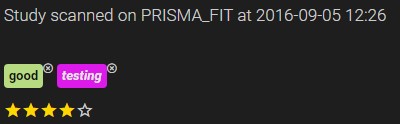
8.12. Tags and Rating
8.12.1. Tags
Tags are labels that can be attached to any Agora object (studies, series, datasets, folders) to classify, organise, and filter your data. Each tag has a display name and a colour, making it easy to identify tagged objects at a glance in tables and detail views.
8.12.1.1. Tag Types
There are three types of tags:
Project Tags — defined within a project and visible to all its members. Use these for shared classification schemes.
User Tags — private to you and not visible to other users. User tags work across all your projects and are displayed in italic to distinguish them from project tags.
Global Tags — created by the system administrator and available across all projects.
8.12.1.2. Managing Tag Definitions
Tag definitions are managed in the project settings under Tags (see Projects). Each tag definition has:
Label — the display name of the tag.
Color — the background colour of the tag badge.
Type — Project Tag or User Tag.
Group — an optional group name for organising related tags into a hierarchy in the tag menu.
Tags can be duplicated, moved, or copied to another project from the tag management toolbar.
8.12.1.3. Applying Tags
Select one or more objects, then click the tag button in the toolbar. A dropdown tree shows all available tags organised by group. Click a tag to apply it to all selected objects. Tags already applied to an object are indicated in the list.
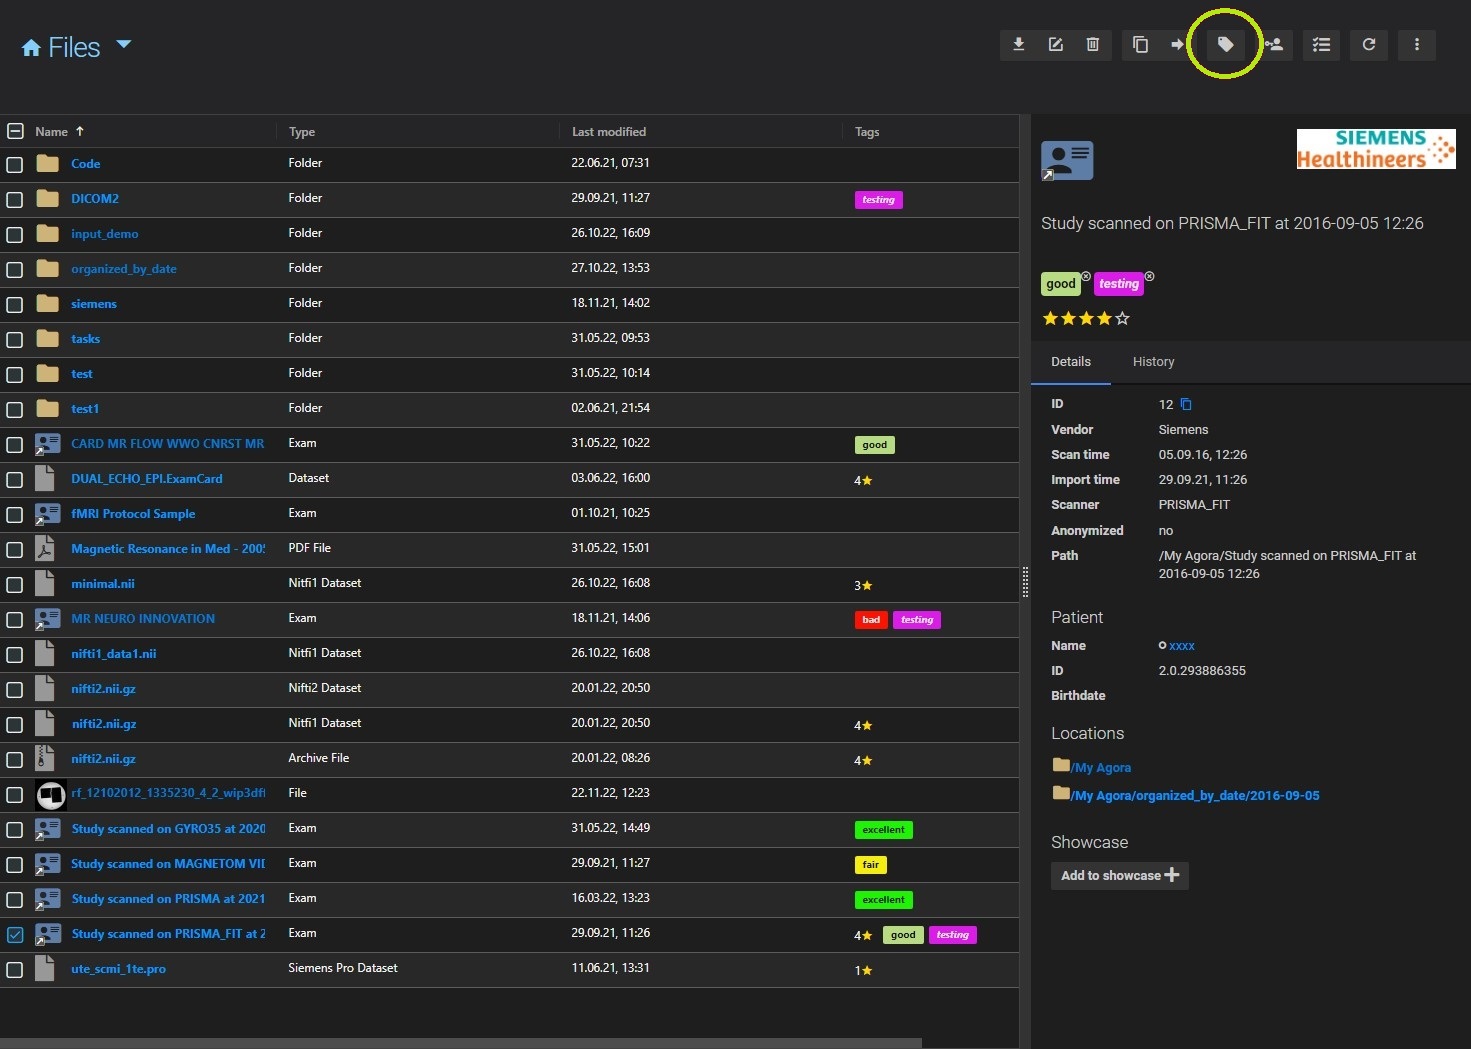
Each tag is shown as a coloured badge on the object. The text colour (light or dark) is automatically adjusted for readability against the badge colour. To remove a tag from an object, click the icon on the badge in the detail panel.
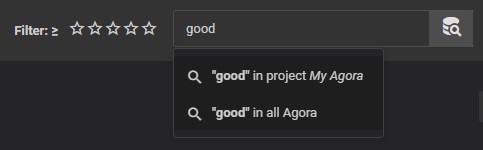
8.12.1.4. Filtering by Tag
Use the quick search field to filter the current view by tag name. Only objects carrying a matching tag will be shown.
8.12.2. Rating
Every Agora object can be given a star rating from 1 to 5. Ratings are personal — each user sets their own rating independently — but they are visible to all project members.
To rate an object, select it and click the desired star in the detail panel on the right. Clicking the same star again removes the rating. When multiple objects with different ratings are selected, no common rating is shown.
To filter the current view by rating, use the rating filter in the toolbar and select the minimum number of stars. Only objects with a rating equal to or higher than the selected value will be shown.
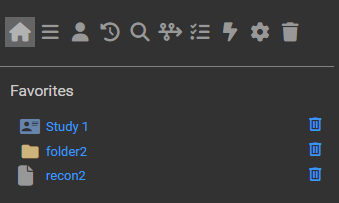
8.13. Favorites
Frequently accessed objects can be pinned to the Favorites list in the left sidebar for quick navigation.
To add objects to favorites, select one or more items and click the icon in the toolbar. The objects will appear in the Favorites section of the left sidebar. Clicking a favorite navigates directly to that object. To remove an item from favorites, click the icon next to it in the sidebar.
8.14. Selection Set
The Selection Set is a temporary collection of objects that acts like a virtual folder. It lets you group studies, series, datasets, and folder items from different folders or studies into a single list — without moving or copying any data. This is useful when you want to work with objects that are spread across the project, for example when starting a task that needs inputs from multiple different locations.
Each project has one selection set. Its contents are stored locally in the browser and are not shared with other users.
To add objects to the selection set, select one or more items in the table and click the Add To Selection Set button in the toolbar. Objects already in the selection set are not added twice.
The Selection Set entry in the left sidebar shows a badge with the current number of objects. Click the label to open the full selection set view, which lists all grouped objects in a table. To remove specific objects, select them in that table and click the Remove From Selection Set button in the toolbar. To clear the entire selection set at once, click the icon next to the label in the sidebar.
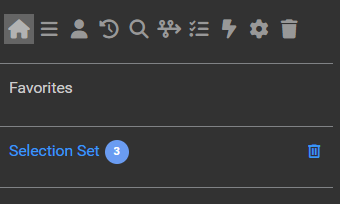
Once you have grouped the objects you need, open the selection set view and select the items you want to work with. You can then start a task directly from that selection, using objects from across the project as inputs regardless of which folders they live in.
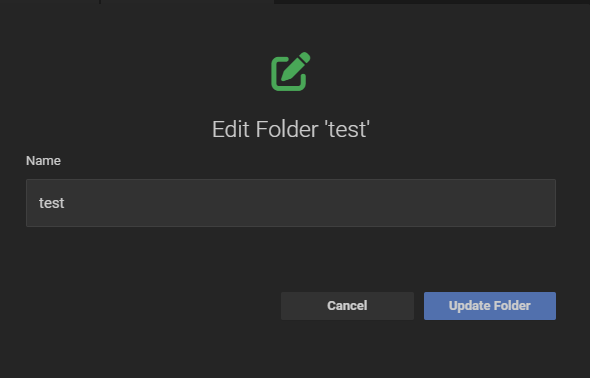
8.15. Editing Objects
To edit an object, select it and click the Edit button in the toolbar. The edit button is only available when exactly one object is selected.
The fields available in the edit dialog depend on the object type:
Studies
Name (required)
Description
Patient — reassigns the study to a different patient. Start typing to search for a patient by name; matching results appear in a dropdown.
Series, Datasets, and Folders
Name (required)
8.16. Dataset Versions
Agora can track multiple versions of a dataset over time. When a new dataset with the same name is uploaded into the same container (folder, series, or study) as an existing one, Agora automatically creates a new version instead of silently replacing the old file. All previous versions remain accessible and can be restored at any time.
Note
Versioning is only supported for generic datasets (type Other). Structured datasets such as DICOM, NIfTI, Philips Raw, Siemens Raw, and similar vendor formats are not versioned.
8.16.1. Viewing Versions
Select a dataset in the table to open its detail panel. If the dataset has more than one version, a Versions tab appears in the detail panel listing all versions in reverse order. Each entry shows the version number, creation date, and whether it is the currently active version.
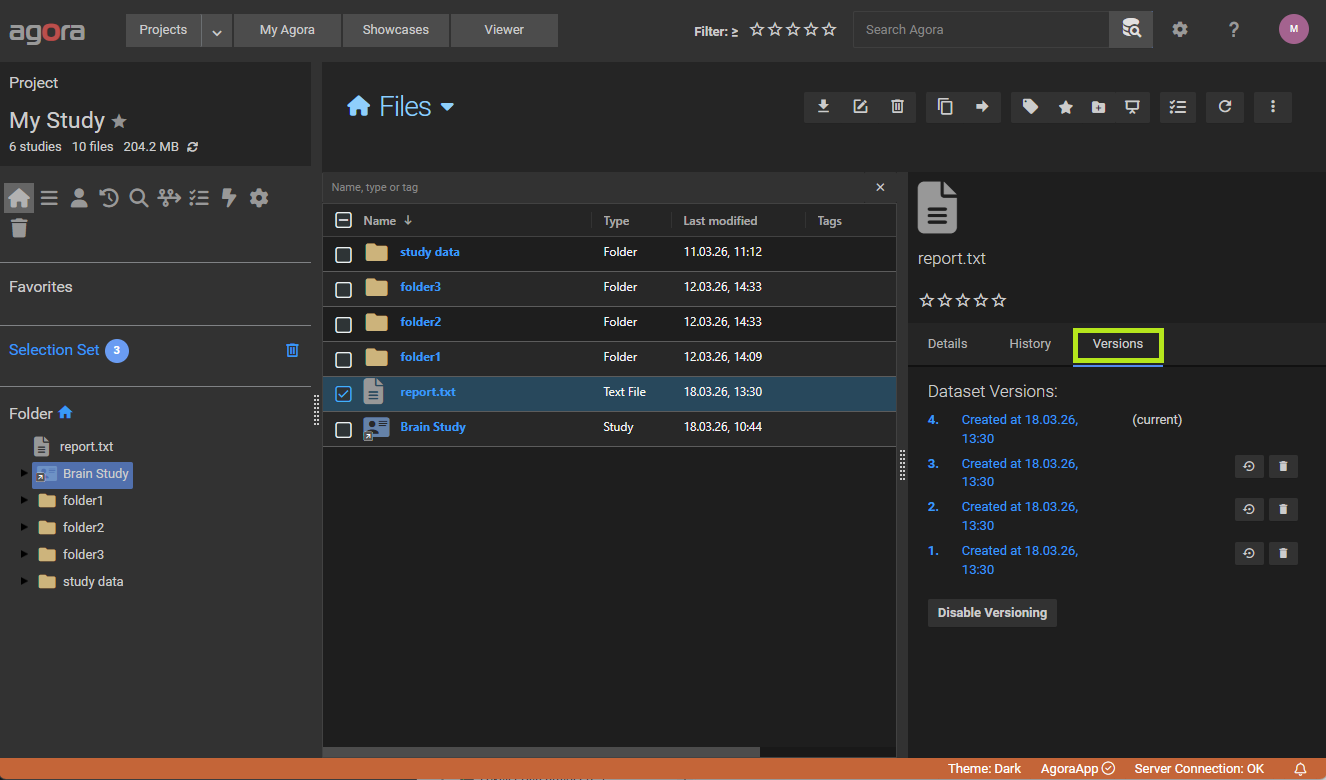
8.16.2. Restoring a Version
In the Versions tab, click Restore next to any older version to make it the active version. The restored version replaces the current one in the folder or study view. The previously active version is not deleted — it becomes a non-current version and remains visible in the list.
8.16.3. Deleting a Version
Individual non-current versions can be deleted from the Versions tab. The current (active) version cannot be deleted directly — restore a different version first.
8.16.4. Enabling and Disabling Versioning
Versioning can be toggled per dataset:
Disable versioning — all non-current versions are permanently deleted and subsequent uploads of the same dataset name will overwrite the current version without creating a history entry.
Re-enable versioning — new uploads of the same name will again create new versions going forward. Previously deleted versions are not recovered.
8.17. Deleting Objects
To delete one or more objects, select them and click the Delete button in the toolbar.
Note
Patients with studies cannot be deleted directly. In the Patient List view, the delete button is disabled for any selection that includes a patient who still has studies assigned. To delete such a patient, first reassign or delete all of their studies.
Deleted objects are not immediately removed. They are moved to the Trash, where they can be recovered for up to 30 days. After 30 days, objects in the trash are permanently deleted automatically.
Note
Deleting a link is not the same as deleting the underlying data. When you delete a study, series, or dataset from a folder, you are removing the link (reference) to that object — the underlying data remains intact and continues to exist in any other folders or views where it is referenced. To permanently delete the underlying data, navigate to the Study List view and delete the study or series from there. The same applies to series within a study.
The Trash can be accessed from the project navigation. It shows all deleted objects for the current project.
To restore an object, select it in the trash and click the Restore button in the toolbar.
To permanently delete specific objects, select them and click the button (Delete Selected Items). To permanently delete everything at once, click the same button with nothing selected — this performs an Empty Trash.
Note
Permanent deletion cannot be undone.
8.18. Copying Objects to Another Project
Agora allows you to copy studies, series, datasets, folders, and files from one project to another. This is useful for sharing data, creating backup copies, or reorganizing work across projects.
Navigate to the project that contains the data you want to copy.
Select one or more objects using the checkboxes.
Click the Copy button in the toolbar.
In the Select Project dialog, choose the destination project from the project list.
Optionally, click Browse to select a target folder within the destination project. If no folder is selected, the objects will be placed in the root of the destination project.
Click Copy to start the operation.
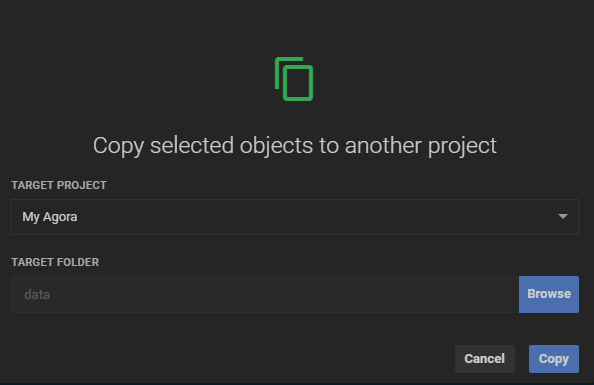
The copy runs in the background — the original objects remain in the source project and you can continue working. The dialog remembers your last used destination project and folder, so repeat operations to the same target require fewer clicks.
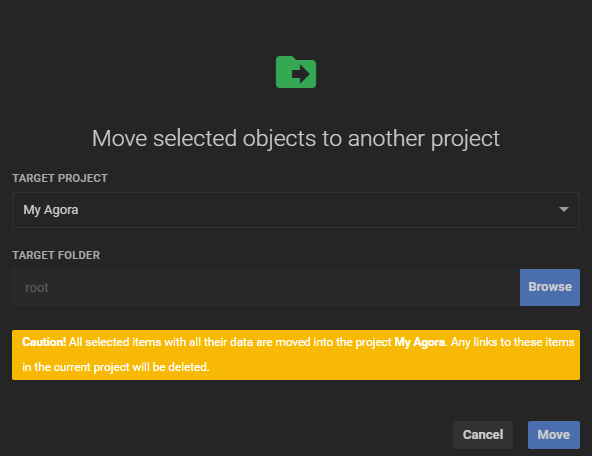
8.19. Moving Objects
You can also move objects to another project instead of copying them. A move removes the objects from the source project; any folder-tree references to those objects in the source project will be deleted.
Select the objects and click the Move button in the toolbar.
8.20. Copying Objects to a Remote Agora Instance
If your project has an Agora Server host configured, you can copy objects directly to a remote Agora instance without manually downloading and re-uploading the data. The transfer runs entirely server-side in the background.
A host of type Agora Server must be defined in the project settings before the remote option becomes available. Refer to the Hosts section for instructions on how to add and configure an Agora host.
Select the objects you want to copy.
Click the Copy button in the toolbar.
In the Select Project dialog, click Remote Server in the server-type toggle at the top of the dialog.
Select the target Agora server from the Host dropdown. Agora will connect to the remote server and retrieve its list of projects.
Select the destination project.
Enter the target path within the destination project (e.g.
/raw-data/session-01). Leave the field empty to place the objects at the root of the destination project.Click Copy to start the transfer.
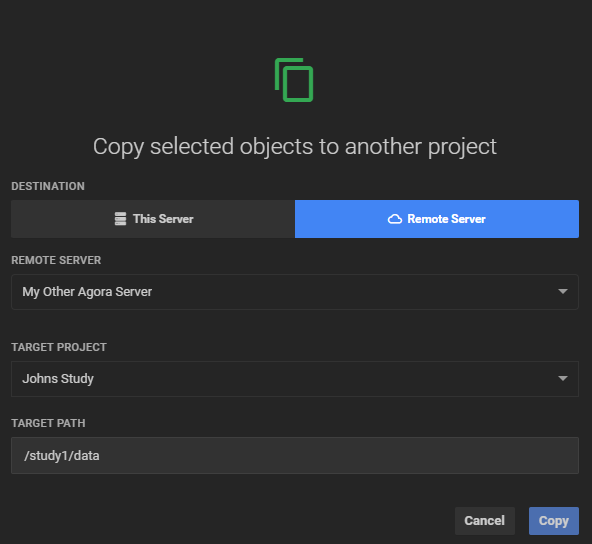
Note
If the Host dropdown is empty or shows an error, verify that the host is correctly configured and that the remote Agora server is reachable from your current instance. Only hosts of type Agora Server are listed in this dialog.
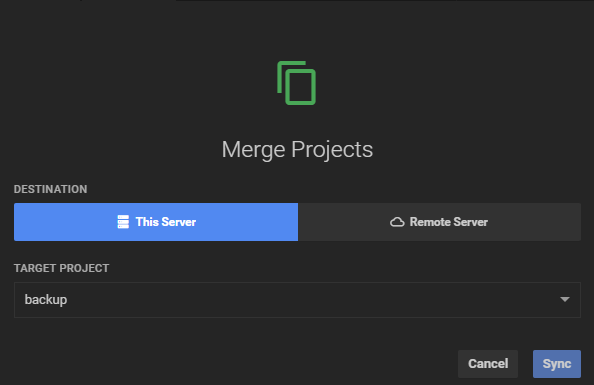
8.21. Transferring Data Between Projects
Agora can synchronise an entire project against another — either on the same instance or on a remote Agora server. Two complementary operations are available:
Push to… — transfers data from the current project to a selected target project.
Pull from… — transfers data from a selected source project into the current project.
Both operations are one-way and additive: data missing in the destination is copied from the source; nothing is ever deleted from either project.
Having two directions also matters in practice: if one Agora instance is behind a firewall, the network connection between the two instances may only work in one direction. Only the one that uses the reachable direction will succeed — choose Push or Pull accordingly.
Note
These operations work at the project level — they compare and synchronise entire projects, not individual selected objects.
The project that receives data is always treated as the master. The master is the authoritative copy that gets brought up to date and only ever gains data, never loses any.
Push to… — the target project is the master. Your current project’s data is pushed into it.
Pull from… — the current project is the master. Data from the source project is pulled into it.
In both cases the direction of data flow is: source → master.
Use Push to… when you want to update a central archive or a project on a remote server with data from the project you are currently working in.
Open the project whose data you want to send.
Click the menu in the project toolbar and select Push to….
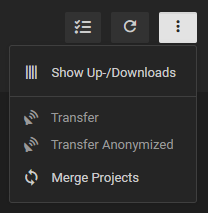
In the Select Project dialog, choose the target project. To push to a project on a remote Agora server, click Remote Server, select a host from the dropdown, then select the remote project. A host of type Agora Server must be configured in the project settings — refer to the Hosts section.
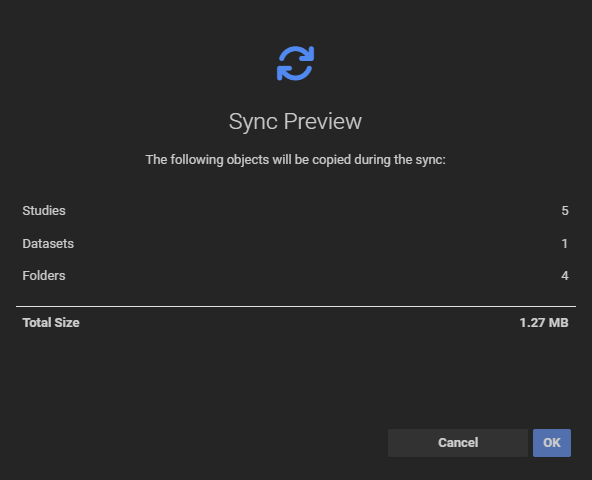
Click OK. Agora compares the two projects and shows a Transfer Preview.
The Transfer Preview lists how many studies, series, datasets, and folders will be copied, along with the total data size. If the projects are already in sync, a message states that no transfer is needed. Click OK to start. The operation runs in the background and is recorded in the project timeline.
Use Pull from… when you want to bring the current project up to date with another project — for example, to consolidate data from a remote site or a colleague’s working project into your local archive.
Open the project that will receive the data (the master).
Click the menu in the project toolbar and select Pull from….
In the Select Project dialog, choose the source project. To pull from a remote Agora server, click Remote Server, select a host, then select the remote project. The same Agora Server host configuration applies as for Push to….
Click OK. Agora shows a Transfer Preview listing the studies, series, datasets, and folders that will be copied, and the total data size.
If the projects are already in sync, a message states that no transfer is needed. Otherwise click OK to start. The operation runs in the background and is recorded in the project timeline.